
2.3: Hammer and Gouge Mastoidectomy for Acute Mastoiditis
- Page ID
- 15435

OPEN ACCESS ATLAS OF OTOLARYNGOLOGY, HEAD & NECK OPERATIVE SURGERY
HAMMER & GOUGE CORTICAL MASTOIDECTOMY FOR ACUTE MASTOIDITIS
Johan Fagan & Robert Jackler
This surgical guide is intended for the many surgeons in the Developing World who do not have access to modern mastoid surgery equipment such functioning mastoid drills, or are regularly faced with power cuts and therefore may be compel led to proceed with a mastoidectomy using a hammer and gouge, and possibly only a headlight and operating loupes.
The text and illustrations are based on the description of mastoid surgery: A Treatise on the Surgical Technique of Otorhinolaryngology (1939) by Georges Portmann. The text has been modified to incorporate modern principles of otology. This operative guide should be read in conjunction with the chapter Hammer and Gouge Radical Mastoidectomy for Cholesteatoma, also on the IFOS educational website.
Mastoid surgery can only be safely performed when the surgeon has an intimate knowledge of temporal bone anatomy. It is imperative that surgeons practice temporal bone dissections as described in the IFOS educational website.
Informed Consent
This should include anesthetic and surgical risks and issues relating to aggravated hearing loss, facial nerve injury, vertigo, taste disturbance, injury to the brain and meninges, and wound complications
Anesthesia
Surgery may be performed under local or general anesthesia.
General anesthesia: Avoid muscle paralysis to facilitate detection of facial nerve irritation or injury.
Local anesthesia: See chapters
Magnification and lighting
Magnification is ideally required once dissection reaches the middle ear, and for removal of the facial ridge. Should an operating microscope not be available, then operating loupes with 2.5x magnification should be used. Good lighting is essential, especially when working in the middle ear. In the absence of an operating microscope or strong operating lights, a headlight may suffice.
Instrumentation (Figures 1a, b)
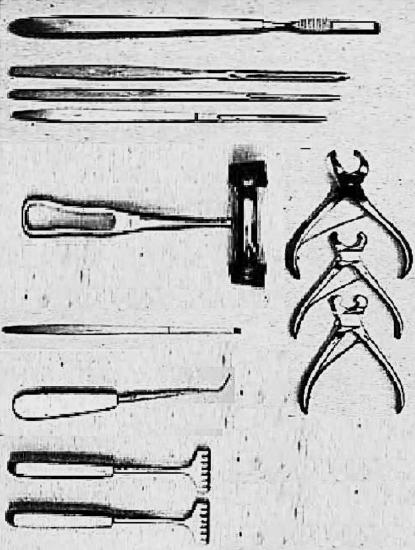
Figure 1a: Instruments for bone work
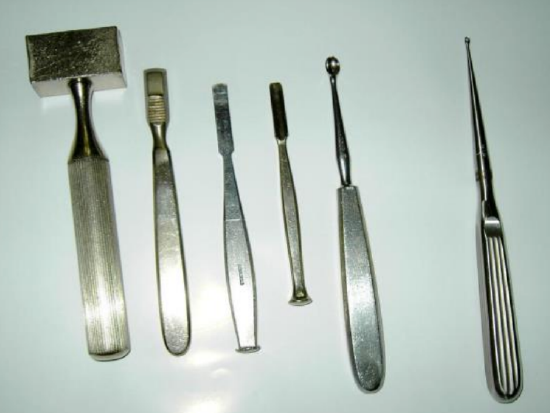
Figure 1b: Mallet, rasp, chisels, curette and gouge (From Professor Malick Diop)
Gouges and chisels should be kept extremely sharp, to ensure controlled bone resection. Blunt instrumentation requires undue force to be applied, and gouges/ chisels may slip off bone and plunge and damage critical structures such as brain, lateral sinus, facial nerve, inner ear, and carotid artery. For the bone work the surgeon requires the following:
- Curved periosteal elevator
- Mallet
- Three gouges: Large, medium, small
- Flat chisel
- Curettes
- Rongeurs/bone nibblers (small, medium and large)
- Retractors (2), ideally self-retracting
- Canal elevator/McDonalds dissector
- Blunt probe
- Microinstruments: Curved needle, Plester knife, sickle knife, curette
- Suction tips
Position of Patient
The patient is laid supine with the head turned towards the normal ear.
Position of Surgeon and Assistants
The surgeon stands on the side of the affected ear. Two assistants are stationed on the other side, facing the surgeon. The 1st assistant is nearest to the head. The 2nd assistant is exactly opposite the surgeon.
Operative Field
The mastoid, auricle, and preauricular regions are extensively swabbed with tincture of iodine. The patient is covered to the neck with a sterile sheet. The operative field is isolated by four towels. Over them is placed a fenestrated sheet, the orifice of which encircles the auricle and mastoid.
Antibiotics
No antibiotics are required for mastoidectomy for uncomplicated cholesteatoma, other than when there is secondary infection (mastoiditis).
BIPP Paste
BIPP Paste can be prepared and used to impregnate ribbon gauze. This can be used to pack the mastoid cavity or ear canal, and because of its antiseptic properties, may be left in place for a few weeks. Bismuth subnitrate 20% w/w, iodoform 40% w/w, paraffin liquid 40% w/w (w/w = weight for weight).
Surgical anatomy for Mastoidectomy
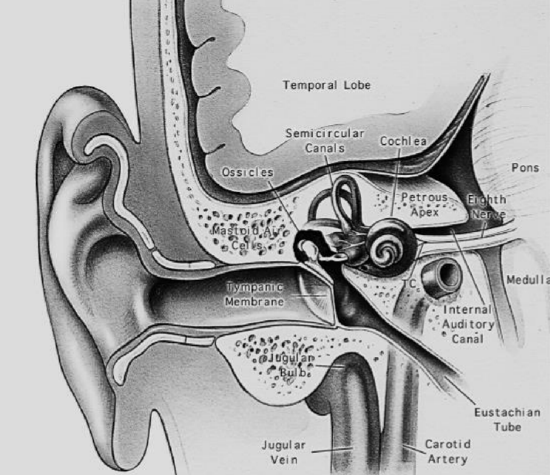
Figure 2: Coronal section through middle ear and temporal bone
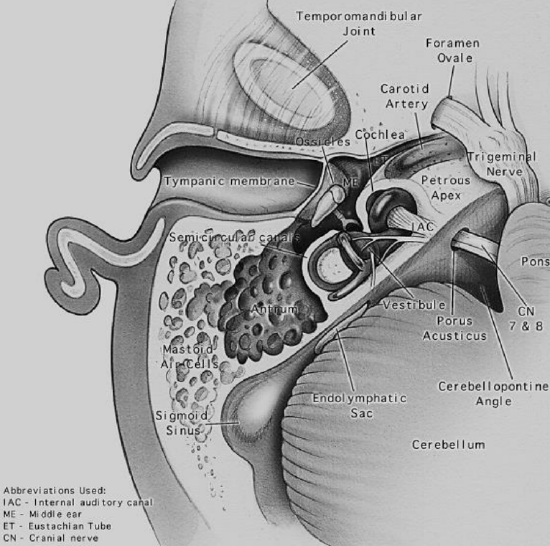
Figure 3: Axial view of temporal bone anatomy
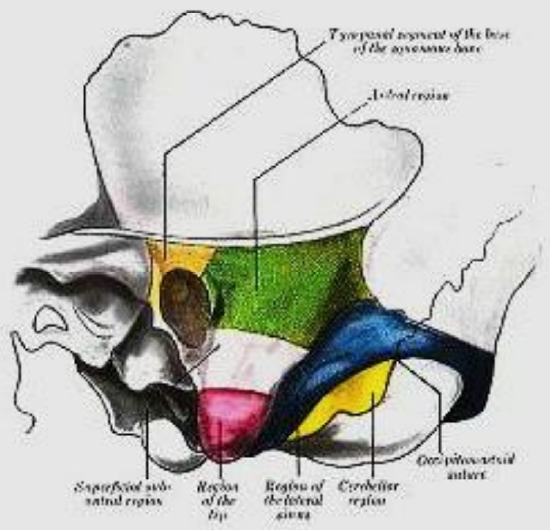
Brown: Tympanic segment of base of squamous bone; Green: Antral region; Rose: Subantral region; Red: Region of tip; Blue: Sinus region; Yellow: Cerebellar region or region of mastoid vein
Figure 4: Surface boundaries of mastoid regions
Surgical Steps: Cortical Mastoidectomy
Unlike with mastoid surgery for cholesteatoma, mastoidectomy for acute mastoiditis may be associated with significant blood loss, especially in the absence of mono- or bipolar coagulation. Patients may even require blood transfusion.
First Step: Incision of Superficial Tissues
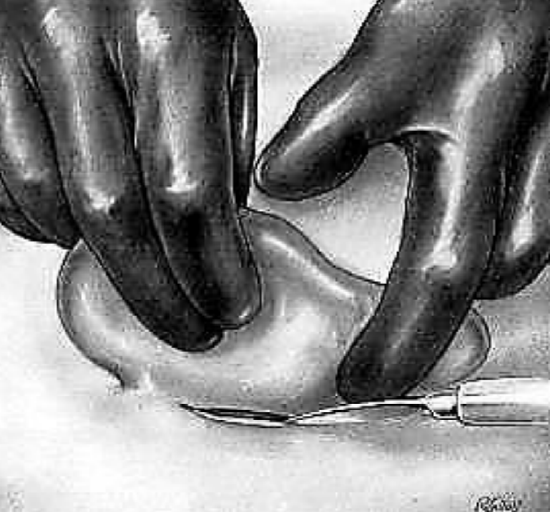
Figure 5: Incision of Superficial Tissues
The 1st assistant retracts the auricle towards himself, using both hands. The 3rd finger of the lower hand is pressed strongly under the mastoid tip in order to compress the posterior auricular artery. The other assistant is prepared to sponge/swab with mastoid sponges/swabs held in angular forceps. The surgeon incises the retroauricular crease down to bone from left to right, from the linea temporalis to the inferior part of the crease, or vice versa (Figure 5). In the event of a retroauricular abscess, the abscess cavity may be entered at this point or during periosteal elevation.
Second Step: Periosteal Elevation

Figure 6: Periosteal elevation
Following hemostasis and ligation of bleeding vessels, the mastoid is completely exposed proceeding posteriorly to the incision, without elevating the anterior cartilaginous canal. This is easy in the superior portion where the periosteum frees itself but becomes more laborious toward the inferior and posteroinferior portions where the muscular insertions must be sectioned with the elevator. Figure 6 demonstrates how the cartilaginous canal has been respected (Figure 6).
Third Step: Exploration of Bone
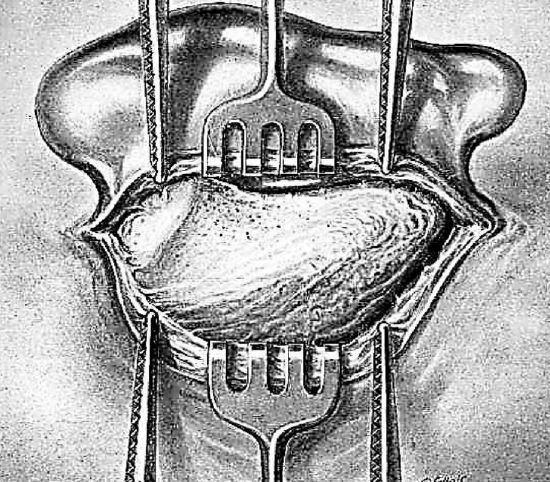
Figure 7: Examine the mastoid surface
In the absence of electrocoagulation, 2 Kocher hemostats are applied to the periosteum, one in front and one in back, assuring hemostasis. Two sharp toothed retractors are held by the assistant. One is placed forward to retract the auricle in the canal without separating it from the bone. The other embraces the posterior lip of the wound, retracting it backward to uncover the operative surface. A self-retaining retractor may also be employed. After completing the periosteal elevation, the surgeon carefully examines the mastoid surface for changes in form, color, and surface (Figure 7).
Form: In adjoining illustration one sees the crest of the linea temporalis, the spine of Henlé, and the sieve-like region, the retromeatal depression, and the bulge of the posterosuperior region. The anterior mastoid portion is free of all muscular insertions. The muscles from the nape of the neck and the sternocleidomastoid muscle are inserted into the posterior portion of the mastoid. These two regions are separated by the posterior external petrosquamous suture. With acute mastoiditis these landmarks may be absent and the mastoid may then present an evenly rounded bulge, having the appearance of an egg. The spine of Henlé remains and is the only really important landmark.
Color: Normally the bone appears white or oozes blood through the porous portions of the retromeatal region. However, in mastoiditis the external cortex bleeds diffusely due to the deep inflammatory process. If there is underlying empyema, the wall appears bluish.
Surface: Some irregularities may appear along the surface of the mastoid. These often consist of inflammatory granulations which are apparent through the external posterior petrosquamous suture or of a fistula, which may be verified with the aid of a probe. The existence of a fistula is sought wherever the incision has uncovered free pus.
Fourth Step: Trephining - Exploration of Superficial Antral Region

Figure 8: Trephining and exploring antral region
A large gouge is placed immediately below the linea temporalis (Figure 8). It is held between the thumb and first two fingers, with the ring finger serving as a brake. The instrument is held in the position shown in the illustration, being directed vertically at right angles to the bone surface.
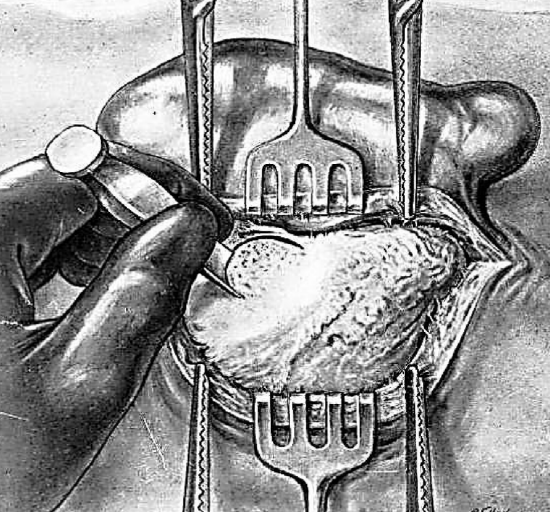
Figure 9: 1st & 2nd cuts
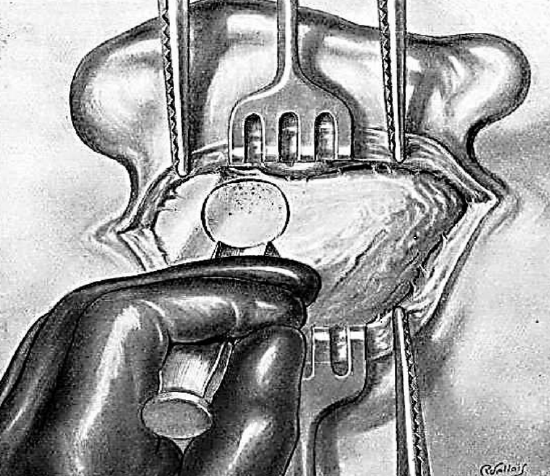
Figure 10: completing a circle of trephination
Site of Trephination: If a fistula is present and is at the level of the antral region or its immediate vicinity, the trephine is performed at that level. If no fistula exists or is very far from the antral region, the trephining is done as follows. An area of approach is outlined with the gouge by applying it above and behind the canal at the following points (Figures 9, 10):
- 1st cut: 2-3 mm behind spine of Henlé
- 2nd cut: just below linea temporalis
- 3rd cut: parallel, but 1 cm below 2nd cut
- 4th cut: 1 cm behind 1st, thus completing a circle of trephination
- The 1st 3 taps of the gouge are perpendicular to the bony surface
- The 4th tap is applied obliquely to avoid the lateral sinus which may be superficial or prominent.
Fifth Step: Exploration of Superficial Subantral Region and Tip
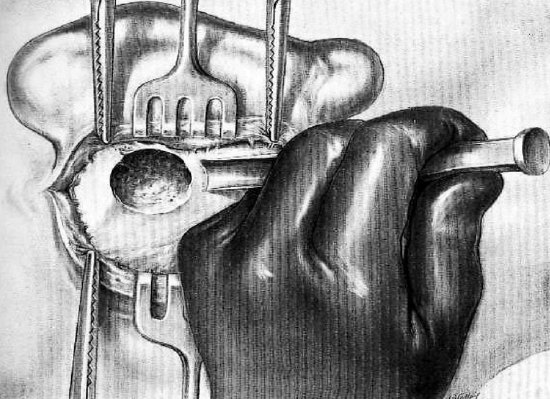
Figure 11: Gouge directed toward inferior portion of mastoid
After trephining and curetting the superficial antral region, the gouge is directed toward the inferior portion of the mastoid, making a superficial vertical trench. The instrument is held between the thumb and first two fingers of the left hand with the two remaining fingers resting on the bony surface to provide control and to avoid dangerous slip of the gouge (Figure 11).
Sixth Step: Opening of Apical Region
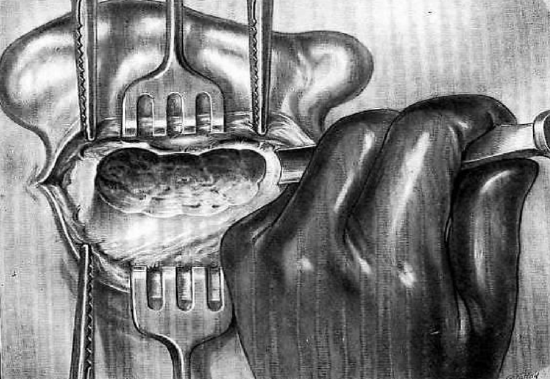
Figure 12: Creating a vertical trench
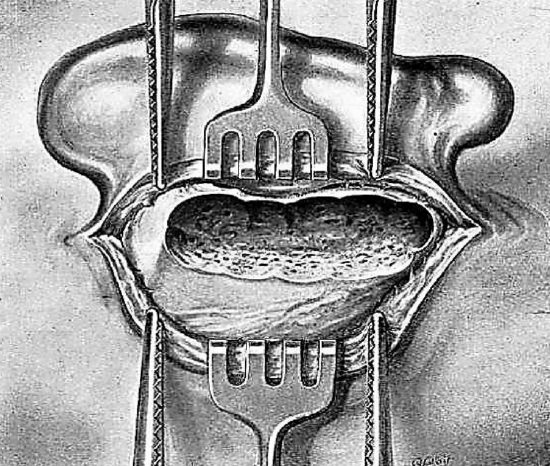
Figure 13: Vertical trench
After exploring and curetting the antral and subantral regions, the surgeon works toward the tip, creating a superficial, vertical trench, and exposing diseased mastoid cells (Figures 12, 13). Only if the tip is osteitic need it be resected with the gouge or rongeur.
Seventh Step: Exploration of Posteroinferior Region
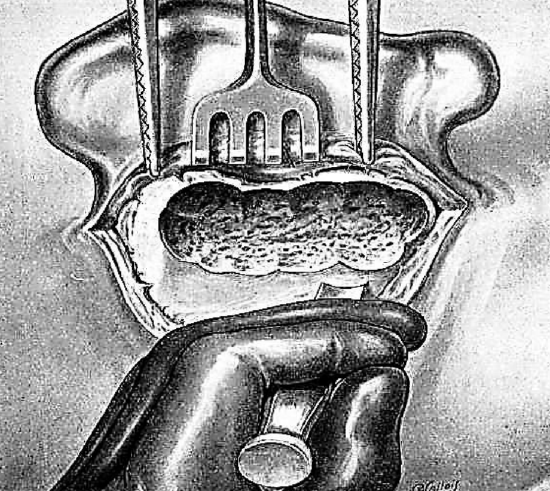
Figure 14: Opening posteroinferior region
The posteroinferior region, which is also called the region of the mastoid vein, is opened with the gouge. The instrument is held in the same position as described previously but is slanted obliquely from behind forward and gently forced in with light taps of the mallet. The procedure progresses backward toward the posterior portion of the mastoid from below up. (Figure 14)
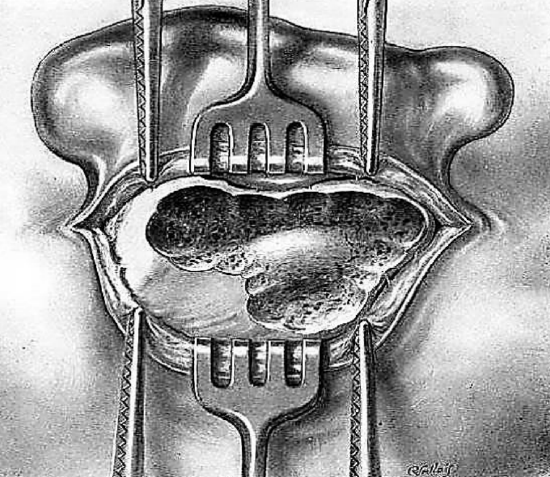
Figure 15: Completed posteroinferior dissection
Opening this posteroinferior region exposes the inner table of the skull which at this level forms the bony outer shell of the lateral sinus. This region is meticulously curetted (Figure 15).
If the bony disease is very extensive, the soft tissues may have to be sectioned by a horizontal incision perpendicular to the retro-auricular incision, forming a “T”, and additional posterior exposure of the mastoid bone done.
Eighth Step: Exploration of Posterosuperior Region and Lateral Sinus / Sinodural Angle (Figure 16)
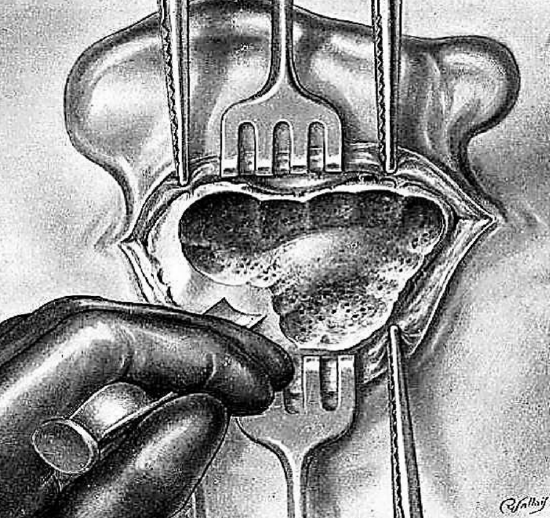
Figure 16: Exploring the sinodural angle
Trephination is continued from below up and behind forward, burrowing progressively into the mastoid and to join the superficial antral region. The taps on the gouge are performed cautiously. They are made on a tangent to permit the gradual removal of the cortex over the lateral sinus or even to uncover the venous wall, if this should be necessary. The rongeur is dangerous when handled blindly and may penetrate dura and injure the brain. The gouge is much more manageable; its action more easily controlled. The posterior limit of trephination is determined by the status of the bone. The process continues until normal resistant bone, which does not bleed, is encountered. If hemorrhage occurs from the mastoid vein, this may be cauterized or occluded with bone wax. A gauze pack impregnated with the adrenaline and kept in place for several minutes may reduce bleeding.
Ninth Step: Exploring Lateral Sinus
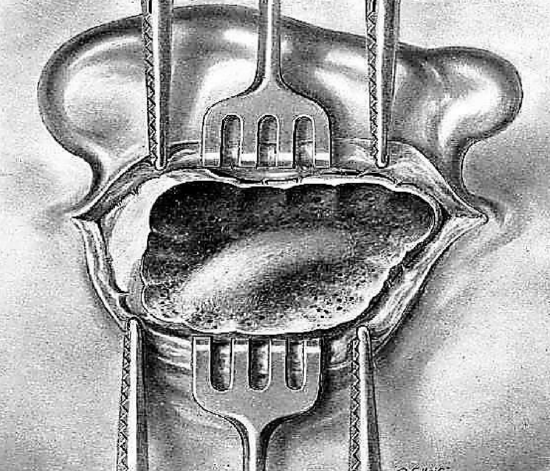
Figure 17: The lateral sinus
The posterosuperior region of the mastoid is also called the region of the lateral sinus (Figure 17).
Since this vessel is sometimes very superficial, the gouge is the only instrument that should be used. It is held between the thumb and the first two fingers of the left hand and placed obliquely on the bony surface. Small slanting blows made with the gouge permit a very careful sculpturing of the cortex of the lateral sinus.
Lateral Sinus Thrombosis and Perisinus Abscesses
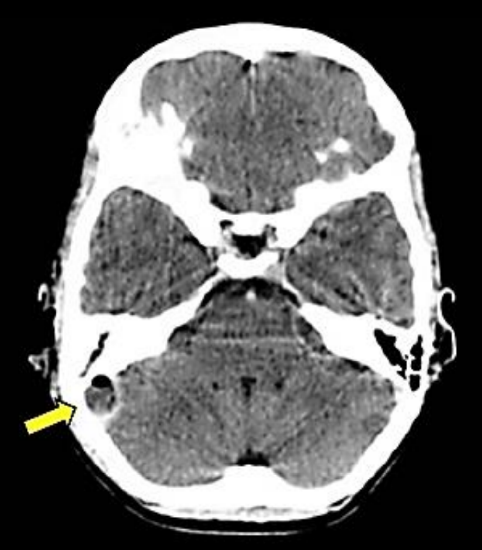
Figure 18: Thrombosed (L) lateral sinus with posterior fossa abscess
Acute mastoiditis may be complicated by a perisinus (extradural) abscess, lateral sinus thrombosis, or there may be pus within the sinus (Figure 18). In the absence of preoperative CT scanning facilities, the sinus should be uncapped of bone. If a perisinus abscess is encountered, it is drained into the mastoid cavity. The sinus is aspirated with a needle and syringe. Should there be no free flow of blood, it might be thrombosed, or there may be an intrasinus abscess that needs to be drained.
Tenth Step: Search for Antrum
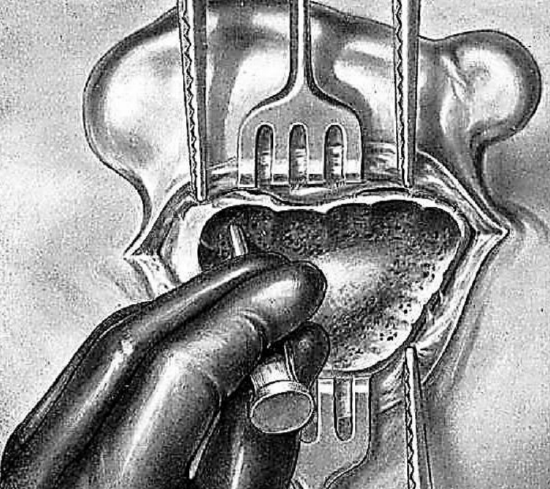
Figure 19: Accessing the antrum
The antrum is sought with a small gouge directed from behind forward towards the spine of Henlé, paralleling the canal and excavating down towards the antrum with small taps of the mallet (Figure 19).
With the superficial antral region open, this step is particularly easy and the antrum is accessible even when small and deeply located. The antrum is enlarged above and posteriorly, either with a gouge or curette. Small curettes which may result in dangerous slips should not be used. The aditus is located with a blunt angular probe. This permits a determination of the status of the tegmen tympani superiorly, especially at the level of the antral roof.
Eleventh Step: Opening the Deep Antral Region
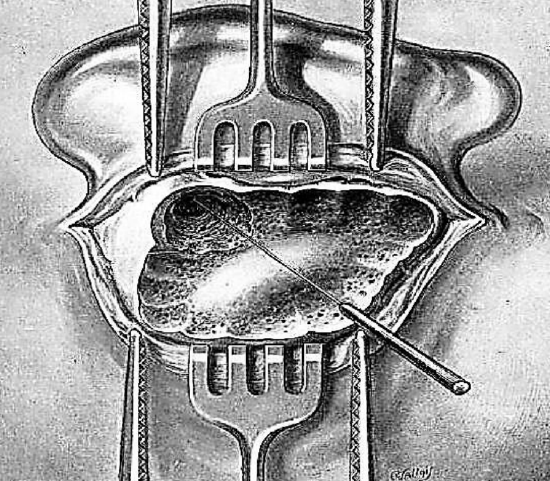
Figure 20: Probing the aditus
After widely opening the antrum, the aditus is sought with a blunt curved probe (Figure 20). It is carefully cleansed with a medium sized curette. Very small curettes should not be used since they may slip and cause serious injuries.
Twelfth Step: Opening the Deep Antral Region (Figure 21)
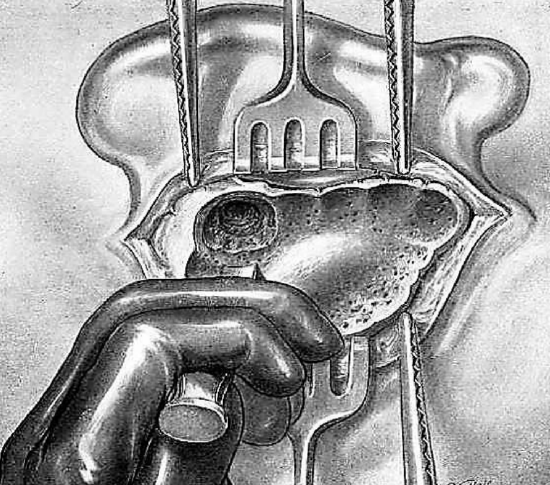
Figure 21: Approaching deep antral region
The antrum is enlarged toward its posterior part. Between the posterosuperior region just opened and the antrum there is a bony ridge which should be resected. This resection is performed with a gouge of medium caliber held obliquely from behind forward between the thumb and first two fingers of the left hand; the remaining two fingers rest on the bony surface. Thus, a horizontal trench is made which is almost perpendicular to the anterior vertical one.
Thirteenth Step: Exploration of Deep Subantral Region (Retrofacial Groove)
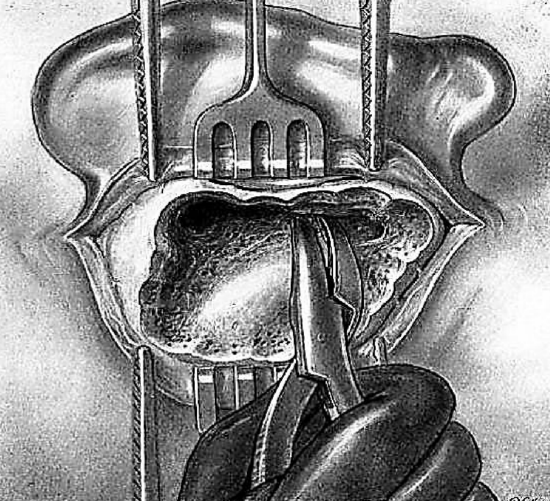
Figure 22: Using a narrow-jawed curved rongeur in the deep subantral region
Between the deep antrum and mastoid tip there remains a bony, often cellular, mass which it is wise to remove. The antrum is thus continued below by a deep vertical trench. Exploration of this region sometimes reveals large cells located very deep in the bone. This resection may be performed with the gouge, using vertical blows first in front of the sinus then against the posterior wall of the canal which must be preserved. The curette, directed from above downwards, may be used. It is controlled by the index finger of the left of hand to avoid injury to the lateral sinus or a too deep curettage towards the facial nerve anteriorly. If the deep subantral region is narrow and the lateral sinus prominent, it is preferable to use a narrow jawed curved rongeur (Figure 22). The instrument is held in the right hand with the jaws parallel to the anterior aspect of the mastoid; this permits safe progress into the deeper regions between the facial nerve in front and the lateral sinus at the back.
Fourteenth Step: Exploration and Cleansing of Operative Cavity (Figures 23, 24)
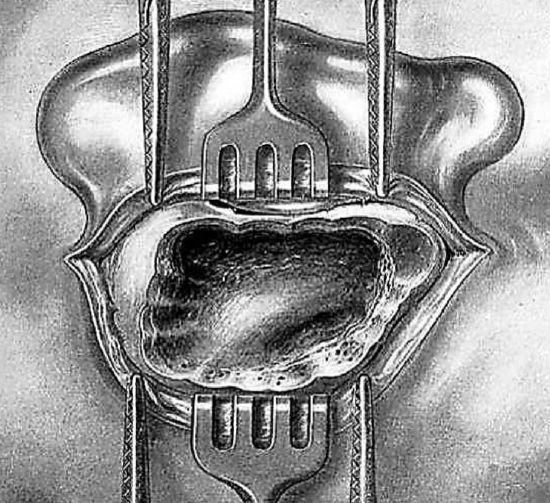
Figure 23: Cleaned cavity
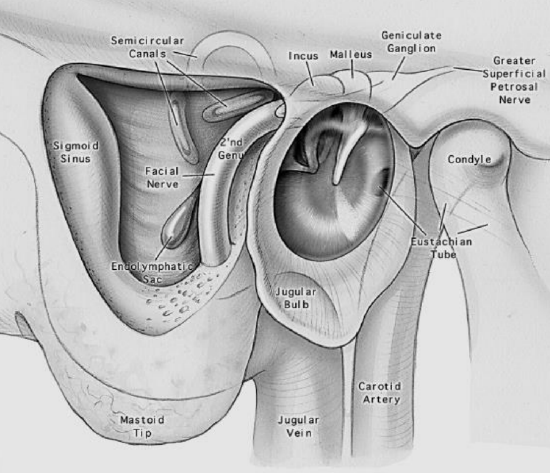
Figure 24: Schematic representation of anatomy of final cavity
The cavity is thoroughly explored and cleared of loose or adherent bony spicules. The edges and bottom are smoothed with a curette or rongeur. Suspicious areas are explored with a blunt probe which locates previously unnoticed cells and determines the presence of inflammatory granulations on the dura mater.
Fifteenth Step: Drainage and suturing and postoperative Care
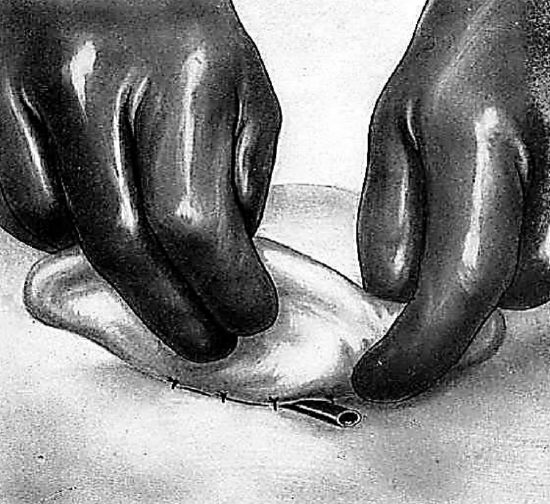
Figure 25: Pencil drain protruding from wound
A glove/corrugated/pencil drain is inserted (Figure 25). The skin edges are carefully approximated. A pressure dressing is applied held in place by a bandage wrapped around the head.
Postoperative antibiotics are administered. The patient should be carefully monitored for several days to detect intracranial septic complications, as posterior fossa collections can have subtle clinical signs.
TEMPOROZYGOMATIC MASTOIDITIS
The pneumatic cells adjacent to the middle ear may develop not only in the mastoid but also above the canal and the temporomaxillary joint i.e. at the base of the squamous bone (zygomatic arch). The base of the squamosa may be pneumatized either by way of the intermediary of the antral system or through the cells opening directly into the attic. This pneumatization, however, may extend very high into the squama temporalis. Infection of the cells in the base of the squamous bone constitutes a paramastoiditis or temporozygomatic mastoiditis and necessitates a special operative technique.
If the infection in the base of the squamous bone is a consequence of an infection of the antral system, i.e. a true mastoiditis, the opening of the cells of the tympanic and temporomaxillary segments will only be an additional procedure to the mastoidectomy, which has previously been described.
If, on the other hand, the temporozygomatic mastoiditis is the result of an infection arising directly from the tympanic cavity and not including the mastoid itself, which may be verified easily by the absence of clinical symptoms at this level and by a normal radiographic picture of the mastoid, the operation will consist only of the opening of the cells in the temporozygomatic region.
First Step: Incision
The cutaneous incision of the mastoidectomy is extended 3.0 or 4.0 cm. above and in front of the auricle of the ear. This incision obliquely crosses the linea temporalis; it goes through to the bone, including the temporal muscle and the periosteum.
Second Step: Periosteal Elevation
The bone of the squama temporalis is exposed above and in front of the canal, if necessary, as far as the zygomatic arch. Whenever temporozygomatic mastoiditis is a complication of mastoiditis, the periosteal elevation naturally extends to include the entire external surface of the mastoid.
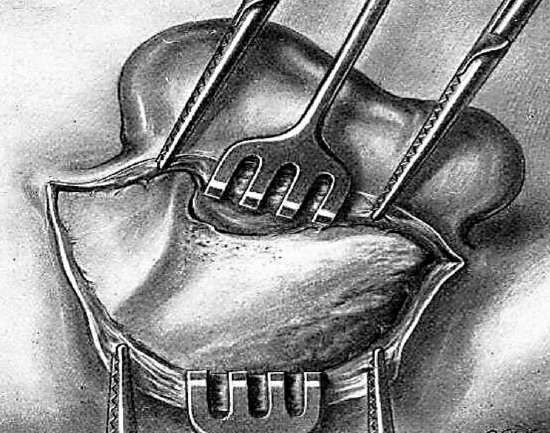
Figure 26: Exposed bone
Third Step: Exploration of the Bone
Kocher hemostats are applied to the periosteal flaps and the portion of the temporal muscle, which bleed freely. Ligatures are applied to the muscular vessels. Two hooked retractors are held by the second assistant. The region being well exposed, the surgeon examines it for alterations in color, form, and surface. He verifies the areas of osteitis and the possible presence of a fistula, which may be located in the squama temporalis under the muscle (deep temporozygomatic mastoiditis) or on the zygomatic arch immediately above the canal (superficial temporozygomatic mastoiditis).
Fourth Step: Trephining
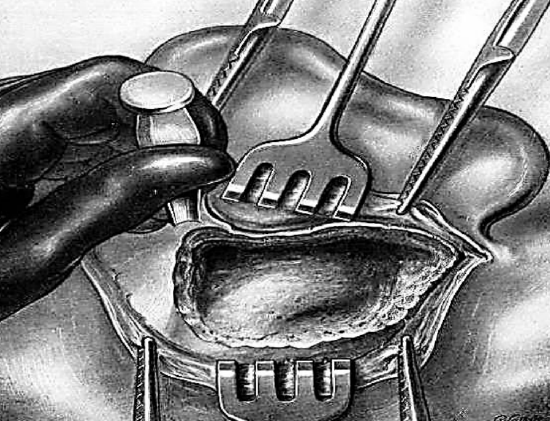
Figure 27: Trephination done above the ear canal
If a complete mastoidectomy has been performed, systematic exploration is carried out with a small gouge, starting from the antral region and including the entire base of the squamous bone, being guided by the existing lesions. If the mastoid is normal and if the radiological and clinical examinations have shown absolute integrity of the antral system, trephination is done above the canal in order to curette and cleanse the cavities of empyema and osteitic foci (Figure 27). This is continued until normal bone is encountered.
Fifth Step: Exploration and Cleansing of the Operative Cavity
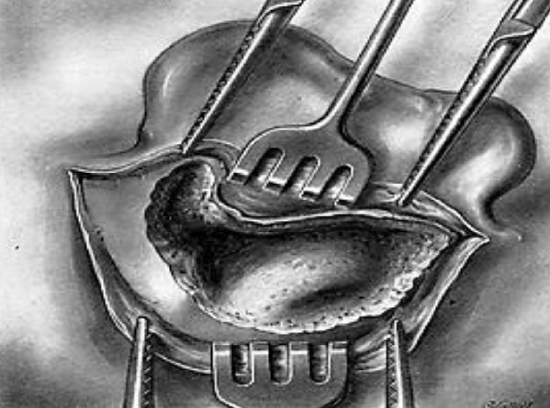
Figure 28: Final cavity
The cavity is explored with great rare. All the bony spicules, whether free or adherent are removed. The edges of the interior of the cavity are smoothed with the fine angular rongeur (Figure 28). The succeeding steps of this operation are the same as those in the mastoidectomy.
CERVICAL SEPSIS
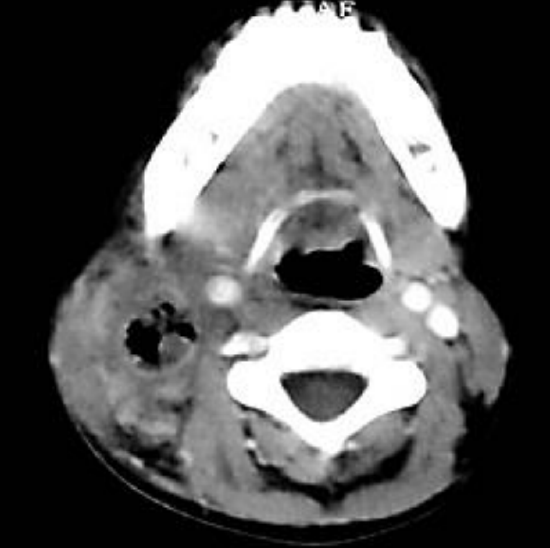
Figure 29: Extension of sepsis down internal jugular vein
Lateral sinus thrombosis may be complicated by extension of sepsis down the internal jugular vein into the neck (Figure 29).
Infection of the mastoid may also lead to the formation of cervical abscesses which vary according to their form of exteriorization:
- Abscess of nape of neck in postero-inferior mastoiditis
- Substernomastoid abscess (Bezold’s abscess)
- Internal aspect of mastoid tip, along digastric muscle
- Deep jugulodigastric cervical abscess (mastoiditis of Mouret)
INTRAOPERATIVE INCIDENTS
Accidental Opening of the Lateral Sinus or Mastoid Vein
Opening of the lateral sinus is more severe if accidentally produced with a rongeur. The use of this instrument is therefore discouraged in the posterior region of the mastoid. Injury to the venous wall with the gouge is usually very limited and quickly settles. Bleeding can usually be controlled by packing off the sinus with surgical. If the hemorrhage persists or threatens to recur, the cavity is firmly packed with iodoform impregnated ribbon gauze, the end of which exits from the wound next to the drain. It is removed a few days later.
Exposure of Meninges: Exposure of the meninges is not a concern. No change in management is required.
Tear of Meninges with Cerebrospinal Fluid leak: A tear of the meninges is simply repaired with silk or other suture. If necessary, muscle or fascia can be used to augment the repair.
Opening of lateral or posterior semicircular canal: The canal is simply covered with fascia, which is held in place by muscle or gauze packing.
ANTROTOMY IN THE INFANT
Antrotomy is the surgical opening of the antrum, which is the principal mastoid cavity in the infant. Antrum is fully developed, as opposed to the mastoid that is not fully developed. The facial nerve is more superficial at the mastoid tip than in the adult. Indications include: Early acute mastoiditis unresponsive to antibiotics; complicated mastoiditis; subperiosteal abscess; intracranial complications (meningitis, abscess); facial paralysis secondary to mastoiditis; suspected tuberculous mastoiditis (remove sequestrum and obtain tissue for diagnosis of TB; and mastoiditis secondary to cholesteatoma.
Author & Editor
Johan Fagan MBChB, FCS(ORL), MMed
Professor and Chairman
Division of Otolaryngology
University of Cape Town
Cape Town, South Africa
johannes.fagan@uct.ac.za
Author
Robert Jackler MD
Sewall Professor and Chair
Department of Otolaryngology-Head & Neck Surgery
Associate Dean, Postgraduate Medical Education
Stanford University School of Medicine
Stanford, CA 94305-5101, USA