
5.7: Principles and Technique of Microvascular Anastomosis for Free Tissue Transfer Flaps in Head and Neck Reconstructive Surgery
- Page ID
- 52894

OPEN ACCESS ATLAS OF OTOLARYNGOLOGY, HEAD & NECK OPERATIVE SURGERY
FREE TISSUE TRANSFER FLAPS IN HEAD & NECK RECONSTRUCTION: MICROVASCULAR ANASTOMOSIS TECHNIQUE
Ottie van Zyl, Johan Fagan
This chapter describes the surgical technique of microvascular anastomosis, and the management of patients undergoing vascularized free tissue transfer reconstruction of the head and neck.
Readers are referred to the open access atlas chapters on vascularized free fibula (FFF), radial free forearm (RFFF), anterolateral thigh (ALTF), rectus abdominis and jejenum flaps for technical details about how to raise these flaps, and to chapters about their applications to reconstruct oropharyngeal, cervical esophageal, floor of mouth, partial glossectomy, total glossectomy, total maxillectomy, inferior maxillectomy, and total laryngectomy defects.
Preoperative evaluation
Preoperative evaluation is important in order to select the most suitable flap, and to select patients and to optimize their medical status. Factors to consider include:
- Flap
- Vascular status
- Tissue quantity and quality
- Donor site: Functional and cosmetic morbidity
- Patient: Medical and oncologic status
Vascular status
|
Table 1: Allen test
Most head and neck cancer patients are smokers and are middle aged or older. Therefore, one must carefully assess the peripheral circulation and the quality of the skin. Severe atherosclerosis is not necessarily a contraindication to free flap surgery; in the authors’ experience, with careful suturing, rigid, hard arterial walls of flap vessels actually splint and keep an anastomosis patent. Enquire about a history of intermittent claudication, deep vein thrombosis, limb trauma and varicose veins; previous trauma or fractures may warrant taking x-rays. An Allen test should be done prior to harvesting a RFFF to assess whether collateral ulnar arterial supply to the hand is sufficient if radial artery supply is lost (Table 1).
Only if concerns exist about arterial and/or venous insufficiency are further investigations indicated. Duplex color-flow Doppler will usually suffice. Only very rarely is MRI angiography or invasive angiography indicated. Should there be a major concern about vascular supply then an alternative donor site should be considered.
Tissue quantity and quality of flap
Adequate skin should be harvested to reconstruct the defect. With through-and-through defects one may add a 2nd skin island based on the same pedicle; or a 2nd free flap; or leave muscle of the flap exposed intraorally to epithelialize; or cover the external surface of the flap with split skin graft. Thick inelastic skin may be inappropriate to reconstruct defects where mobility is important e.g. RFFF is the preferred option for larger floor of mouth or anterior tongue defects. Thickness of subcutaneous fat is important in terms of tissue bulk and pliability; it should be minimal with anterior oral cavity reconstruction and may preclude using ALTFs in some patients. In other situations additional bulk may be advantageous e.g. following total glossectomy. The quality, volume and length of bone required with osseous flaps depend on the defect. Fibula (FFF) is the most versatile bone to reconstruct bony defects in the head and neck. Bone stock should be adequate if dental implants are to be inserted.
Donor site: Functional and cosmetic morbidity
Functional morbidity may influence the choice of flap e.g. a painter or sportsman may prefer to have the non-dominant forearm used. Avoid using disfiguring pedicled flaps from the head/neck/ shoulder/chest regions, and flaps that cause tethering or downward traction on facial tissue (e.g. pectoralis major and deltopectoral flaps). Skin that is transposed from the trunk and limbs is of a much lighter, pale/yellow color (especially Caucasians) compared to the face, whereas regional flaps taken from the neck such as submental artery flaps gives a better color match (has limited utility if neck dissection done). The ALTF has gained popularity because unlike the RFFF its scar is less obtrusive and can be hidden under clothing.
Patient: Medical and oncologic status
Assess the patient’s fitness to undergo major surgery and optimize his/her medical status. Advanced age and lack of fitness does not rule out using free flaps per se. It is critical not to waste time by working as two surgical teams and being technically competent and quick in frail patients; with high risk patients one might even opt for a much quicker and less invasive option such as simple primary closure following e.g. hemimandibulectomy. Although using regional flaps e.g. pectoralis major myocutaneous flaps may appear to be a more sensible choice in high risk patients, it may be detrimental, firstly because operating time may be increased when a 2-team approach is not possible and, secondly because pain at the donor site may increase risks of atelectasis and chest infection.
Operating room setup
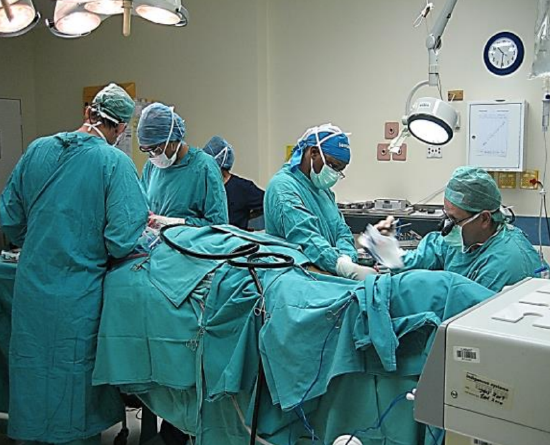
Figure 1: Two-team approach with anesthetic equipment stationed at foot of bed
Resect the primary tumor and elevate the flap simultaneously as a 2-team approach to reduce surgical time (Figure 1); minimizing length of surgery has benefits both for the patient and for flap survival.
Create working space around the head and neck region by placing the anesthetic machinery at the foot of the bed with extensions for intravenous lines and anesthetic tubing. Two electrocautery systems are used. Cautery and other equipment are positioned at the foot of the bed, contralateral to the operated limb. A warming blanket covers the torso and the opposite limb when elevating a FFF or ALTF. The heights of the table and/or chair are adjusted so that the surgeon and assistant are seated while raising the flap (Figure 1).
Loupes vs. Microscope 1 (Figure 2)
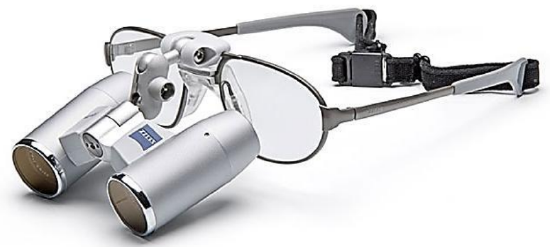
Figure 2: Surgeon uses 4.5x loupes; assistant can use 2.5x loupes
While many surgeons use microscopes, it is the 1st author’s preference to use loupes with 4-5x magnification whenever possible; the assistant may use 2.5x (Figure 2). Recipient vessels in the neck are quite large as are vessels in free flaps used in head and neck reconstruction (unlike replant and experimental laboratory surgery). Loupes are more appropriate for surgeons with steady hands and stable heads. As long as a surgeon is capable and confident about his/her visual acuity and never has doubts about placing sutures, surgery with loupes is very efficient.
Advantages of loupes include:
- No visual adjustment required between elevating the flap and suturing the anastomosis
- Wider field of vision
- Greater mobility and ability to access difficult areas
- Can move around patient’s head for better position and improved visual access
- Quicker surgery, shorter operating time
- More space in the operating room
- Ability to work in different hospitals and operating rooms without needing to adjust to unfamiliar microscopes
- Assistants do not need to be trained to work with an operating microscope
- Cheaper
Surgical instrumentation (Figures 3-5)
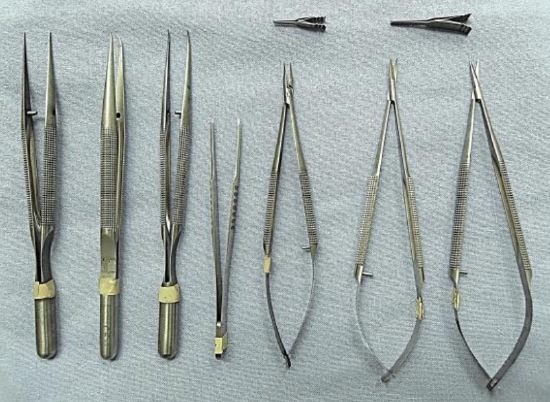
Figure 3: Microinstruments and single microvascular clamps
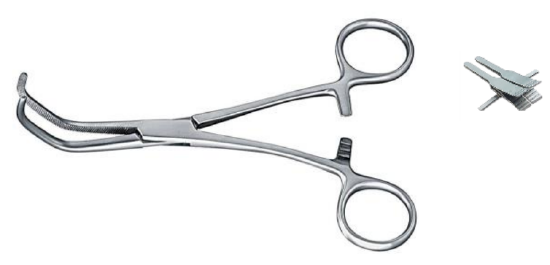
Figure 4: Baby Satinsky vascular clamp and double microvascular clamp
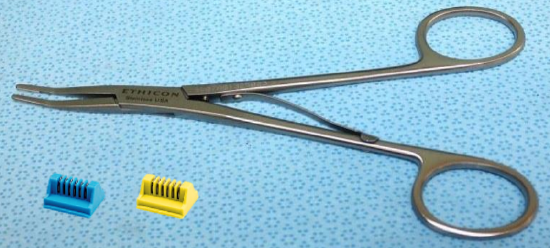
Figure 5: Hemostatic Ligaclip applier and clips
- Microsurgical forceps x 3 (minimum)
- Micro needle holder
- Microscissors (straight and curved)
- Microvascular clamp (selection of single and double clamps)
- Baby Satinsky vascular clamp (for endto-side anastomoses)
- Bipolar coagulation forceps
- Hemostatic Ligaclip appliers (small and medium)
It is preferable to use longer forceps and needle holders as it reduces crowding in restricted spaces by the 2 pairs of hands. Shorter forceps are also less stable if not securely placed on the dorsal aspect of the first web of the hand.
The most appropriate suture to use for the microvascular anastomosis when using loupes, is 8/0 nylon.
Irrigation fluids
Heparin-saline solution
- 5000 units in 50 mL saline
- Mixed in a small bowl
- Draw up two 5 mL syringes with intravenous cannula attached
- To flush and irrigate vessels (without separating or damaging endothelial layer of artery)
- To hydro-dissect adventitia off vessels
Lignocaine solution 1%
- 5 mL/500 mg ampoule in 50 mL saline
- Apply topically via 20 mL syringe with venous cannula attached
- To relieve spasm with small caliber vessels while dissecting a perforator flap
Lignocaine 10 % (undiluted)
- Soaked into a gauze swab
- Applied topically to anastomosis to relieve spasm (if necessary)
- Papaverine may be used as an alternative, but is less readily available
Choice of limb
Selecting the appropriate donor leg or arm is based on the type and location of the surgical defect and which the side of the neck is to be used for the vascular anastomoses (Refer to chapters on free fibula, anterolateral thigh and radial forearm flaps for detail).
Flap design
The flap should ideally have been elevated at the same time as completion of resection of the primary and the neck dissection. With a two-team approach the oncologic surgeon therefore resects the primary tumor early so that the reconstructive surgeon can inspect the defect and plan the flap. The resection is done first, or immediately following dissection of Levels I & II of the neck. The reconstructive surgeon starts elevating the flap once he/ she has some idea about the dimensions of the defect, or if the proportions of the flap can be adjusted subsequently.
It is best to inspect the tumor at the time of initial exposure prior to resection and to “picture” the normal anatomy and that of the defect; then to draw the flap on paper; to cut out the paper template and then to transpose it to the donor site to plan the dimensions of the flap (The author rarely measures the resected specimen to determine the dimensions of the flap, as shrinkage of soft tissue and postsurgical changes can modify the shape and size of the defect). With experience, inspecting the tumor prior to dissection is often adequate to design an appropriate flap.
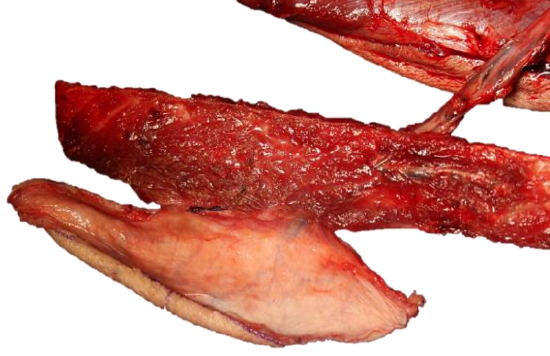
Figure 6: Skin island, perforator, fibula, and vascular pedicle ready to be detached
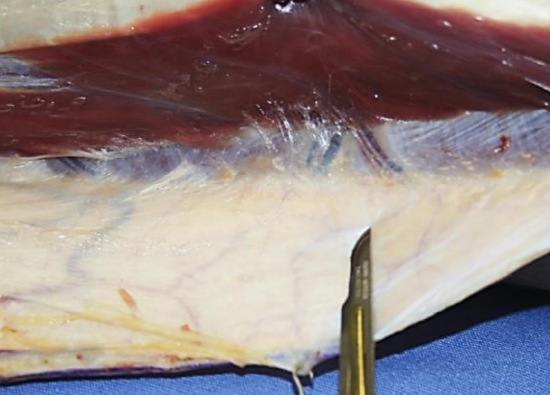
Figure 7: Perforators tracking across the posterior crural intermuscular septum of the leg (free fibula flap)
Unexpected problems may necessitate one to raise a different size or shape of flap, or even a totally different flap e.g. the resection may be greater or lesser than planned; one may encounter unexpected anatomical variations; or there may be severe atherosclerosis or unreliable perforators (Figures 6, 7).
Principles of elevating a flap
Size
Design a large enough flap but avoid large and bulky flaps especially in the anterior oral cavity.
Bloodless field
Perforator flaps are meticulously elevated in a bloodless field without using a tourniquet. RFFF and FFFs are done with tourniquet compression; in adults the average tourniquet pressure for the arm is 250 mmHg, and 300 mmHg for the leg. Note: vessels appear smaller when operating with a tourniquet in a bloodless field.
Ligaclips (Figure 5)
Ligaclips are preferable to bipolar coagulation. Only use bipolar coagulation away from vessels supplying/draining the flap, as coagulation can cause thermal injury of critical vessels; this is certainly true when elevating perforator flaps. Ligaclips avoid narrowing or occlusion of veins sometimes seen when venous tributaries are ligated with braided (silk/vicryl) ties.
Preparing the vascular pedicle
- Continuously apply topical lignocaine to the perforator pedicle
- Keep vessels (especially veins) intact until a decision has been made about what vessels are to be used for the anastomosis
- Fashion the length of the pedicle so that it reaches the mid-internal jugular vein, the superior thyroid artery, facial artery or transverse cervical artery
- Problems with pedicle length may occur especially when the contralateral neck is used for vascular anastomoses e.g. with revision flaps, following previous neck dissection or irradiation, or when reconstructing midface or maxilla. In such cases the oncologic surgeon should maintain continuity of the facial artery and keep the common facial vein and/or external jugular vein intact; even the anterior jugular veins may be used
- Select the most suitable vein and ligate the others; only one vein is generally needed
- It is better to interpose a vein graft to a larger vessel than to anastomose to a small vein or for the anastomosis to be under tension
- Carefully separate the vein and artery from each other to permit the arterial and venous anastomoses to be placed some distance from each other if necessary
- Deflate the tourniquet
- Obtain meticulous hemostasis of the flap and the surgical bed with bipolar cautery, ligaclips and ligatures
Preparing the flap
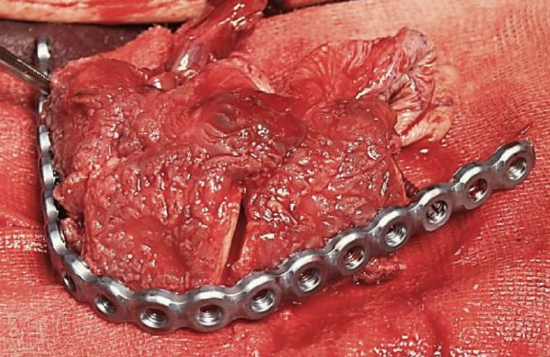
Figure 8: Bony segments fixed to plate with vascular pedicle still attached to leg
In order to minimize ischemic time, leave the flap attached by its vascular pedicle until tumor resection is complete, and the donor vessels have been prepared. If possible, complete the osteotomies and secure bony segments to the reconstruction plate before detaching the vascular pedicle (Figure 8) so that the bony reconstruction is virtually completed with the vascular pedicle still attached. Only if this is not possible should the bony segments be fixed to the plate after transposing the flap to the mandibular or maxillary defect.
Selecting the donor vessels
An end-to-end arterial anastomosis is generally done to the facial, superior thyroid, external carotid or transverse cervical arteries. The surgeon selects the most suitable donor artery based on the anatomical relationship of the donor artery to the defect, access to do the anastomosis, the relative diameters of the flap and neck arteries, atherosclerosis, scarring from previous surgery and/or irradiation, and the length of the vascular pedicle. Dividing the posterior belly of digastric and the stylohyoid muscle may improve access to the stump of the facial artery. When the artery of the flap is hard and rigid due to atherosclerosis and cannot be twisted or curved towards the donor artery, warn the oncologic surgeon that a longer donor artery pedicle is required that can reach across to the flap’s artery.
An end-to-side venous anastomosis is generally done to the internal jugular vein, or to one of its major tributaries.
Preparing the donor artery in the neck
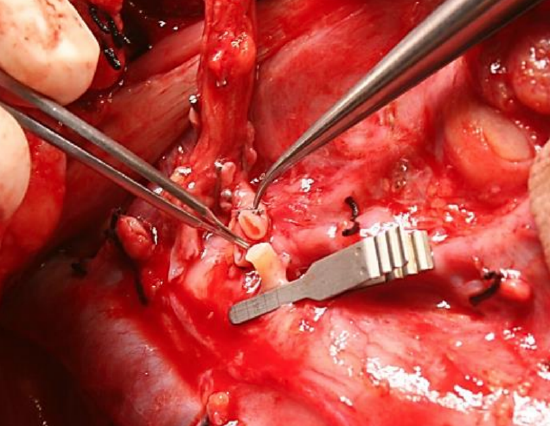
Figure 9: Microvascular clamp placed across origin of superior thyroid artery; peroneal artery of free fibula flap vascular pedicle lies adjacent
- Determine the required length of the artery
- Place a micro clamp proximally on the donor artery (Figures 3, 4, 9)
- Divide the artery with micro scissors
- Remove excess adventitia from the tip of the artery
- Irrigate the lumen with heparin/saline
- Inspect the arterial lumen and remove fibrin from the lumen with microforceps (occurs if artery was ligated during neck dissection)
- Carefully dilate the arterial lumen with the rounded tip of a micro needle holder taking extreme care not to traumatize the endothelium
- Observe whether the endothelium has separated from the mesothelium; this necessitates additional trimming of the end of the artery, or taking special care to catch the loose endothelial layer with the sutures when doing the microanastomosis, thus preventing dissection of the endothelial layer, formation of an endothelial flap and thrombosis
- Again, irrigate the arterial lumen with heparin/saline to remove blood clots
- Trim loose advential strands around the tip of the vessel with microscissors to prevent them from prolapsing into the arterial lumen and causing thrombosis
Preparing the Internal Jugular Vein
- Select the segment of the jugular vein that is to be used for the anastomosis
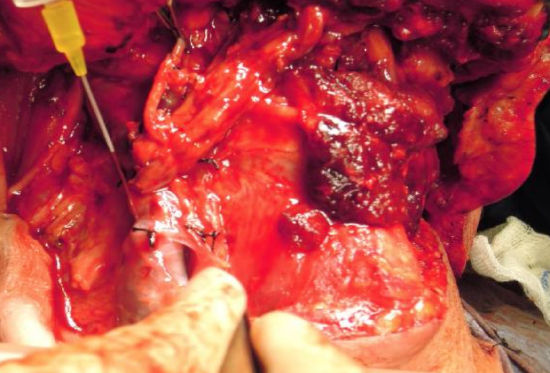
Figure 10: Separating adventitia of carotid sheath off internal jugular vein with gentle hydrodissection
- Use hydro dissection to elevate and separate any remaining adventitia (carotid sheath) over the vein by irrigating the surface of the vein with the heparin/saline solution (Figure 10)
- Remove this adventitial layer with microscissors
Dividing the vascular pedicle of the flap
- Divide and ligate the vascular pedicle of the flap only after the recipient vessels in the neck have been prepared
- Flush the vein and the artery with the heparin/saline solution
Securing the flap prior to doing the microvascular anastomosis
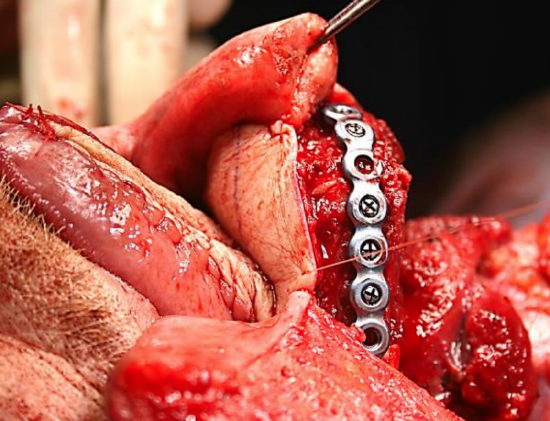
Figure 11: Flap partially sutured and bone secured prior to commencing microvascular anastomosis
- Secure bone flaps to mandible/maxilla and suture skin flaps to mucosa or skin (Figure 11) to avoid inadvertently applying traction to the microvascular anastomoses
- Do not entirely suture a skin flap at this stage to have access to the deep aspect of the flap to secure hemostasis should bleeding occur from the flap once it is revascularized
Orientating the vascular pedicle
It is crucial to avoid kinking or rotating the vascular pedicle. Mark the anterior edge of the pedicle with blue ink as it lies in situ, to avoid twisting the pedicle when it is transferred. Consider that the pedicle elongates after it has been revascularized due to the vessels distending with blood.
It may be difficult to atraumatically pass the vascular pedicle through a soft tissue tunnel. A long artery forceps can be passed through the tunnel, taking hold of adventitia near the end of the pedicle and gently drawing the pedicle through the tunnel. Alternatively, it can be done by first passing a pencil drain through the tunnel, advancing the pedicle into the pencil drain by flushing saline through the drain alongside the pedicle, and then jointly retracting drain and pedicle into the neck.
Handling the microinstruments
Microinstruments are extremely delicate and are expensive and must be handled with extreme care (Figure 3, 4)
- Do not drop the forceps as the tips will bend out of alignment or break
- Place microinstruments separately and away from other surgical instruments
- The scrub nurse should clean the microinstruments with a warm, wet gauze swab every time they are handed off to remove dried blood and tissue
- Microsuture needles, sutures and microclips are easily lost during surgery; once lost they are extremely difficult to find
Suturing technique and tips
It is the authors’ preference to employ a continuous suture technique for both the arterial and venous anastomoses, except when suturing extremely small vessels. Although many surgeons use interrupted sutures, using continuous sutures is much quicker and causes less anastomotic leaks.
- Suturing technique should be practiced in an animal laboratory
- The author uses an 8/0 nylon suture on a taper pointed needle
- Stabilizing the wrists is important
- Rest them on the operative field
- A patient's chest movement may affect the stability of a surgeon's hand
- The arterial anastomosis is usually done close to the carotid; the surgeon needs to adapt to the pulsations of the carotid
- Avoid moving one’s hands outside the visual field
- Suturing tips
- It is easier to run a suture towards yourself
- Avoid transferring a needle directly from forceps to needle holder as the "spring" in a curved needle can propel the needle and thread a considerable distance from the operating field
- Pass the needle through the vessel wall about a vessel wall’s thickness (or slightly more) from the free edge of the vessel o Pull the thread through the wall to 1-2 cm from the end of the suture
- Pass the needle through the other vessel’s wall
- The assistant uses microforceps to approximate the ends of the pedicle and donor vessels
- Tie a knot by holding the longer length of suture with the needle holder about 2-3 cm from the exit point from the vessel and then tying it to the shorter suture
Arterial microvascular anastomosis
The arterial microanastomosis is usually done first. This allows one to untwist and correctly position the remainder of the pedicle and the vein; kinking and twisting the vein can block venous outflow. If the artery and vein of the pedicle cross over each other, then the vein should be orientated to cross superficially over the artery.
The author employs two anastomotic techniques depending on the relative diameters of the donor and recipient vessels i.e. end-to-end and occasionally, a sleeve anastomosis
End-to-end arterial anastomosis
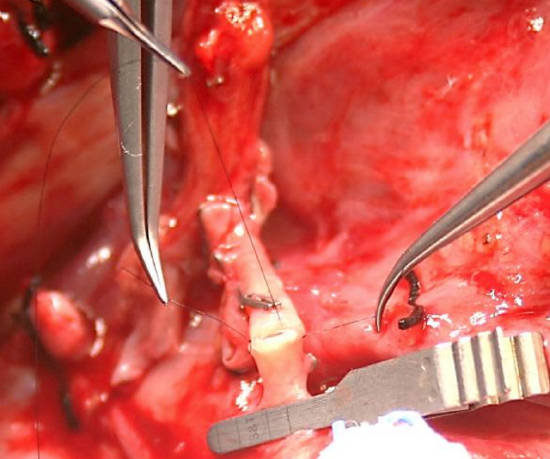
Figure 12: Stay sutures held with curved non-toothed forceps while surgeon inserts row of running sutures
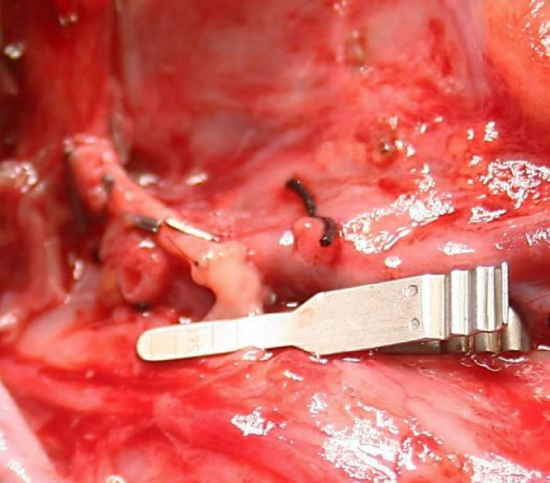
Figure 13: Completed arterial anastomosis
- Flush the donor and recipient arteries with the heparin/saline solution again
- Join the two vessels with a single stay suture, knot it, and cut it to a length of about 2 cm (Figure 12)
- Insert a 2nd stay suture at the opposite side of the vessel’s circumference, knot it, but do not cut it (Figure 12)
- The assistant stabilizes the vessels by holding the two stay sutures with nontoothed forceps (Figure 12)
- Anastomose the anterior walls of the vessels with a continuous running suture taking care to:
- Avoid constricting the lumen
- Avoid catching the back walls of the vessels with the sutures
- Include the endothelial layer with the suture, especially if separated from the mesothelium
- Space the sutures to compensate for vessels of unequal diameter
- Tie it to the 2nd stay suture
- Flip / rotate the vessels to access the side opposite to the anastomosis
- Check the suturing on the inside of the vessel
- Complete the 2nd side of the anastomosis with a running suture (Figure 13)
- Tie the end of the suture to the 1st stay suture
Sleeve arterial anastomosis (Figure 14)
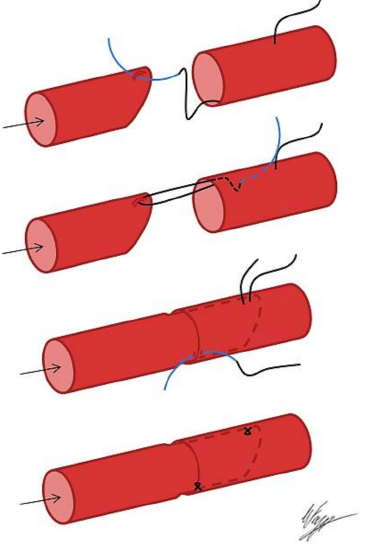
Figure 14: Sleeve arterial anastomosis (arrow indicates direction of blood flow): Cut proximal vessel at 450 angle; pass suture into lumen of larger vessel some distance from end, and through adventitia close to end of smaller vessel; pass suture back along lumen of larger vessel and through its wall; telescope smaller vessel into larger vessel; tack adventitia together
The 1st author uses the sleeve anastomosis technique only when a substantial mismatch exists in the diameters of a larger flap vessel and smaller recipient vessel which makes an end-to-end anastomosis difficult to achieve. It is quick and fairly simple and there are no intraluminal sutures; however, the mismatch in vessel diameters must not be too great, and vessel spasm is more pronounced and lasts longer following release of the clamps.
Venous microvascular anastomosis
The venous anastomosis is done end-to-side to the internal jugular vein, or to a major tributary e.g. the common facial vein. Rarely, it is done as an end-to-end anastomosis to a very small internal jugular vein or one of its tributaries. Never allow the internal jugular vein to dry out as it is then more likely to thrombose with loss of the flap.
- Identify the vein in the vascular pedicle which is to be anastomosed
- Ensure that the vein is not kinked or rotated
- Flush the vein with heparin/saline solution
- Cut the flap vein obliquely to angle the end-to-side anastomosis at 450
- Choose the exact point of the internal jugular for the anastomosis
- Vein must reach it comfortably
- Avoid suturing under tension or under suboptimal conditions - rather interpose a vein graft
- Anastomosis usually on the side of the vein so that vein of the pedicle lies comfortably without a likelihood of kinking
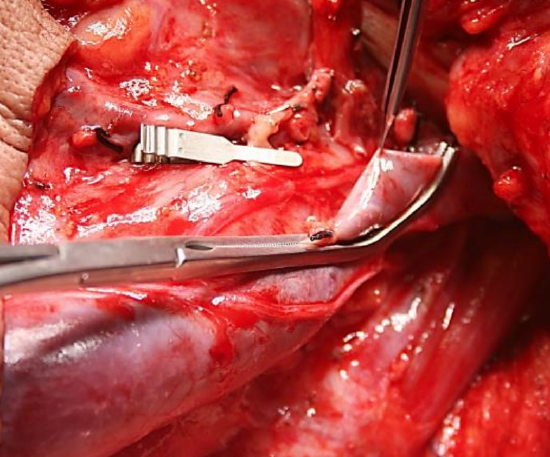
Figure 15: Applying baby Satinsky vascular clamp to internal jugular vein
- Atraumatically isolate the segment of internal jugular vein with a baby Satinsky vascular clamp (Figure 15)
- Incise the internal jugular vein with sharp microscissors. The defect in the vein should exceed the diameter of the recipient vein to stretch the vein open
- Flush the lumen of the internal jugular vein with heparin/saline solution
- Join the two vessels together at one end of the incision in the internal jugular vein with a single stay suture, knot it, and cut it to a length of about 2 cm
- Insert a 2nd stay suture at the opposing end of the jugular vein incision, knot it, but do not cut it
- The assistant may hold the stay sutures with non-toothed forceps to improve exposure
- Anastomose one side of the suture line with a continuous suture
- Space the sutures to compensate for unequal lengths of the vessel walls
- Tie the suture to the stay suture on completion of the 1st suture line
- Flip / rotate the vessels to access the 2nd anastomotic suture line
- Irrigate the lumen of the internal jugular vein and inspect the completed suture line
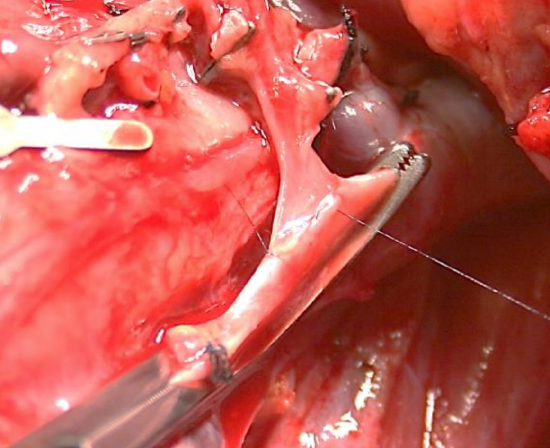
Figure 16: Complete 1st anastomotic suture line; commencing 2nd suture line
- Complete the 2nd suture line taking care not to catch the back walls of the vessels (Figure 16)
- Tie the suture to the stay suture on completion of the 2nd suture line
Revascularizing the flap (Figure 17)
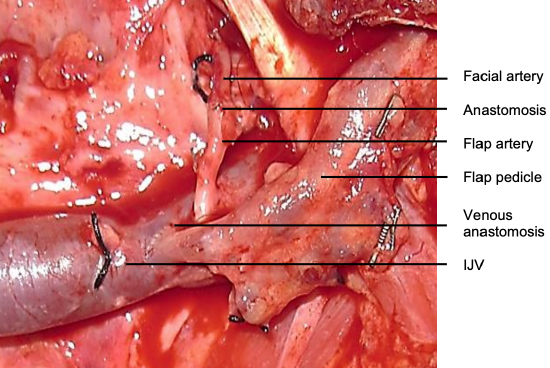
Figure 17: Pedicle anastomosed to facial artery (FA) and internal jugular vein (IJV)
- Ask the anesthetist to raise the mean arterial blood pressure to within a normal range
- Release the vascular clamp on the internal jugular vein
- Check venous filling/distension in the vascular pedicle
- Check for bleeding from the venous anastomosis
- Minor bleeding settles within a few minutes; significant leaks need to be sutured
- Release the microclamp on the artery
- Check for arterial filling/distension and arterial pulsation in the pedicle
- If arteries are in spasm, apply a swab soaked in 10% lignocaine to the vessel for a few minutes
- Check for bleeding from the arterial anastomosis
- Minor bleeding settles within a few minutes
- Significant leaks need to be sutured
Anastomotic bleeding
- The assistant irrigates the suture line with heparin/saline solution to better identify the site of the leak
- Insert a single 8/0 suture at bleeding point and ligate to seal the bleeding point
Checking perfusion of the flap
Be happy with the anastomosis before closing the wound. Check flow across the anastomoses and perfusion of the flap using the following measures:
- Ensure an adequate blood pressure
- Observe and feel pulsation of the arterial pedicle
- Check for bleeding from the flap
- Prick the skin flap with a needle if spontaneous bleeding is not observed
- No bleeding suggests arterial inflow obstruction
- Dark blood suggests venous outflow obstruction
- Intra- and postoperative Doppler of the vascular pedicle (not routinely)
- Continuous invasive monitoring of oxygenation of the flap e.g. Licox P02 microprobe (not routinely)
Complete inset of skin flap
Always leave some of the suturing of the flap to be done after the anastomoses have been completed to be able to control bleeding from the deep aspect of the flap. This also creates time for blood pressure to normalize, spasm to settle, and for a "2nd look", prior to closing the neck. If necessary, cover the arterial anastomosis and pedicle with a swab soaked in 10% lingocaine to relieve arterial spasm while completing the soft tissue repair. If any doubt exists about the anastomosis it should be taken down and redone.
Hemostasis
It is critical to achieve meticulous hemostasis before closing the neck as a hematoma increases the failure rate of flaps. Inspect the deep aspect of the skin flap and obtain hemostasis with bipolar cautery and/or ligaclips. Take care not to injure the vascular pedicle or perforators. A Valsalva maneuver is done, and the neck wound checked for bleeding.
Wound closure
- Insert a suction drain into the neck taking care for it not to pass close to the anastomoses, and not to cross over the microvascular repair or over the internal jugular vein (may obstruct internal jugular vein and cause thrombosis and flap failure)
- Suture the tracheostomy to the skin; avoid ties around the neck as they may occlude the internal jugular vein and cause venous outflow obstruction and flap failure
- Repair the donor site
Postoperative management
Patients are ideally initially managed in a high care / step down unit where the following parameters that may contribute to flap failure are closely monitored and corrected:
- Reduced cardiac output
- Hypotension
- Hypovolaemia
- Hypercoagulability
- Anemia or polycythaemia
- Hypothermia
- Shifting of suction drain to cross and compress internal jugular vein
- Wound hematoma
- Tracheostomy tapes too tight (once tube is changed)
- Excessive movement of flap
- Neck position which may kink the pedicle
- Wound sepsis
- Alcohol withdrawal syndrome
Monitoring flap perfusion
Flaps are most likely to fail in the 1st 48 hours. If detected and acted on timeously it may be possible to salvage a poorly perfused flap. Therefore, regular and close monitoring of perfusion is imperative. The following methods may be employed to monitor perfusion:
- Color
- Temperature
- Needle pricks to check bleeding (presence/absence and color)
- Invasive monitoring of oxygen saturation (Licox)
- Doppler monitoring of arterial inflow
Final comments
Successful free tissue transfer depends on the many factors outlined in this chapter. By attending to all these measures one can achieve outstanding results even in a developing world setting (flap success rates approx. 95% in our own public hospital in Cape Town1. However, failure to pay attention to detail and to all these factors may lead to flap failure and a very difficult and often catastrophic course for a head and neck patient.
Reference
- Dos Passos G, Rogers A, Price C, et al. Loupe Magnification for Head and Neck Free Flap Reconstruction in a Developing Country. European J Plastic Surg 2015:1-8 (http://link.springer.com/article/10....238-015-1108-z)
Other flaps described in The Open Access Atlas of Otolaryngology Head & Neck Operative Surgery
- Pectoralis major flap
- Buccinator myomucosal flap
- Buccal fat pad flap
- Nasolabial flap
- Temporalis muscle flap
- Deltopectoral flap
- Paramedian forehead flap
- Upper and lower trapezius flaps
- Cervicofacial flaps
- Submental artery island flap
- Supraclavicular flap
- Latissimus dorsi flap
- Local flaps for facial reconstruction
- Radial free forearm flap
- Free fibula flap
- Rectus abdominis flap
- Anterolateral free thigh flap
Author
JE (Ottie) Van Zyl MBChB, FCS
Plastic & Reconstructive Surgeon
Groote Schuur Hospital
Cape Town, South Africa
ottie@mweb.co.za
Author and Editor
Johan Fagan MBChB, FCS(ORL), MMed
Professor and Chairman
Division of Otolaryngology
University of Cape Town
Cape Town, South Africa
johannes.fagan@uct.ac.za