
6: The Appendicular Skeleton
- Page ID
- 12526
Information
The appendicular skeleton is made up by the bones attached or appended to the axial skeleton. These are the bones of the limbs, hands, and feet, the bones of the pectoral (shoulder) girdles, and the coxal bones of the pelvic girdle.
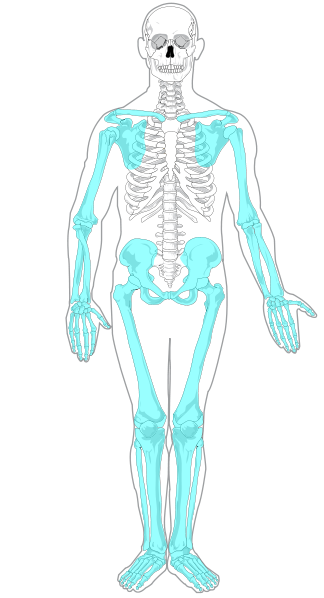
Figure 6.1. The appendicular skeleton highlighted in blue. (CC BY SA; LadyofHats Mariana Ruiz Villarreal via Wikicommons)
The pectoral girdles
There is a pectoral girdle above each arm, consisting of the scapula (shoulder blade) and clavicle (collar bone.)
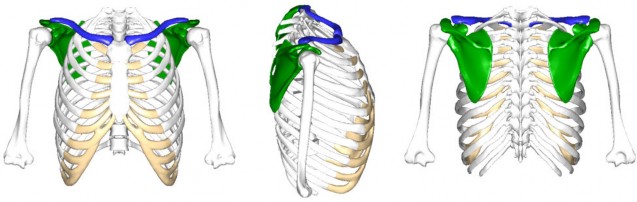
Figure 6.2. The pectoral girdle. The scapulae are in green and the clavicles are in blue.
The scapula has a triangular body with three main processes coming off the body. On the posterior side is the spine of the scapula that ends in the acromion process, which articulates with the lateral end of the scapula. On the anterior side, facing into the body, is a right-angled process called the coracoid process. While at the superior lateral edge of the scapula the glenoid cavity, which serves as the socket for the head of the humerus bone. The glenoid cavity always points laterally, while the spine and acromion are posterior. This will help you determine whether a particular scapula comes from the anatomical left or right.
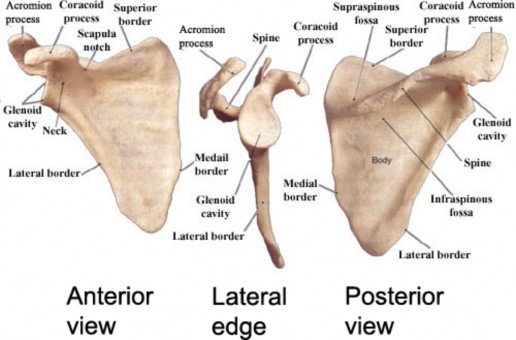
Figure 6.3. The scapula bone.
The clavicle is a vaguely S-shaped bone which articulates with the scapula in the lateral and articulates with the sternum at the medial end. The flatter broader end is the acromial extremity (end), which articulates with the acromion process of the scapula. The superior surface of the acromial extremity is smoother than its inferior surface, which can help you determine whether a particular clavicle bone comes from the left or right. The more circular end is the sternal extremity (end), which articulates with the manubrium of the sternum.
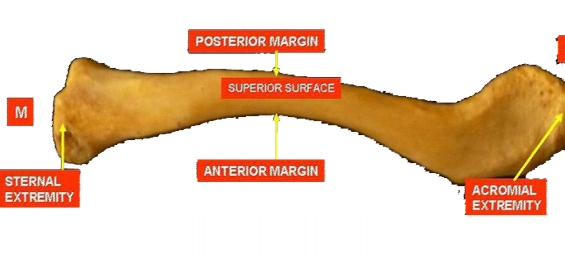
Figure 6.4. The right clavicle bone.
LAB 6 EXERCISE 6-1
- Using one of the full skeletons in the room, fill out the table below with three or four steps to determine whether an individual scapula comes from the anatomical left or anatomical right. You must use any features that are already filled in. The clavicle was done as an example.
- You can describe any features on that bone and which direction it has to face to allow you to determine whether that particular bone came from anatomical left or anatomical right.
- Sample instructions for the clavicle are provided as an example for all subsequent exercises. Use proper anatomical terminology. Use terms which will make sense to anyone schooled in anatomy if they read it. Use as many steps as you need, not necessarily four.
Clavicle – Anatomical left from anatomical right
- Put the smooth side of the acromial end facing superiorly.
- Put the curve in the middle of the bone facing anteriorly.
- If the acromial end is on the right, the clavicle is from the anatomical right.
- If the acromial end is on the left, the clavicle is from the anatomical left
Scapula – Fill in four steps to determine anatomical left from anatomical right
1. Glenoid cavity - 2.
3.
4.
The Upper Limbs
Information
For anatomists, the upper limb consists of the arm (the upper arm), the forearm (the lower arm), and the hand. The arm consists of a single bone, the humerus. The forearm consists of two bones, the ulna and radius. And the hand consists of 27 bones, which are grouped into the phalanges, metacarpals, and carpals.

Fig 6.5. The bones of the left upper limb.
The major processes and markings of the humerus, ulna, and radius bones are shown in Figures 6.6, 6.7, and 6.8, respectively.
The bones of the hands are divided into three groups. The carpals articulate with the ulna and radius bones of the forearm and are named after the carpus, or wrist. There are 8 carpal bones and each has its own name. In Figure 6.9 they are numbered so that 1-trapezium, 2-trapezoid, 3-capitate, 4-hamate, 5-pisiform, 6-triquetrum, 7-lunate, 8- scaphoid.

Lesser Greater
Capitulum
Figure 6.6. The left humerus and its various processes and markings.
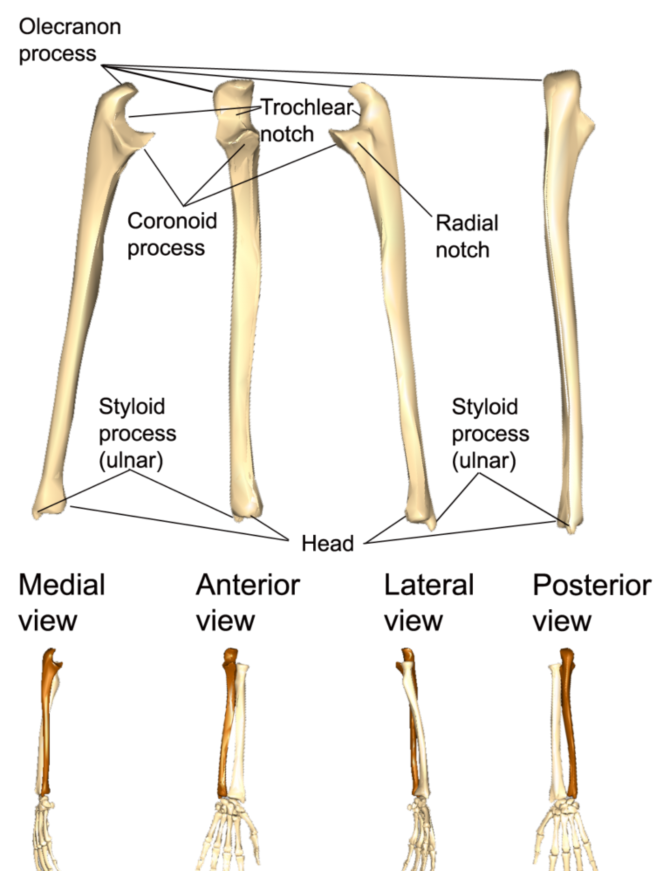
Figure 6.7. The left ulna (in brown) and its major markings and processes.

Figure 6.8. The left radius (in brown) and its major markings and processes.
The metacarpals are five individual bones that are wrapped in muscle and collective tissue to create a single solid mass that serves as the palm of the hand. They are numbered I – V, starting with the metacarpal under the thumb and moving sequentially to the little finger.
Metacarpals are individually named according to the hand they come from and their number. So the metacarpal under the little finger in Figure 6.9 is named left metacarpal V.
There are 14 bones that make up the fingers. All are called phalanges (singular is phalanx). Each finger is made up of three phalanges, labelled the proximal, middle and distal phalanges as you move farther out from the metacarpals. Each thumb only has two phalanges, labelled proximal and distal. The phalanges are numbered I through V, like the metacarpals. Each phalanx then is named according to which hand it comes from, which number it is, and whether it is proximal, middle, or distal. So the second phalanx on the pointing finger in Figure is the left medial phalanx II.
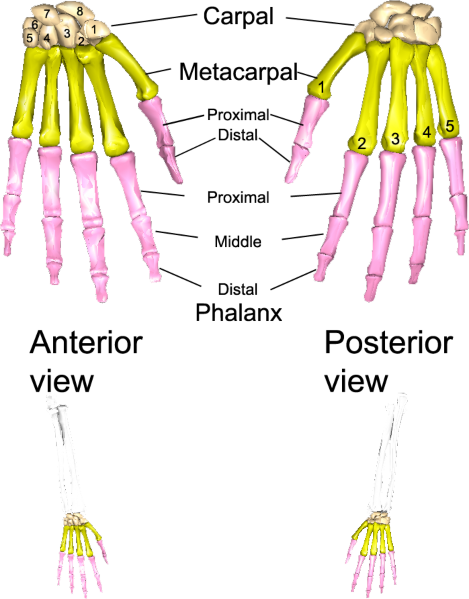
Figure 6.9. The bones of the left hand.
LAB 6 EXERCISE 6-2
- Using one of the full skeletons in the room, fill out the table below with three or four steps to determine whether an individual bone comes from the anatomical left or anatomical right. You must use any features that are already filled in.
- You can describe any features on that bone and which direction it has to face to allow you to determine whether that particular bone came from anatomical left or anatomical right.
- Sample instructions for the clavicle are provided as an example for all subsequent exercises. Use proper anatomical terminology. Use terms which will make sense to anyone schooled in anatomy if they read it. Use as many steps as you need, not necessarily four.
Humerus – Anatomical left from anatomical right.
1. Olecranon fossa - 2.
3.
4.
Ulna – Anatomical left from anatomical right.
1. Radial notch - 2.
3.
4.
Radius – Anatomical left from anatomical right.
1. Styloid process - 2.
3.
4.
LICENSES AND ATTRIBUTIONS
CC LICENSED CONTENT, ORIGINAL
- A&P Labs. Authored by: Ross Whitwam. Provided by: Mississippi University for Women. Located at: http://www.muw.edu. License: CC BY-SA: Attribution-ShareAlike
- Fig 6-5. The bones of the left upper limb.. Authored by: Images in Figure 7-8 were made out of, or made from, content published in a BodyParts3D/Anatomography web site. The content of their website is published under the Creative Commons Attribution 2.1 Japan license. The author and licenser of the contents is http://lifesciencedb.jp/bp3d/?lng=en. Located
at: http://lifesciencedb.jp/bp3d/?lng=en. License: CC BY-SA: Attribution-ShareAlike
- Figure 6-6. The left humerus and its various processes and markings.. Authored by: Images in Figure 7-9 were made out of, or made from, content published in a BodyParts3D/Anatomography web site. The content of their website is published under the Creative Commons Attribution 2.1 Japan license. The author and licenser of the contents is http://lifesciencedb.jp/bp3d/?lng=en. Located
at: http://lifesciencedb.jp/bp3d/?lng=en. License: CC BY-SA: Attribution-ShareAlike
- Figure 6-7. The left ulna (in brown) and its major markings and processes.. Authored by: Images in Figure 7-10 were made out of, or made from, content published in a BodyParts3D/Anatomography web site. The content of their website is published under the Creative Commons Attribution 2.1 Japan license. The author and licenser of the contents is
http://lifesciencedb.jp/bp3d/?lng=en. Located at: http://lifesciencedb.jp/bp3d/?lng=en. License: CC BY-SA: Attribution- ShareAlike
- Figure 6-8. The left radius (in brown) and its major markings and processes.. Authored by: Images in Figure 7-11 were made out of, or made from, content published in a BodyParts3D/Anatomography web site. The content of their website is published under the Creative Commons Attribution 2.1 Japan license. The author and licenser of the contents is
http://lifesciencedb.jp/bp3d/?lng=en. Located at: http://lifesciencedb.jp/bp3d/?lng=en. License: CC BY-SA: Attribution- ShareAlike
Figure 6-9. The bones of the left hand.. Authored by: Images in Figure 7-12 were made out of, or made from, content published in a BodyParts3D/Anatomography web site. The content of their website is published under the Creative Commons Attribution 2.1 Japan license. The author and licenser of the contents is http://lifesciencedb.jp/bp3d/?lng=en. Located
at: http://lifesciencedb.jp/bp3d/?lng=en. License: CC BY-SA: Attribution-ShareAlike
The Pelvic Girdle
Information
The pelvic girdle is name given the left and right coxal bones. Colloquially, these are known as the “hip bones”. The pelvic girdle is just the two coxal bones, but the pelvis itself is the bowl- like structure created by the two coxal bones joined in the anterior by the sacrum, and coccyx. (“Pelvis “comes from the Latin word for “basin”.)
At birth, each coxal bone starts out as three separate bones – the ilium, (ILL-ee-um),
the ischium, (ISH-ee-um) and the pubis (PYOO-bus) bones – joined by hyaline cartilage. Figure 6.10 shows what these bones look like initially. By the age of 25, these three bones have fully fused into a single coxal bone. We still subdivide the fully-formed coxal bone into three regions based on the positions of the three bones that fused to form it, each region named after the bone that gave rise to that region.
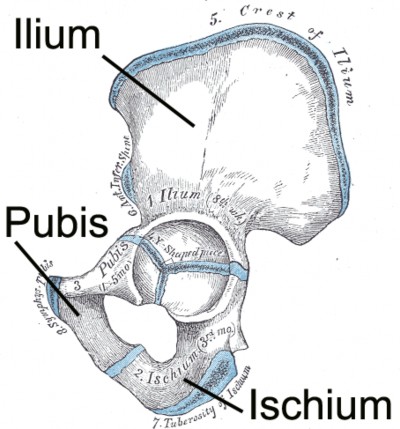
Figure 6.10. The three bones of an unfused coxal bone.
In a fully fused coxal bone, the ilium is the most superior portion, forming the “wing” that makes up the most prominent part of the coxal bone. The interior-facing side of this “wing” is called the iliac fossa. The ilium is where the sacrum attaches to each coxal bone to complete the pelvic bowl. This attachment point is alternatively called the sacroiliac joint, the sacroiliac articulation, or the iliac tuberosity, and is a rough surface. In anatomical position, the rough sacroiliac joint is always facing anterior.
In anatomical position, the ischium is posterior to the pubis. You “sit on the ischium” portion of the coxal bone. It is thicker and stronger than the pubis, allowing it to support your weight.
The large socket of the coxal bone is called the acetabulum (“ah-set-TAB-you-lum”). It faces laterally and is where the ball-like head of the femur bone articulates with the pelvis. Its name is derived from the Latin for vinegar cup, because of its cup-like shape. Inferior to the acetabulum is a large opening called the obturator foramen (“OB-tur-aye-tor for-AY-men”).
The major processes and markings of the coxal bone are shown in Figure 6.11.
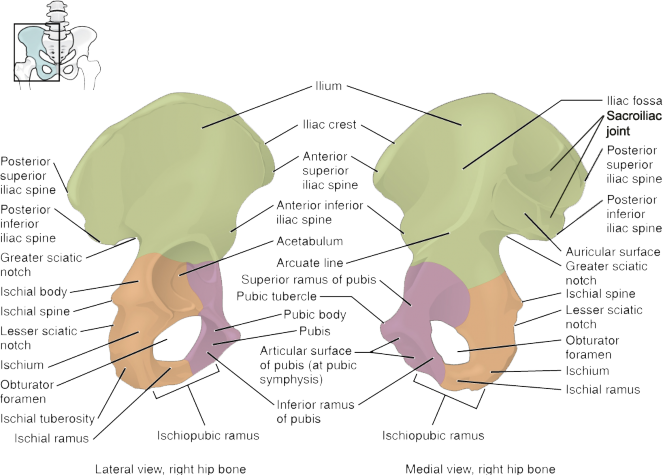
Figure 6.11. The right coxal bone.
LAB 6 EXERCISE 6-3
Coxal bone – Anatomical left from anatomical right
- Using one of the full skeletons in the room, fill out the table below with three or four steps to determine whether an individual bone comes from the anatomical left or anatomical right. You must use any features that are already filled in.
- You can describe any features on that bone and which direction it has to face to allow you to determine whether that particular bone came from anatomical left or anatomical right.
- Sample instructions for the clavicle are provided as an example for all subsequent exercises. Use proper anatomical terminology. Use terms which will make sense to anyone schooled in anatomy if they read it. Use as many steps as you need, not necessarily four.
- Pubis - 2.
3.
4.
LICENSES AND ATTRIBUTIONS
CC LICENSED CONTENT, ORIGINAL
A&P Labs. Authored by: Ross Whitwam. Provided by: Mississippi University for Women. Located at: http://www.muw.edu. License: CC BY-SA: Attribution-ShareAlike
CC LICENSED CONTENT, SPECIFIC ATTRIBUTION
Figure 6-10. The right coxal bone.. Authored by: OpenStax College. Located
at: http://cnx.org/contents/FPtK1zmh@8.8...dle-and-Pelvis. License: CC BY-SA: Attribution- ShareAlike
PUBLIC DOMAIN CONTENT
Figure 6-11. The three bones of an unfused coxal bone.. Authored by: Henry Vandyke Carter. Located
at: https://commons.wikimedia.org/wiki/File:Gray237.png. License: CC BY-SA: Attribution-ShareAlike
The Pelvis
Information
The pelvis is the bowl-shaped structure generated by the two coxal bones articulated with the sacrum and coccyx bones. On the anterior side of the pelvis, the pubis portions of the two coxal bones do not articulate with each other, but instead are joined with a small piece of cartilage called the pubic symphysis (“PYOO-bick SIM-fiss-is”)
Figure 6.12. The bones of the pelvis.
Anatomists divide the pelvis into two regions. The false pelvis is superior and is surrounded by iliac fossa portions of the coxal bones and the upper portion of the sacrum. The true pelvis is inferior and is surrounded by the pubis and ischium portions of the coxal bones, in addition to the lower sections of the ilium and the sacrum. In women, the true pelvis defines the space babies must squeeze through during childbirth.
Figure 6.13. The true pelvis vs. the false pelvis.
One of the few ways a skeleton stripped of all flesh can be reliably established as either male or female comes from examining the pelvis. The female pelvis can be distinguished from the male pelvis by a number or criterion, three of which are shown in Figure 6.14.
Most of these anatomical differences between the pelvises of males and females reflect the fact that only female pelvises have to serve as part of the birth canal, and these sex differences are not as pronounced in the skeletons of children who have not finished puberty.
In female pelvises, both the pelvic inlet and the pelvic outlet (not shown in Figure 6.14) are wider and more oval-shaped than those in male pelvises. The pelvic inlet in males tends to be more heart-shaped (narrower on the dorsal side) and the pelvic outlet tends to be more narrow. The pubic arch, found immediately inferior to the pubic symphysis, tends to form an angle closer to 90° in females, but forms an angle closer to 60° in males. The sacrum in female pelvises tends to be less curved; in male pelvises, the sacrum is more curved and tends to impinge upon the space of the pubic outlet.
Figure 6.14. Major differences that distinguish the adult male pelvis from the adult female pelvis.
LAB 6 EXERCISE 6-4
Male or female?
Evidence 1. .
Evidence 2.
Evidence 3.
LICENSES AND ATTRIBUTIONS
CC LICENSED CONTENT, ORIGINAL
-
- Obtain an intact pelvis from the cabinet. Using the criteria in Figure 6.14 determine if the pelvis came from a male or female. Give three lines of evidence to support your conclusion.
A&P Labs. Authored by: Ross Whitwam. Provided by: Mississippi University for Women. Located at: http://www.muw.edu. License: CC BY-SA: Attribution-ShareAlike
CC LICENSED CONTENT, SPECIFIC ATTRIBUTION
Figure 6-12. The bones of the pelvis.. Authored by: BruceBlaus.. Located
at: https://commons.wikimedia.org/wiki/F...723_Pelvis.png. License: Public Domain: No Known Copyright
Figure 6-13. The true pelvis vs. the false pelvis.. Located at: commons.wikimedia.org/wiki/F...is_(male)_03_-
_superior_view.png. License: CC BY-SA: Attribution-ShareAlike
PUBLIC DOMAIN CONTENT
Figure 6-14. Major differences that distinguish the adult male pelvis from the adult female pelvis.. Authored by: Henry Vandyke Carter. Located at: commons.wikimedia.org/wiki/F...lvis_LT.PNG%20. License: CC BY-SA: Attribution-ShareAlike
The lower limbs
Information
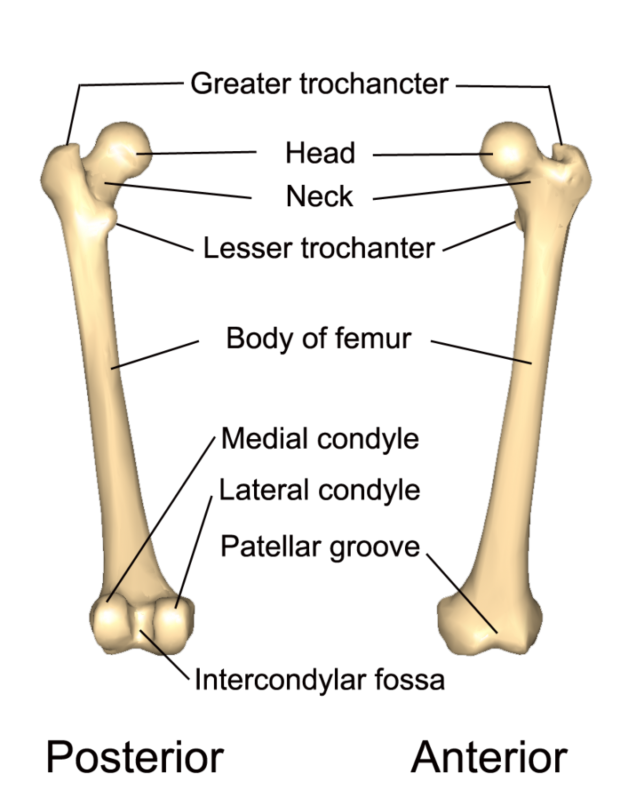
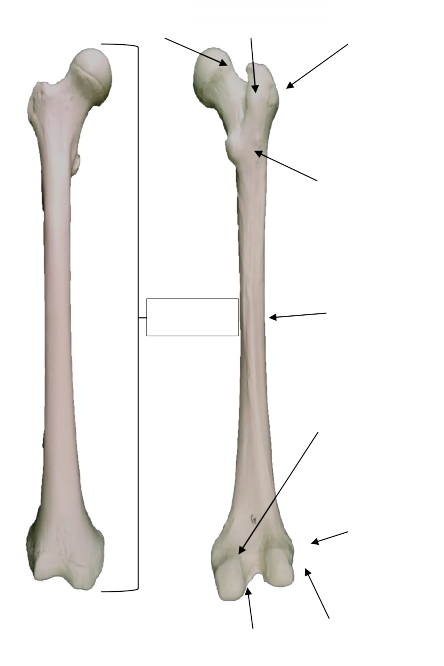
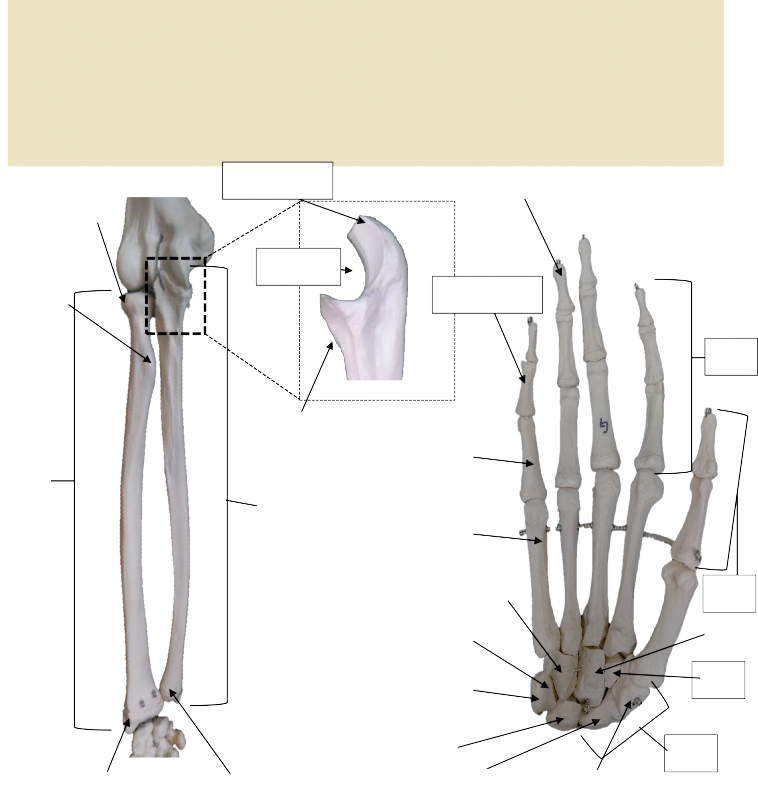
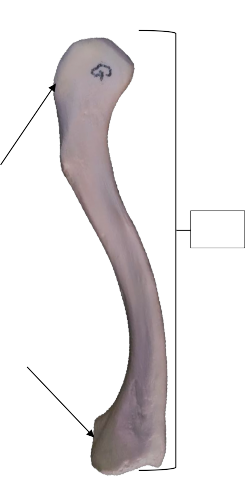
For anatomists, the lower limb consists of the thigh (the upper leg), the leg (the lower leg), and the foot. The thigh consists of a single bone, the femur. The leg consists of two long bones, the tibia and fibula, and the sesamoid bone, the patella, that serves as the knee cap. The foot consists of 26 bones, which are grouped into the tarsals, metatarsals, and phalanges.
Figure 6.15. The bones of the left lower limb.
The major processes and markings of the femur, patella, and tibia & fibula bones are shown in Figures 6.16, 6.17, and 6.18, respectively. The interosseous membrane connecting the tibia and fibula bones is shown in Figure 6.19.
Lateral condyle
Medial condyle
Figure 6.16. The left femur and its various processes and markings.
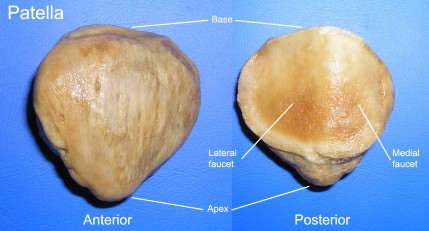
Figure 6.17. The Right patella.
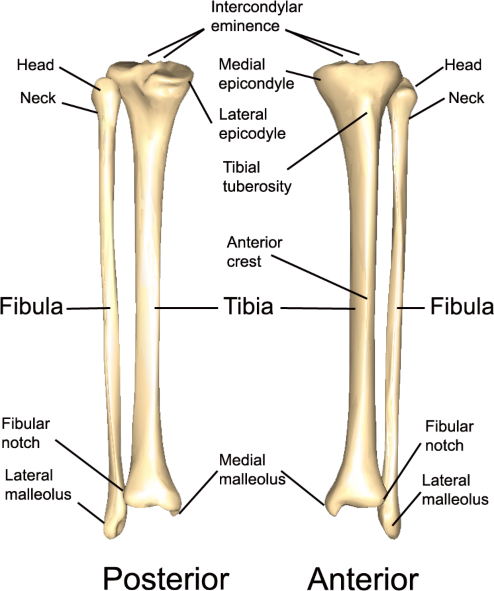
Figure 6.18. The left tibia and femur and their various processes and markings.
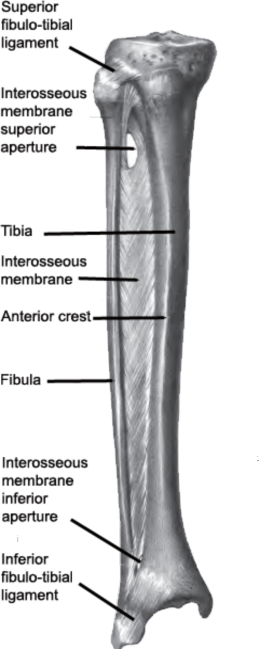
Figure 6.19. The interosseous membrane of the left leg.
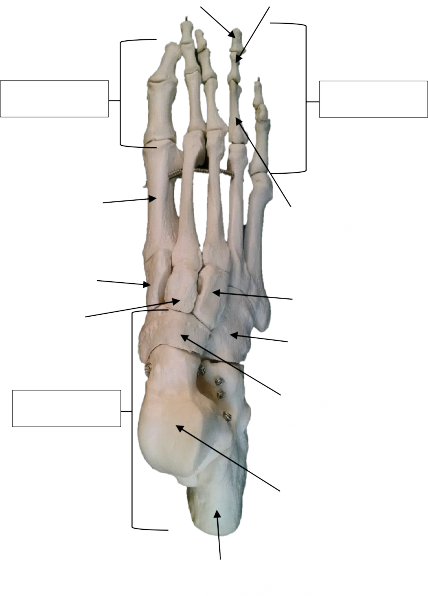
The bones of the foot are shown in Figure 6.20 below. The calcaneus is the heel bone, and the talus bone forms the ankle joint with the tibia and fibula. The calcaneus and tarsus are two of the seven tarsal bones that are posterior to the first long bones of the foot, the metatarsal bones. The bones of the toes are phalanges, the same name used for finger bones.
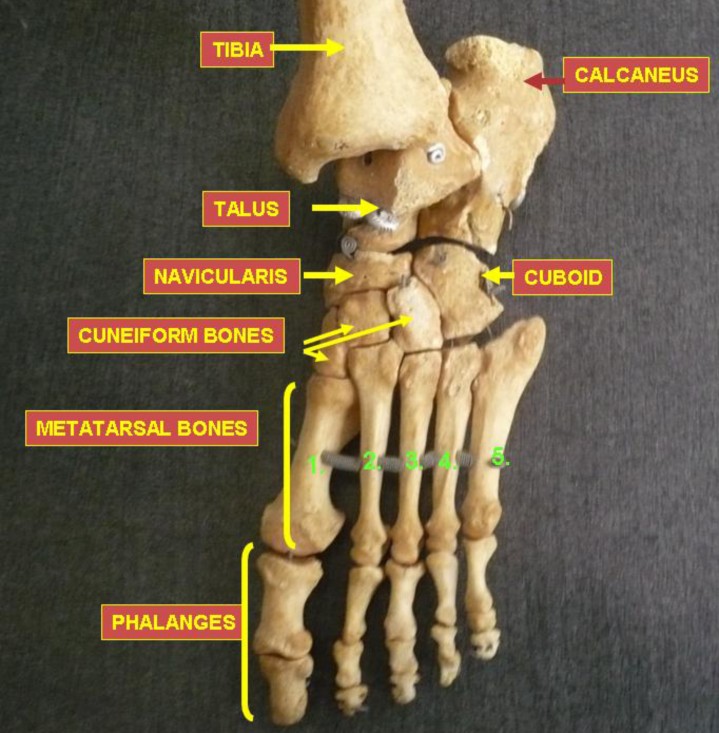
Figure 6.20. The bones of the left foot.
LAB 6 EXERCISE 6-5
Femur – Anatomical left from anatomical right.
1. Head - 2.
3.
4.
Tibia – Anatomical left from anatomical right.
1. Tibial tuberosity - 2.
3.
4.
Fibula – Anatomical left from anatomical right.
Calcaneus bone
1.
2.
3.
Talus bone
1.
2.
3.
LICENSES AND ATTRIBUTIONS
CC LICENSED CONTENT, ORIGINAL
- Using one of the full skeletons in the room, fill out the table below with three or four steps to determine whether an individual bone comes from the anatomical left or anatomical right. You must use any features that are already filled in.
- You can describe any features on that bone and which direction it has to face to allow you to determine whether that particular bone came from anatomical left or anatomical right.
- Sample instructions for the clavicle are provided as an example for all subsequent exercises. Use proper anatomical terminology. Use terms which will make sense to anyone schooled in anatomy if they read it. Use as many steps as you need, not necessarily four.
- Lateral malleolus - 2.
3.
4.
- Using one of the full skeletons again, fill out the tables below with three or four steps to determine how to distinguish the calcaneus bone from the talus bone.
- Use proper anatomical terminology. Use terms which will make sense to anyone schooled in anatomy if they read it. Use as many steps as you need, not necessarily three.
A&P Labs. Authored by: Ross Whitwam. Provided by: Mississippi University for Women. Located at: http://www.muw.edu. License: CC BY-SA: Attribution-ShareAlike
Figure 6-15. The bones of the left lower limb.. Authored by: Images in Figure 7-18 were made out of, or made from, content published in a BodyParts3D/Anatomography web site. The content of their website is published under the Creative Commons Attribution 2.1 Japan license. The author and licenser of the contents is http://lifesciencedb.jp/bp3d/?lng=en.. Located
at: . License: CC BY-SA: Attribution-ShareAlike
Figure 6-16. The left femur and its various processes and markings.. Authored by: Images in Figure 7-19 were made out of, or made from, content published in a BodyParts3D/Anatomography web site. The content of their website is published under the Creative Commons Attribution 2.1 Japan license. The author and licenser of the contents is http://lifesciencedb.jp/bp3d/?lng=en.. Located
at: . License: CC BY-SA: Attribution-ShareAlike
Figure 6-17. The left tibia and femur and their various processes and markings.. Authored by: Images in Figure 7-21 were made out of, or made from, content published in a BodyParts3D/Anatomography web site. The content of their website is published under the Creative Commons Attribution 2.1 Japan license. The author and licenser of the contents is
http://lifesciencedb.jp/bp3d/?lng=en.. Located at: . License: CC BY-SA: Attribution-ShareAlike
CC LICENSED CONTENT, SHARED PREVIOUSLY
Figure 6-18. The interosseous membrane of the left leg.. Authored by: Berichard. Located
at: https://commons.wikimedia.org/wiki/F...ia_Fibula1.png. License: CC BY-SA: Attribution-ShareAlike
Figure 6-19. The bones of the left foot.. Authored by: Anatomist90. Located at: upload.wikimedia.org/wikiped...7/Foot_bones_-
_tarsus%2C_metatarsus_and_phalanges.jpg. License: CC BY-SA: Attribution-ShareAlike
PUBLIC DOMAIN CONTENT
Figure 6-20. The Right patella.. Authored by: Palica . Located
at: commons.wikimedia.org/wiki/F...e:Patella_post
.jpg. License: Public Domain: No Known Copyright
:
:
13
5
18
15
6
*
Label the following:
Scapula Spine * Coracoid process * Acromion * Supra-spinous fossa * Infra-spinous fossa * Sub-scapular fossa * Glenoid cavity Humerus Head * Neck * (surgical and anatomical) * Trochlea * Capitulum * Olecranon fossa * Coronoid fossa * Radial fossa * Medial epicondyle * Lateral epicondyle * Greater tubercle * Lesser tubercle
1
12
2
3
4
14
7
8
16
9
10
11
17
19

Label the following:
Femur * Head * Neck * Greater trochanter * Lesser trochanter * Medial condyle * Lateral condyle * Medial epicondyle * Lateral epicondyle * Linea aspera Tibia * Medial malleolus * Tibial tuberosity. Fibula * Lateral malleolus Patella
5
6
16
7


15
4
12
14
8
2
1
13
3
9
10
11
Label the following:
Radius * Styloid process * Radial head * Radial tuberosity. Ulna * Olecranon * Trochlear notch * Coronoid process * Styloid process * Carpals * Scaphoid * Lunate * Triquetral * Pisiform * Trapezium * Trapezoid * Capitate * Hamate. Metacarpals
1
1
6
2
Phalanges * proximal * middle * distal Pollex
1
5
10
19
3
7
12
14
20
16
22
21
17
15
13
8
23
4
9
18
24
Label the following:
Tarsals * Talus * Calcaneus * Cuboid * Navicular * Medial,intermediate & lateral cuneiforms * Metatarsals Phalanges * proximal * middle * distal. Hallux


17
11
5
10
4
9
3
15
Clavicle * sternal end * acromial end
1
7
2
8
6
12
16
13
14
|
Easy difficulty |
Medium difficulty |
Hard difficulty |
|---|---|---|
|
fossa, Subscapular fossa. |
|
Easy difficulty |
Medium difficulty |
Hard difficulty |
|
trochanter. |
||
Table 6.1: Upper Limb
Table 6.2: Lower Limb
- Bones:
- Clavicle, Scapula
- Humerus, Ulna, Radius,
- Metacarpals, Carpals (group),
- Phalanges (distal, medial, proximal)
- Bones
- Scaphoid, Lunate, Triquetral, Pisiform,
- Trapezium, Trapezoid, Capitate, Hamate.
- Pollex
- Humerus landmarks:
- Head
- Medial & Lateral epidondyles.
- Humerus landmarks :
- Anatomical neck, Surgical neck
- Greater & lesser tubercles
- Deltoid tuberosity
- Trochlea, Capitulum.
- Humerus landmarks:
- Coronoid fossa, Olecrannon fossa, Radial fossa.
- Ulna landmarks:
- Olecranon process.
- Ulna landmarks :
- Coronoid process, Trochlear notch, Styloid process.
- Radius landmarks :
- Head
- Styloid process.
- Ulna landmarks:
- Radial notch.
- Radius landmarks
- Radial tuberosity.
- Clavicle landmarks:
- Acromial end, Sternal end.
- Clavicle landmarks:
- Conoid tubercle.
- Scapula landmarks :
- Acromion, Coracoid process
- Glenoid cavity
- Spine.
- Scapula landmarks
- Supraspinous fossa, Infraspinous,
- Bones:
- Ilium, Ischium, Pubis,
- Femur, Patella, Tibia, Fibula,
- Tarsals (group), Metatarsals.
- Bones
- Talus
- Calcaneus
- Bones
- Cuboid
- Navicular
- Cuneiforms: medial, intermediate, lateral
- Hallux
- Hip landmarks:
- Pubis symphysis
- Hip landmarks
- Acetabulum
- Obturator foramen
- Iliac crest
- Hip landmarks:
- Anterior Superior Iliac spine
- Anterior Inferior Iliac spine
- Posterior Superior Iliac spine
- Posterior Inferior Iliac spine
- Greater sciatic notch
- Iliac fossa
- Ischial tuberosity
- Ischial spine
- Femur landmarks:
- Head
- Neck
- Greater trochanter , Lesser
- Femur landmarks :
- Lateral & medial condyles
- Lateral & medial epicondyles
- Femur landmarks:
- Fovea capitis
- Gluteal tuberosity
- Linea aspera
- Tibia landmarks :
- Medial malleolus.
- Fibula landmarks:
- Lateral malleolus.
- Tibia landmarks:
- Tibial tuberosity