
5.17: Paramedian Forehead Flap Nasal Reconstruction Surgical Technique
- Page ID
- 53289

OPEN ACCESS ATLAS OF OTOLARYNGOLOGY, HEAD & NECK OPERATIVE SURGERY
PARAMEDIAN FOREHEAD FLAP NASAL RECONSTRUCTION SURGICAL TECHNIQUE
Brian Cervenka, Travis Tollefson, Patrik Pipkorn
The paramedian forehead flap is a versatile pedicled flap based on the supratrochlear artery and is commonly used for nasal reconstruction. First described in 700 BC in ancient Indian literature by Sushruta Samita to reconstruct nasal defects from punitive tip amputation, it has subsequently become a workhorse of nasal reconstruction requiring more than 2 cm soft tissue replacement on the external and internal nose 1-3.
Benefits of paramedian forehead flap
The paramedian forehead flap is simple to harvest, causes minimal donor site deformity, provides a large amount of skin and subcutaneous tissue that can be used for complete external and internal nasal defects, and has a robust vascular supply allowing successful flap inset even when perichondrium or periosteum of the recipient site has been removed or there is poor vascular supply. Drawbacks include that it is a 2-stage procedure, and transfer of hair bearing tissue in patients with a low-lying hairline to the external nose.
Framework concept of nasal reconstruction
The nose is composed of an internal mucosal lining, a cartilaginous and bony framework, and a cutaneous soft tissue envelope. It is critical to replace these removed subunits. If the overlying soft tissue is resected together with cartilage, a paramedian forehead flap must be accompanied by cartilaginous/bony framework reconstruction with cartilage or bone, based on preference and defect size. The authors prefer to use auricular cartilage when possible. If internal mucosal lining is missing as well, one must consider internal nasal grafts from adjacent tissue, or free grafts.
Surgical anatomy
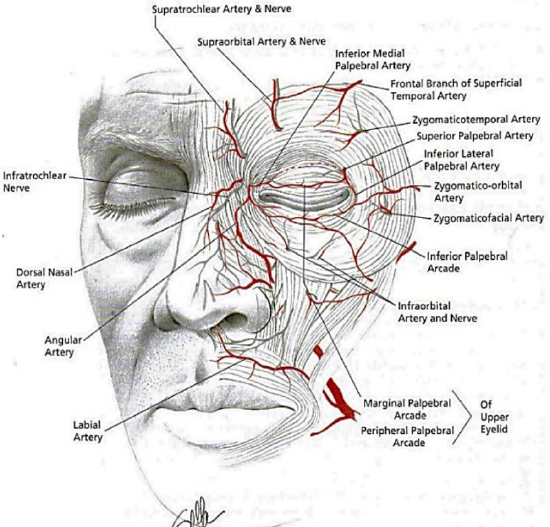
Figure 1: Superficial facial anatomy showing relationship of orbicularis oculi and supratrocheal artery
The paramedian forehead flap is based on an axial blood supply from the supratrochlear artery, which exits the orbit 1.7-2.2 cm lateral to the midline at the level of the superior orbital rim4 (Figure 1).
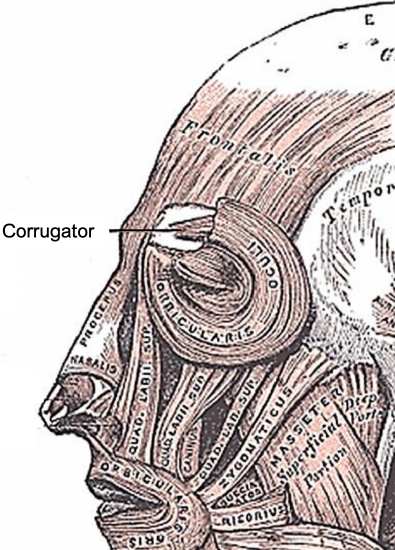
Figure 2: Facial muscles
It then travels deep to the orbicularis oculi and superficial to the corrugator supercilii muscle (Figure 2). It then penetrates the orbicularis and frontalis muscles at the level of the brow to run in a subcutaneous and subdermal plexus approximately 2 cm from midline or approximately at the level of the medial brow 4.
Informed consent
Discussion of specific risks related to paramedian forehead flaps include
- Flap loss
- Need for revision surgery
- Loss of sensation around the forehead
- Open wound and resultant scar over the superior aspect of the forehead
- Risk of bleeding, especially initially as the under surface of the flap is exposed
- Ensuring the patient understands that the pedicle of the flap will only be divided ~3 weeks after the initial surgery
Surgical technique
- The flap includes epidermis, dermis, subcutaneous tissue, frontalis muscle and associated fascia
- For nasal contouring, the frontalis muscle can be removed distally as well as the bulk of subcutaneous tissue, as the vascular supply has a large subdermal plexus component
- The supratrochlear nerve which provides sensation to the paramedian forehead is sacrificed as part of the pedicle division and therefore should not be isolated and preserved (Figure 1)
Prepping and draping
- Shave up to the anterior hairline and expose this region if a need for additional pedicle length is possible
- Prep with a betadine-based solution into the hairline and the entire face
- Prep and expose the ears if one anticipates a need to harvest conchal cartilage
Preparing the nasal defect
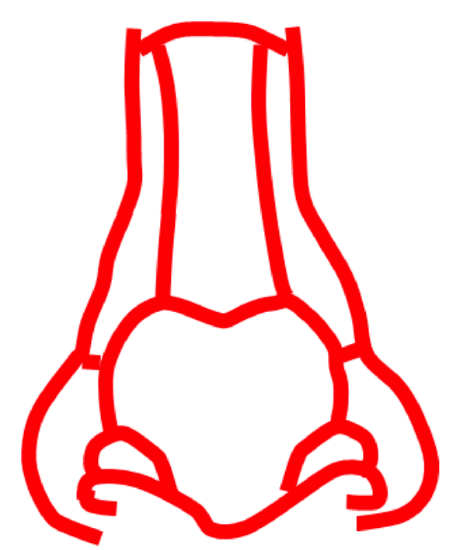
Figure 3: Nasal subunits
- Draw the nasal subunits and consider removing entire subunits when >50% has been resected (Figure 3)
- Reduce the size of the nasal defect
- Inject vasoconstrictive local anesthetic around the margins of the defect
- Undermine the defect in a supraperichondrial plane to mobilize the edges which will aid closure
- Reduce the nasal defect by local wound closure, or by performing a laterally based cheek flap (Figures 18, 19)
- The flap can be attached by anchoring sutures to the piriform aperture by drilling small holes in the bone
Making a template
- Using a template of the exact size and shape of the defect is a precise way to design a flap
- Dry the edges of the defect and mark them with a surgical pen so there is excess ink at the edges
- Use the unmarked internal surface of the foil of a suture packet, open it up completely so that the surface area is maximized, and press it onto the defect so that the inked margins are transferred onto the foil
Figure 4: Foil nasal template cut to size of defect
- Cut the foil along the inked lines with scissors to create a template (Figure 4)
Skin paddle design
- We typically harvest from the side contralateral to the nasal defect to allow for ease of rotation; however, one can use the ipsilateral side if there is scar or other prohibiting factors
- Skin paddle design is critical for good cosmetic and surgical outcomes
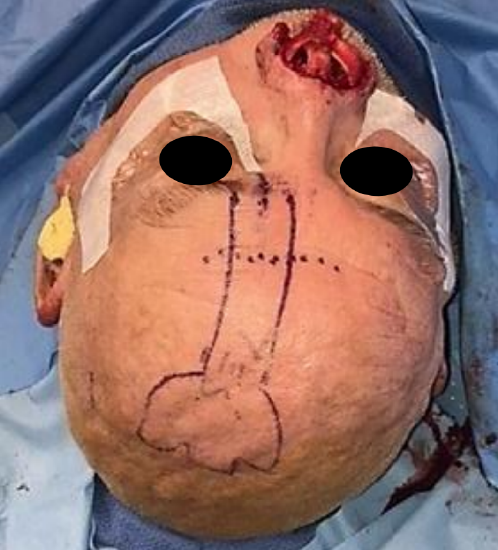
Figure 5: Pedicle drawn from nasal defect foil template with length estimated by the gauze
- Draw the pedicle location as described above (Figure 5)
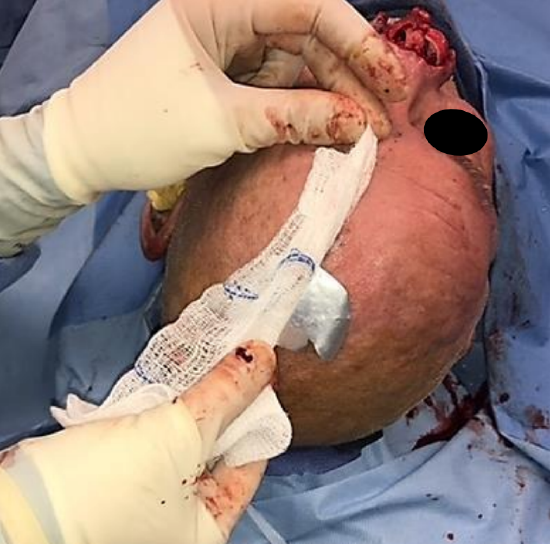
Figure 6: Gauze being used to determine forehead pedicle length (based on pedicleto-nasal-defect marking)
- Use gauze or string from a sponge to determine how far superiorly the skin paddle must be taken from the forehead/scalp to cover the entire defect (Figure 6)
- It needs to be emphasized that it is better to err on the side of having excess flap length
- Repeat the length measurement to ensure accuracy
- Draw the position of the supratrochlear artery approximately 2 cm from midline (Figure 5)
- Place the shaped foil template on the forehead and draw the flap on the skin
- The pedicle is narrowed towards the supratrochlear artery but is not narrowed to less than 1.5 cm (Figure 5)
Harvesting the flap
- Inject vasoconstrictive local anesthetic around the flap, but not directly into the flap to avoid vasoconstrictive complications

Figure 7: Distal tip being elevated in a subcutaneous layer
- Starting at the tip of the pedicle, incise through skin and subcutaneous tissue using skin hooks to generate tension and to pull the skin up and away from the periosteum (Figure 7)
- One can harvest the distal segment of the flap in a subcutaneous plane to allow for thinning of the nasal contour, as illustrated in Figure 7.
- You will feel the galea aponeurotica separate as it is released from the scalp when this layer is entered
- Incise 5 cm at a time down each of the lateral margins of the pedicle, ensuring to dissect down to and through galea
- Once the tip has been mobilized, finger dissection can be used in the loose galeal layer to establish a plane heading inferiorly toward the pedicle and making it easy to define the dissection plane
- You will recall that the supratrochlear vessels penetrate the frontalis muscle at the level of the brow to then travel superficial to the muscle
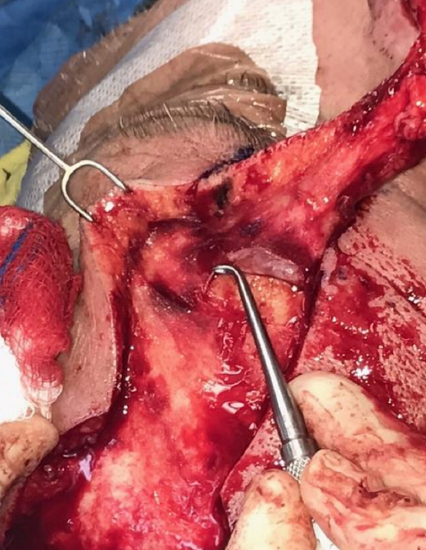
Figure 8: Supratrochlear artery and nerve demonstrated with elevator as dissection plane is changed to a subperiosteal plane
- Therefore, deepen the dissection to a subperiosteal plane to protect the vascular pedicle once you reach the superior aspect of the brow (Figure 8)
- This is achieved by incising the periosteum with a 15 blade and then using a a Freer’s dissector to blunt dissect inferiorly in this plane
- If the pedicle is long enough that it reaches without tension, then stop dissecting the pedicle. However, if there is tension on the pedicle, then continue to dissect through the corrugator muscle, as this step provides significant additional length
- Prior to insetting the flap, assess the blood supply of the flap at the tip by rubbing it with a dry swab and by assessing for bleeding
Insetting the flap
- Before insetting the flap, you should already have reconstructed any internal lining or cartilaginous defects. We typically use conchal cartilage to replace resected nasal cartilage.
- If the flap comes from a hair-bearing region, one can cauterize individual hair follicles…this can be done at a later time
- The flap is set into the defect and its thickness assessed
- Some loss of flap volume is expected to occur with healing
- As the blood supply to the skin runs in the subdermal plexus, it is feasible to thin the flap to the subcutaneous plane by removing the frontalis muscle
- Secure the flap using interrupted deep dermal 4-0 monocryl sutures and 6-0 nylon interrupted cutaneous sutures
- Loosely wrap the undersurface of the pedicle with xeroform to prevent postoperative bleeding from the wound edges
Closing the donor site
- The donor site is then closed using interrupted deep dermal 3-0 Vicryl sutures and 6-0 interrupted nylon cutaneous sutures and 5-0 nylon in the hairline
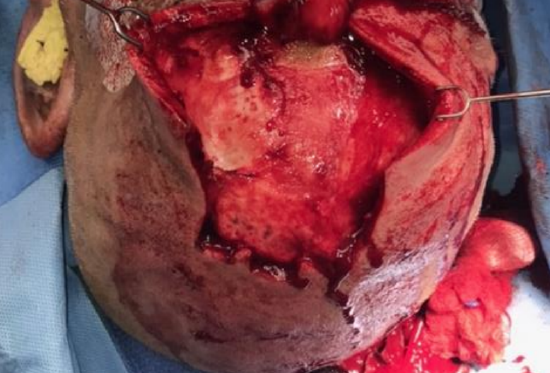
Figure 9: Undermining and galeotomies performed to increase skin laxity and primary closure
- If a large skin paddle was raised, primary closure of the donor site is difficult. In such cases we perform multiple lateral vertical cuts through the galea 2-3 cm apart with electrocautery to increase the skin mobility (Figure 9)
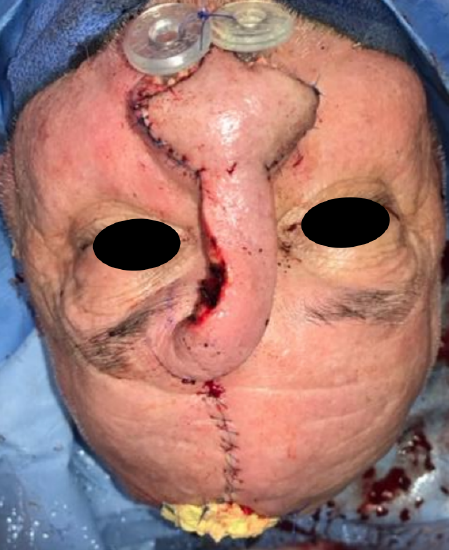
Figure 10: Following closure with residual superior skin defect, which is common, heals well with local wound care
- It is common to have a small remaining defect superiorly that is packed with Xeroform gauze and left to heal by secondary intention. This is encountered when the flap size is greater than 4.5 cm, but the cosmetic outcome is favorable and secondary scar revision is often not even necessary (Figure 10)
- Both wounds are covered with steristrips
- Before reversing the anesthetic, prick the flap with a 25G needle. Bright red blood indicates a good blood supply
Postoperative care
- The wound is kept moist and free from crusting using dilute hydrogen peroxide in saline or sterile water and antibiotic ointment applied after cleaning twice daily
- Sutures are removed between Days 5 and 7
Pedicle division
- The pedicle is divided 3 weeks later, once neovascularization has occurred and the flap has gained a local blood supply
- Pedicle division has three basic goals:
1. Dividing and insetting the superior aspect of the flap
2. Thinning the flap if necessary
3. Elevating the brow where it was previously drawn inferiorly with the pedicle
- The pedicle is typically divided under general anesthesia at our institution, but can be done under local anesthesia
- Prep and drape and keep the entire face exposed
- Inject local anesthetic with a vasoconstrictive agent into both the brow and nasal reconstruction
- Place a clamp on the pedicle at the intended division site, ensuring enough distal pedicle length for proper inset
- Divide the pedicle
- Perform the nasal inset by thinning the pedicle in a subcutaneous plane and then trimming it to fit the residual defect
- An option at this stage is to elevate and thin the entire flap in the subcutaneous plane if there is excess bulk, using the previous incision lines
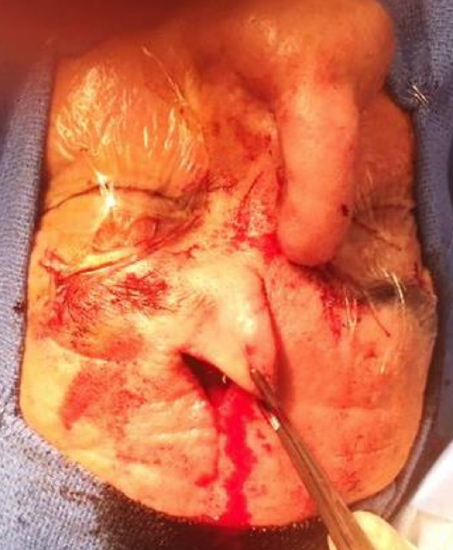
Figure 11: Pedicle had been divided (note divided pedicle inferiorly); now correcting donor eyelid position with triangular advancement flap
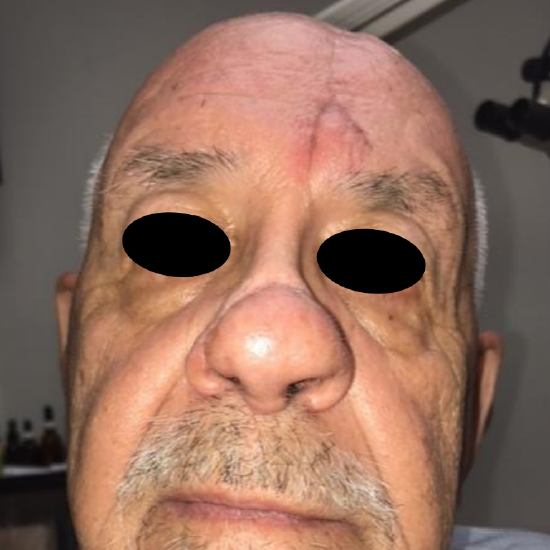
Figure 12: One month following flap takedown; note triangular advancement flap
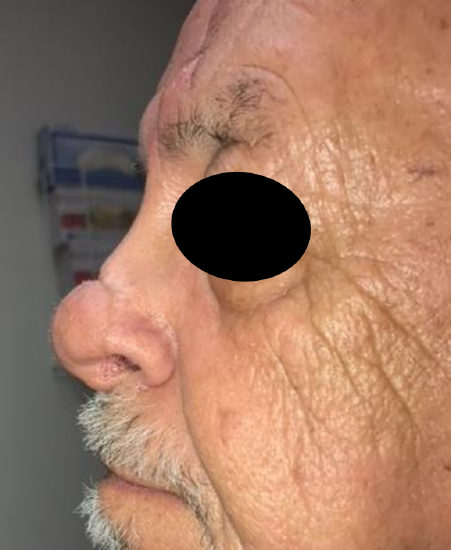
Figure 13: One month following flap takedown
- Next turn your attention to the brow and elevating a triangular rotation advancement flap to raise the medial brow to the level of the contralateral brow (Figures 11, 12)
- The pedicle is then thinned proximally and inset
More clinical examples
Figures 14-17 are of a patient with soft tissue breakdown and exposure of titanium mesh following a previous resection and reconstruction with a soft tissue free flap.
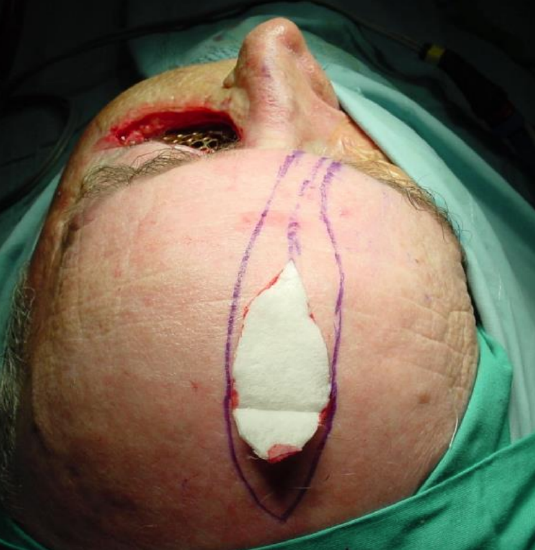
Figure 14

Figure 15

Figure 16
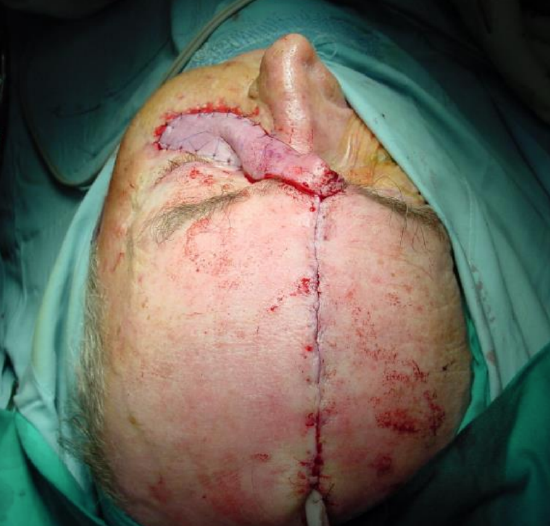
Figure 17
Figures 18-23 illustrate the laterally based cheek flap to reduce the nasal defect, the vascular pedicle and repair of a lateral nasal defect.
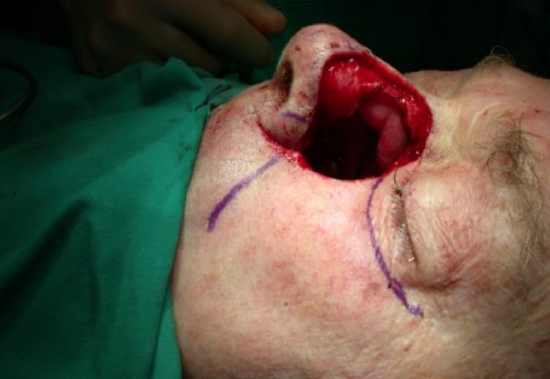
Figure 18
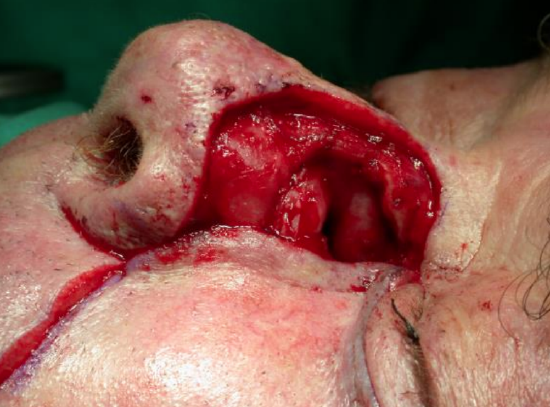
Figure 19
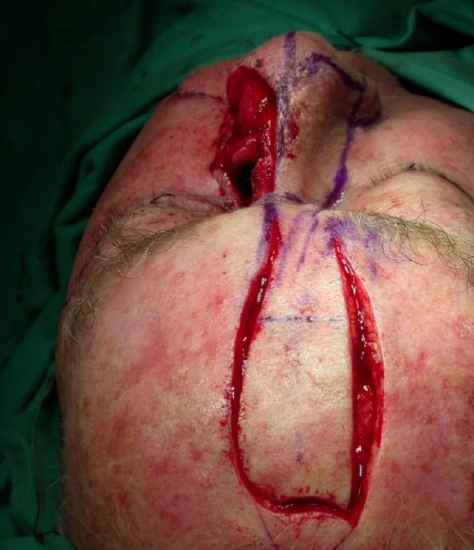
Figure 20
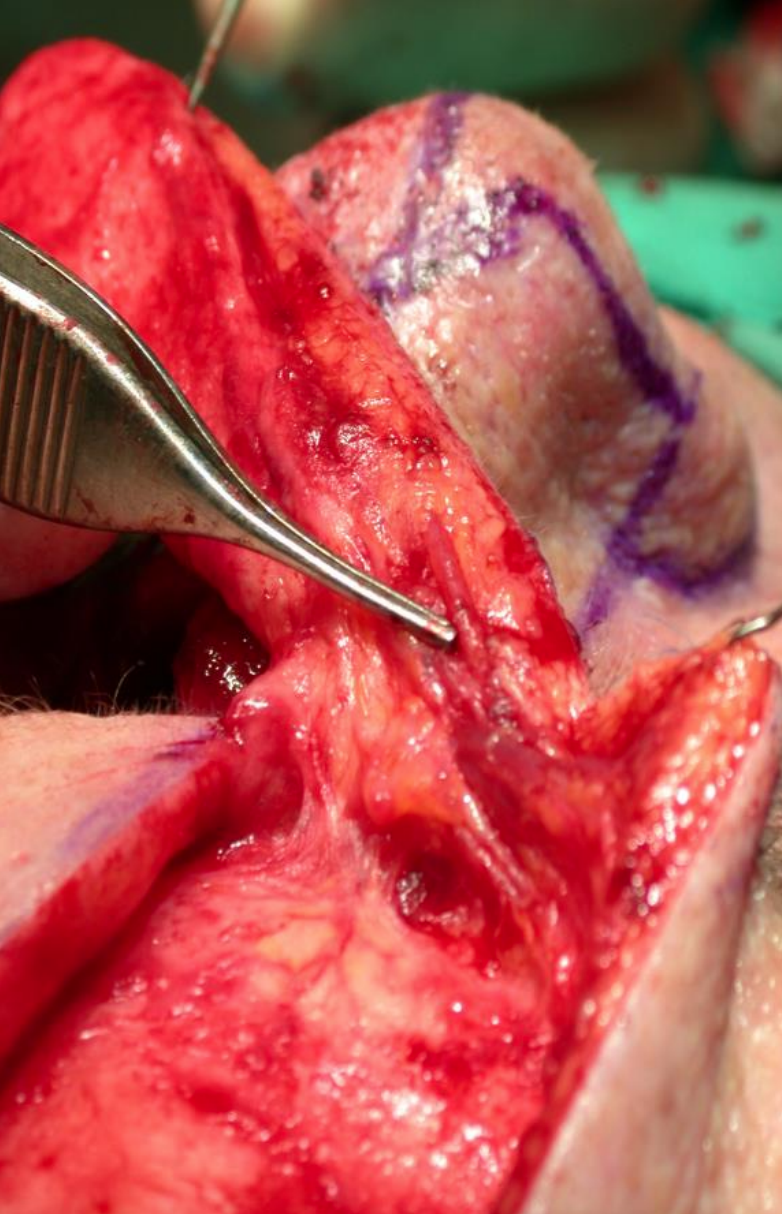
Figure 21: Vascular pedicle
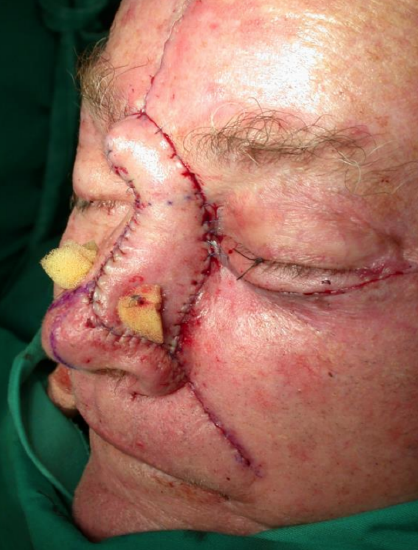
Figure 22
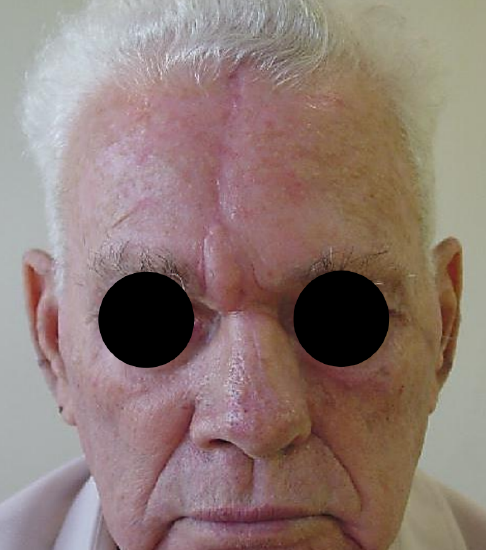
Figure 23
References
- Burget GC, Menick FJ. Nasal support and lining: the marriage of beauty and blood supply. Plast Reconstr Surg. 1989;84(2):189-202
- Conley JJ, Price JC. The midline vertical forehead flap. Otolaryngol Head Neck Surg. 1981;89(1):38-44
- Jackson I. Local Flaps in Head and Neck Reconstruction. Mosby; 1985
- Baker S. Local Flaps in Facial Reconstruction. St. Louis, Missouri: Mosby; 2007
Other flaps described in The Open Access Atlas of Otolaryngology Head & Neck Operative Surgery
- Pectoralis major flap
- Buccinator myomucosal flap
- Buccal fat pad flap
- Nasolabial flap
- Temporalis muscle flap
- Deltopectoral flap
- Upper and lower trapezius flaps
- Cervicofacial flaps
- Submental artery island flap
- Supraclavicular flap
- Latissimus dorsi flap
- Local flaps for facial reconstruction
- Radial free forearm flap
- Free fibula flap
- Rectus abdominis flap
- Anterolateral free thigh flap
- Thoracodorsal artery scapular tip (TDAST) flap
- Principles and technique of microvascular anastomosis for free tissue transfer flaps in head and neck reconstructive surgery
Authors
Brian P. Cervenka MD
Department of Otolaryngology, Head and Neck Surgery
University of California, Davis, Sacramento, CA, USA
bcervenka@ucdavis.edu
Travis Tollefson MD
Department of Otolaryngology, Head and Neck Surgery
University of California, Davis, Sacramento, CA, USA
tttolefson@ucdavis.edu
Patrik Pipkorn MD
Assistant Professor
Head & Neck Microvascular Reconstruction
Department of Otolaryngology, Head and Neck Surgery
Washington University
St Louis, MO, USA
patrikpipkorn@hotmail.com
Editor
Johan Fagan MBChB, FCS(ORL), MMed
Professor and Chairman
Division of Otolaryngology
University of Cape Town
Cape Town, South Africa
johannes.fagan@uct.ac.za