
2.7: Mastoidectomy and Epitympanectomy
- Page ID
- 17698

OPEN ACCESS ATLAS OF OTOLARYNGOLOGY, HEAD & NECK OPERATIVE SURGERY
MASTOIDECTOMY & EPITYMPANECTOMY
Tashneem Harris & Thomas Linder
Chronic otitis media, with or without cholesteatoma, is one of the more common indications for performing a mastoidectomy. Mastoidectomy permits access to remove cholesteatoma matrix or diseased air cells in chronic otitis media. Mastoidectomy is one of the key steps in placing a cochlear implant. Here a mastoidectomy allows the surgeon access to the middle ear through the facial recess. A complete mastoidectomy is not necessary; therefore, the term anterior mastoidectomy is often used (anterior to the sigmoid sinus). A mastoidectomy is often an initial step in lateral skull base surgery for tumors involving the lateral skull base, including vestibular schwannomas, meningiomas, temporal bone paragangliomas (glomus tumors), and epidermoids or repair of CSF leaks arising from the temporal bone.
Definition of Cholesteatoma
Cholesteatoma is a chronic middle ear infection with squamous epithelium and retention of keratin in the middle ear and/ or temporal bone with progressive bone erosion. A middle ear atelectasis does not retain keratin, although it also reveals skin in the middle ear space due to the retraction pocket.
Aims of Cholesteatoma Surgery
- Eradication of disease and preventing residual disease
- Improving middle ear ventilation and preventing recurrent disease
- Creating a dry, self-cleansing cavity
- Reconstitution of the hearing mechanism
Types of Mastoidectomy
The terminology around mastoid surgery is not uniform. In fact, several terms are used to describe the different types of mastoidectomy as summarized in Table 1.
| Canal wall up mastoidectomy | Canal wall down mastoidectomy |
|---|---|
| Combined approach | Radical mastoidectomy |
| Intact canal wall mastoidectomy | Modified radical mastoidectomy |
| Closed technique | Open technique |
| Front-to-back mastoidectomy | |
| Atticoantrostomy | |
| Open mastoidoepitympanectomy |
One of the problems is that the terminology does not in fact entail specific information about what was done either to the middle ear or the mastoid. It is the authors’ preference to use the terms open/closed mastoidoepitympanectomy and to state separately whether a tympanoplasty or ossiculoplasty was done e.g. left open mastoidoepitympanectomy and tympanoplasty type III.
The most commonly used terms for canal wall down mastoidectomy are radical or modified radical mastoidectomy. The classical radical mastoidectomy is not favored by the authors as it results in a large cavity which frequently discharges and therefore does not satisfy the ultimate goal of mastoid surgery which includes having a “trouble free” cavity.
The method of open and closed mastoidoepitympanectomy as described in this text is standard. Common to both open and closed mastoidoepitympanectomy is the bony work involving the mastoid cavity. It involves first identifying the important landmarks (= skeletonization = leaving a thin shelf of bone covering the important structure) before removing the disease and maximum exposure for complete exenteration of the disease.
A closed technique, keeping the posterior canal wall in place and working transcanal (following a proper canalplasty) and transmastoid (with or without posterior tympanotomy) is suggested in moderately pneumatized and ventilated ears with sufficient exposure to remove the disease.
Open mastoidoepitympanectomy involves complete exenteration of the mastoid air cell system (e.g. retrosigmoid, retrofacial, perilabyrinthine) and the epitympanum (removal of incus and malleus head, exenteration of the supralabyrinthine and supratubal cells) and is indicated in poorly pneumatized and ventilated ears with limited access and exposure. It requires skeletonization of the facial nerve along the mastoid segment to lower the posterior canal wall to the facial nerve (still covered by bone). The mastoid area behind the facial nerve is later obliterated with a muscle flap to keep the volume of the final cavity low and avoid discharging ears.
The other method of “canal wall down” mastoidectomy is front-to-back mastoidectomy. Surgeons may elect this approach when it has been decided in advance that the canal wall will be taken down e.g. with a sclerotic mastoid. The principles of this method are that one follows the disease, i.e. the mastoid is only opened as far as the extent of the disease. The only problem with this approach is that one must be certain that there are no more mastoid cells present as incomplete exenteration will cause a discharging cavity.
Surgical Terminology
Canalplasty: Enlargement of the external ear canal while avoiding injury to the temporomandibular joint anteriorly and the mastoid air cells posteriorly
Epitympanotomy: Partial removal of the lateral wall of the attic to expose the head of the malleus and incus in order to remove soft tissue pathology in the epitympanum; the ossicles are left in place
Epitympanectomy: Removal of the lateral wall of the attic, with removal of the incus and head of malleus and with exenteration and exteriorisation of supralabyrinthine cells
Cortical mastoidectomy: Also referred to as simple mastoidectomy, it entails exenteration of the mastoid air cells and is performed most commonly for acute mastoiditis
Posterior tympanotomy: Drilling away of the bone between the pyramidal (mastoid) segment of the facial nerve, and the lateral bony canal and chorda tympani resulting in access to the middle ear from the mastoid. Posterior tympanotomy may be done for the following reasons:
- As part of a closed mastoidoepitympanectomy (combined approach) when removing cholesteatoma
- To remove pus from the region of the round window in acute bacterial or viral otitis media with sensorineural hearing loss
- To provide access to the promontory or round window in cochlear implant surgery and access to incus or round window with insertion of the Vibrant Soundbridge
Closed mastoidoepitympanectomy with tympanoplasty: This includes a canalplasty, mastoidectomy, epitympanectomy, (posterior tympanotomy) and tympanoplasty. The external bony canal is preserved. The drawback of this approach is the limited view into the anterior epitympanum and the sinus tympani in cases of limited pneumatisation and cholesteatoma formation
Open mastoidoepitympanectomy (with obliteration): This involves the radical exenteration of the tympanomastoid tracts with exteriorization of the surgical cavity and lowering of the posterior bony canal wall to the level of the skeletonized facial nerve. In order to reduce the size of the cavity, especially with moderately-well pneumatized mastoids, the mastoid tip is removed and a myosubcutaneous occipital flap is created to reduce the size of the cavity. Meatoplasty is routinely performed.
Open/Closed Mastoidoepitympanectomy
Age is not a limiting factor as children behave equally well with open MET’s as do adult patients!
Deciding whether to do open or closed cavity mastoidoepitym-panectomy may depend on the factors listed in Table 2.
| Factor | Closed MET | Open MET |
| Extent of disease |
Limited Primary surgery with sufficient space |
Large cholesteatoma Labyrinthine fistula Other complications Recurrent cholesteatoma after previous closed MET |
| Pneumatization | Good pneumatization | Poor pneumatization |
| Aeration | Air in middle ear and mastoid air cells |
Glue in middle ear Granulation tissue in mastoid air cells Bleeding |
| Follow-up | Good 5-year follow-up anticipated | Poor 5-year follow-up anticipated |
Table 2: Indications for closed vs. open cavity mastoidoepitympanectomy (MET)
Applied Anatomy
Knowledge of middle ear and temporal bone anatomy is vital to understanding the concepts of surgical management. It is imperative to practice the surgery and learn the 3-dimensional temporal bone anatomy in a temporal bone laboratory. The important landmarks and structures will be highlighted with the surgical steps.
Preoperative assessment
History
Patients with chronic ear disease frequently have a longstanding history of hearing loss or chronic otorrhoea. It is important to establish whether there is a history of previous surgery. Foul smelling otorrhoea is a clear hint of cholesteatoma.
Otomicroscopy
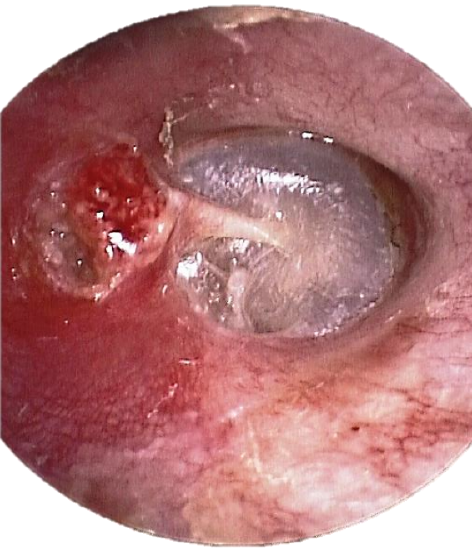
Figure 1: Right ear: Granulation tissue in the attic and a retracted tympanic membrane; bony erosion of the superior canal wall; lenticular and long process of the incus is present with retraction of posterosuperior quadrant of tympanic membrane; tympanic membrane is in direct contact with the stapes superstructure (myringostapediopexy)
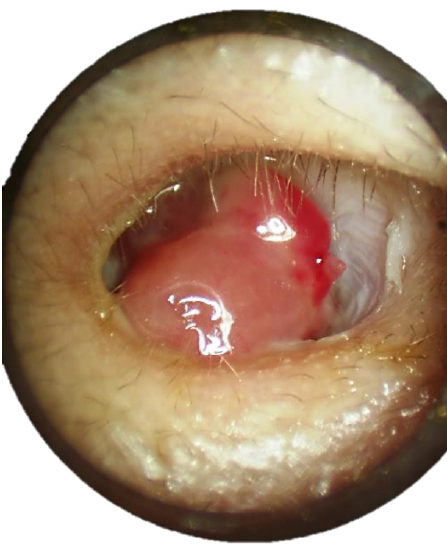
Figure 2: Right ear: Polyp obscuring posterosuperior retraction pocket
This is an important means to determine the presence of cholesteatoma and it helps to define the extent of disease. The ear should be thoroughly cleaned of secretions and debris. Findings may include a retraction pocket with accumulation of keratin in the attic or in the posterosuperior quadrant of the tympanic membrane, granulation tissue or a polyp (Figures 1 & 2). A polyp “signals” an underlying cholesteatoma.
Pneumatic otoscopy
This should be routinely performed to determine the presence of a positive fistula response. A negative response however does not exclude a fistula.
Audiology
Pure tone audiometry should be obtained with air and bone conduction, and also speech reception thresholds should be determined. These should be done within 3 months of surgery.
High resolution CT (HRCT) scan
All patients undergoing surgery should ideally have preoperative imaging as HRCT (0.5 mm cuts) is invaluable for both for diagnosis and surgical planning. Preoperative counseling is mandatory with any surgical procedure. Information gained from the CT scan enables the surgeon to discuss in detail with the patient what the surgical goals and risks of the surgery are, as well as the possibility of a staged procedure and follow-up routine.
Diagnostic value of HRCT
- Specificity is poor with mass lesions which may include granulation tissue, secretions, cholesterol granuloma or a neoplasm
- It therefore cannot be used to definitively diagnose cholesteatoma, which remains a clinical diagnosis based on otoscopic findings
- Findings highly suggestive of cholesteatoma include the presence of an expansile soft tissue mass; retraction of the tympanic membrane; erosion of the scutum; erosion of the ossicles; sharp erosion of bone; extension of the lesion medial to the otic capsule; and erosion of the tegmen tympani
Surgical planning with HRCT
HRCT of the temporal bone is the otologist’s road map and one should have a systematic approach when evaluating the CT scan. The decision whether to do an open or closed cavity operation depends on the degree of pneumatization and ventilation of the temporal bone and extent of disease, all of which can be determined on HRCT. Axial as well as coronal images are needed for preoperative evaluation and should always be in the operating theater and visible to the surgeon as intraoperative reference (and not in the patient’s chart!)
CT scan checklist
- Pneumatization: The temporal bone may be well pneumatized, may have reduced pneumatization, or be sclerotic. This gives important information about what the eustachian tube function during the first 4 years of the patient’s life was like. It is important to assess the pneumatization of the petrous apex as well. Poor ventilation favours an open cavity procedure
- Ventilation: This is assessed by the aeration of the middle ear and mastoid air cells. Opacification of the middle ear or mastoid cells suggests poor ventilation of the middle ear cleft. This gives the best information about eustachian function at the present time. Poor ventilation of already-impaired pneumatized cell tracts favors an open cavity procedure
- Ear canal: Evaluate the thickness of the bone anteriorly and posteriorly. This is important when one needs to do a canalplasty as the anterior relation of the tympanic bone is the temporomandibular joint and posteriorly are mastoid air cells. These should not be breached when doing a canalplasty
- Size and presence of emissary vein: A large emissary vein can cause troublesome bleeding if not anticipated!
- Sigmoid sinus and its relation in the mastoid cavity: In children the sigmoid may be very close to the lateral surface of the mastoid; in adults a sigmoid sinus malformation may only be appreciated on preoperative CT scan. When the sigmoid sinus lies very anteriorly in the mastoid cavity it may be difficult to perform a posterior tympanotomy due to very limited exposure. In revision surgery, it is important to assess whether the sigmoid sinus has been exposed or whether it is still covered by bone. If the sigmoid sinus has been exposed at previous surgery, it will be covered with scar tissue which becomes difficult to elevate thus risking breaching the sinus when elevating the periosteal flap
- Jugular bulb: Is it high-riding (up to the level of annulus)? Is it dehiscent?
- Carotid artery: Is there dehiscence, especially at the level of the eustachian tube?
- Tegmen tympani: What is the shape of the tegmen? Is it flat or does it slope upwards with cells lying medial to it? Is it low-lying? Is it dehiscent? A bony defect of the tympanic tegmen or anterior wall of the epitympanum should raise the suspicion of an encephalocoele or cholesteatoma extending into the middle cranial fossa. This requires further imaging in the form of an MRI
- Facial nerve: The tympanic segment may be dehiscent, especially in children or in the presence of cholesteatoma. In cases of revision surgery, it is important to know whether the facial nerve has been left exposed in an open cavity when elevating the tympanomeatal flap
- Is there a fistula of the lateral semicircular canal?
- Extent of disease: Does it only involve the mesotympanum or does it extend further into the mastoid cavity? Is the petrous apex involved?
- Status of ossicular chain: Are the ossicles present or have they been eroded?
Preoperative preparation
Drugs: A single intravenous dose of amoxicillin with clavulanic acid and an antiemetic is given preoperatively. However, antibiotics are unnecessary with a dry ear, even in presence of a cholesteatoma. Low dose subcutaneous heparin is recommended to prevent deep vein thrombosis with prolonged surgery.
Positioning: The patient lies supine with the head rotated away from the surgeon. Avoid overextension in children; Down’s syndrome is associated with atlantoaxial subluxation.
Facial nerve monitoring: Avoid longacting muscle relaxants so that the facial nerve can be monitored.
Closed Mastoidoepitympanectomy
Skin Incision and flap
- Infiltrate the area of the postauricular skin incision as with local anesthetic (lidocaine 1% and adrenaline diluted to 1:200 000)
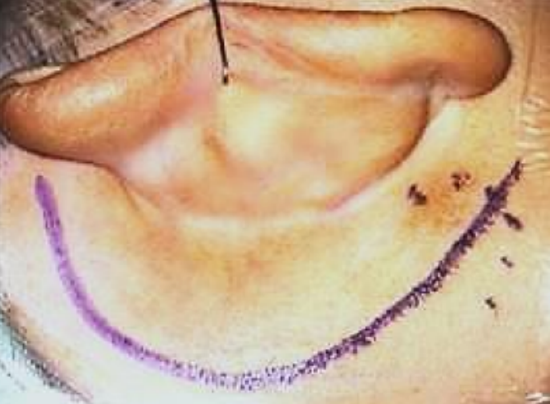
Figure 3: Postauricular skin incision (left ear)
- Make a curved skin incision about 1.5 cm behind the postauricular sulcus with a #10 blade extending from just above linea temporalis to the mastoid tip. Do not place the incision in the postauricular sulcus (Figure 3)
- When approaching the mastoid tip, the skin incision follows the skin tension lines which run directly inferiorly (not curved) towards the neck
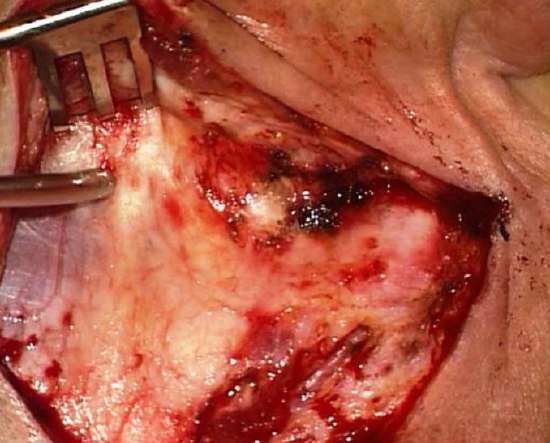
Figure 4: Flap elevated in plane just superficial to temporalis fascia
- Elevate the skin flap towards the external ear canal. Cut through the postauricular muscle to reach the correct plane just superficial to temporalis fascia. A large rake can be used to retract the pinna forward (Figure 4)
- For adequate exposure the superior incision must be made at the 12 o’clock position relative to the bony ear canal (Figure 4)
Periosteal flap
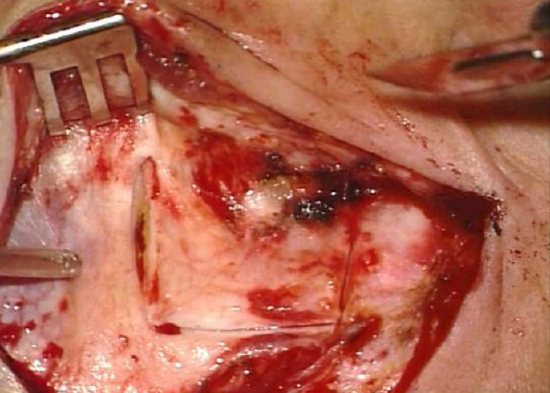
Figure 5: Periosteal flap
- An anteriorly based periosteal flap is developed, about 1.5 cm in length (Figure 5)
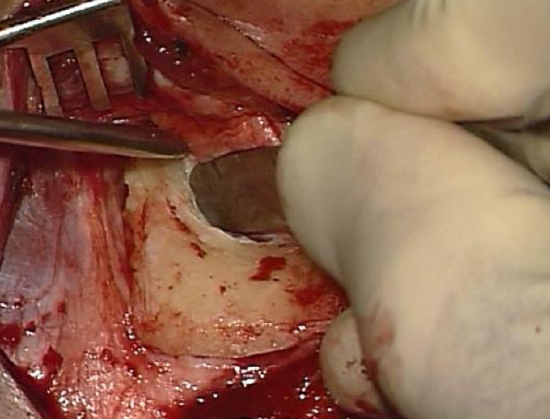
Figure 6: Raspatory used to elevate flap until spine of Henlé and the entrance to bony canal come into view
- A periosteal raspatory is used to elevate the flap from the bone until the spine of Henlé and the entrance to bony canal come into view (Figure 6)
- A sharp towel clip can be placed on the periosteal flap at the level of the ear canal to retract the pinna forward
- In an adult two self-retaining retractors are placed between the skin edges and soft tissue for exposure; one selfretaining retractor is usually sufficient in a child
Canalplasty
- If there are any bony overhangs a canalplasty is performed
- A canalplasty should always be done first as it defines the anterior limit of your mastoidectomy
- For a detailed description of the surgical technique readers are referred to the canalplasty chapter
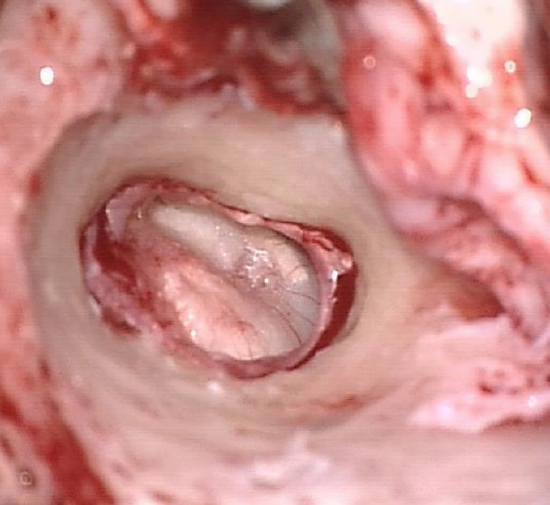
Figure 7: Completed canalplasty with entire annulus visible
- The entire annulus should be visible with one view of the microscope following canalplasty (Figure 7)
Elevation of tympanomeatal flap
- The posterior meatal skin flap is elevated towards the annulus using a microraspatory in one hand and a piece of ribbon gauze which has been soaked in adrenaline
- The microsuction is never placed directly onto the meatal skin for risk of injury of the skin flap
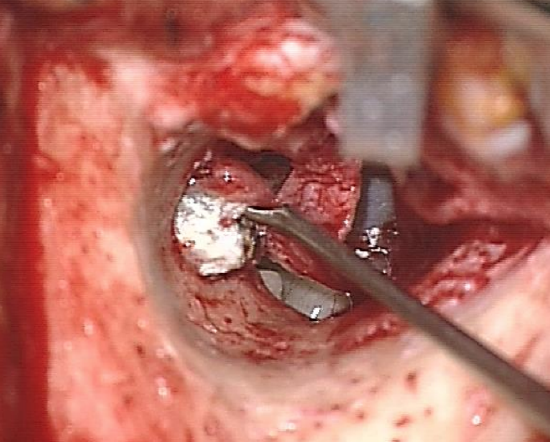
Figure 8: Tympanomeatal flap and annulus have been elevated and middle ear is entered below the pathological area
- Elevate the annulus from its sulcus away from the pathological area e.g. a posterior retraction pocket would preclude entering the middle ear at the level of the posterior tympanic spine as this would breach the cholesteatoma sac (Figure 8)
Inspection of middle ear
- The middle ear in Figure 8 has been entered at 6 o’clock after excluding a dehiscent jugular bulb on CT scan
- Define the extent of disease in the middle ear and around the ossicular chain
Division of incudostapedial joint
- To avoid causing a sensorineural hearing loss when working in the epitympanum, the incudostapedial joint is divided using a small joint knife
Antrotomy and Mastoidectomy
Note: Always perform antrotomy and/or mastoidectomy after the canalplasty has been done
- The principal surgical landmarks are linea temporalis superiorly, the bony ear canal and spine of Henlé anteriorly and the mastoid tip inferiorly
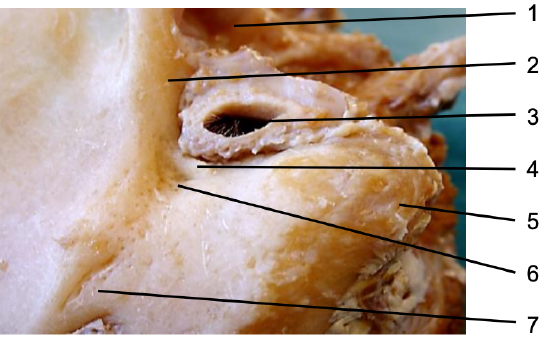
Figure 9: Surface markings of left ear: Temporomandibular joint (1); root of zygoma (2); external ear canal (3); suprameatal spine (4); mastoid tip (5); Macewen’s triangle (6); opening of emissary vein (7)
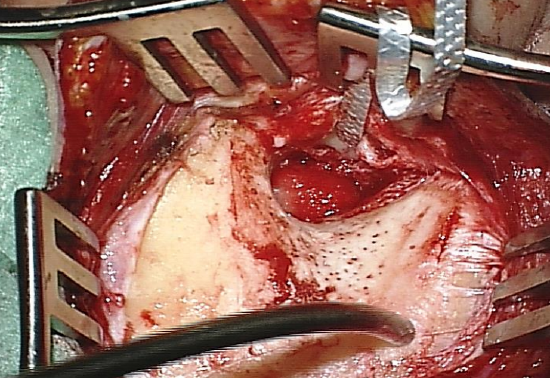
Figure 10: Completed bony exposure
- Identify and expose the surgical landmarks (Figures 9, 10)
- Using the mastoid raspatory, reflect the periosteal tissue superiorly in order to expose the linea temporalis; then reflect periosteum posteriorly where you may encounter an emissary vein, and inferiorly to the mastoid tip
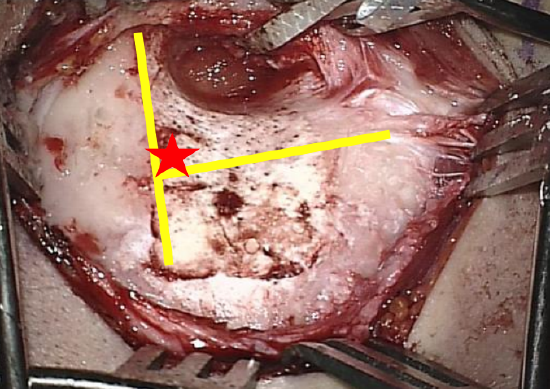
Figure 11: Yellow lines indicate where to drill; red star indicates where to commence drilling
- Identify Macewen’s triangle which is situated posterosuperiorly to the external auditory canal. It is bounded anteriorly by the Spine of Henlé and approximates the position of the antrum medially (Figure 10, 11)
Antrotomy
- A common mistake is to search for the antrum very low, thus endangering the facial nerve
- The safest way to finding the antrum is to follow dura
- The tegmen tympani marks the superior limit of the dissection
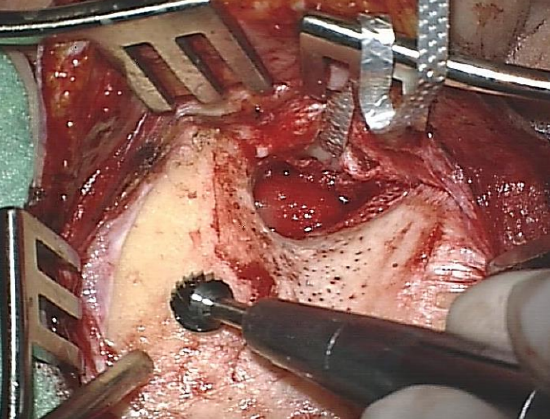
Figure 12: Drilling along linea temporalis
- Start drilling above linea temporalis (Figures 11, 12)
- Expose tegmen tympani (middle cranial fossa dural plate); it is identified by a change in color of the bone and change in pitch of the burr (Figure 13)
- Always skeletonize the dura of the middle cranial fossa (dura seen shining through thin layer of bone) and follow the dural plate of the middle cranial fossa in an anteromedial direction
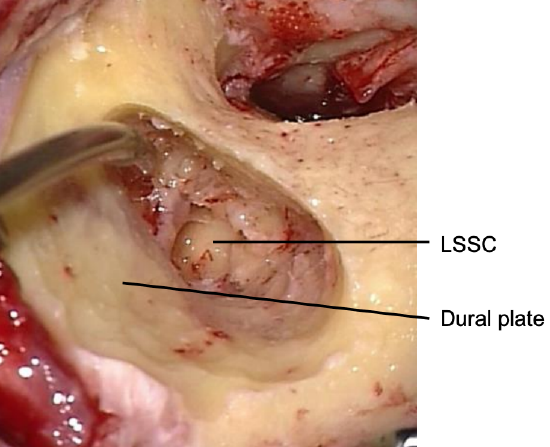
Figure 13: Dural plate and lateral semicircular canal
- The lateral semicircular canal is encountered next (Figure 13)
- The direction of the drilling now must be changed to a medial-to-lateral action to avoid touching the ossicles which would induce sensorineural hearing loss
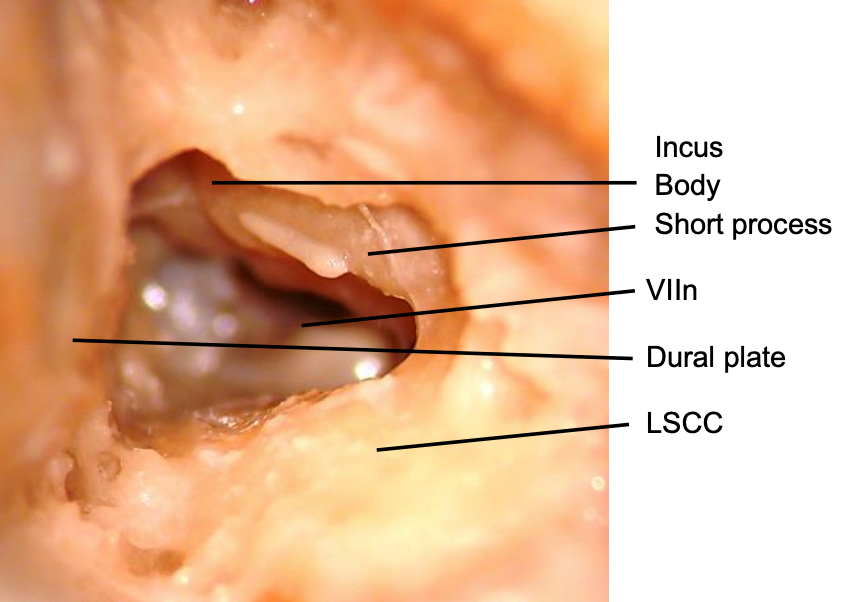
Figure 14: Postero-anterior view through antrotomy and aditus ad antrum into epitympanum
- The body and short process of incus are the next landmarks one encounters; the incus is often first identified by its refraction in the irrigation fluid (Figure 14)
- Medial to the incus the tympanic segment of the facial nerve (VIIn) is identified (Figure 14)
Drilling tips
- Avoid keyhole surgery; work through a wide space
- The tip of the drill should always be visible
- Never drill behind edges of bone
- Drilling should always be parallel to any structure you are trying to preserve e.g. facial nerve, sigmoid sinus
- When drilling deeper in the mastoid cavity the burr needs to be lengthened
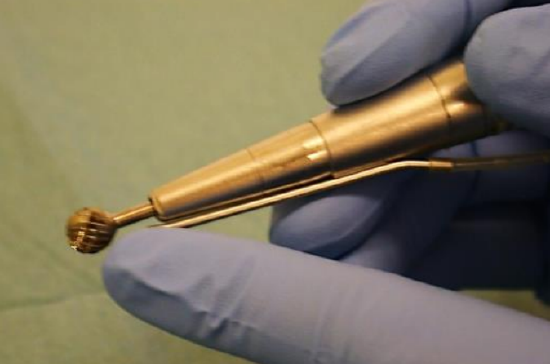
Figure 15: Correct length of a cutting burr in the drill
- One cannot lengthen a cutting burr as this will cause the drill to jump with the risk of injuring structures (Figure 15)
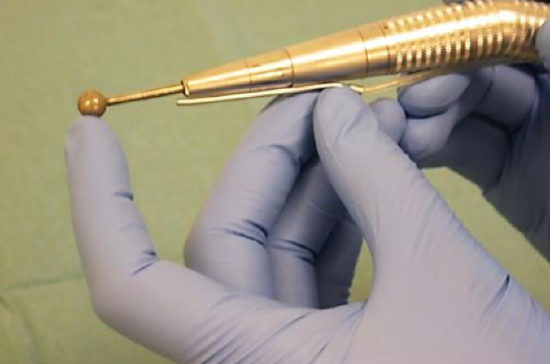
Figure 16: A diamond burr can be lengthened to safely drill deeper in the mastoid
- Therefore, if it is necessary to lengthen the burr, then change to a rough diamond or diamond burr (Figure 16)
Mastoidectomy
- Follow the sinodural plate posteriorly up to the sinodural angle, which is the area between the sigmoid sinus and dura
- Like the dural plate, the sinus plate is identified by the change in color of the bone and a change in the pitch of the burr
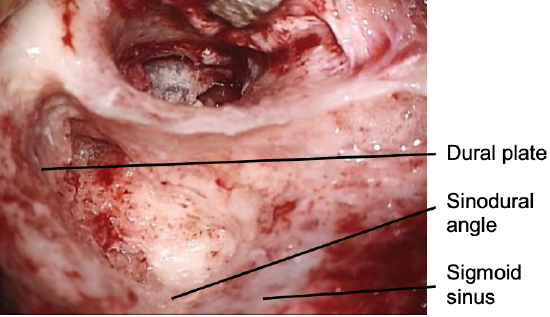
Figure 17: Sigmoid sinus, sinodural angle and dural plate
- Skeletonize the sigmoid sinus; do not expose the sigmoid sinus but leave a covering of bone over the sinus (Figure 17)
- The lateral and posterior semicircular canals are identified and the retrolabyrinthine air cells are exenterated
- Next identify the facial nerve
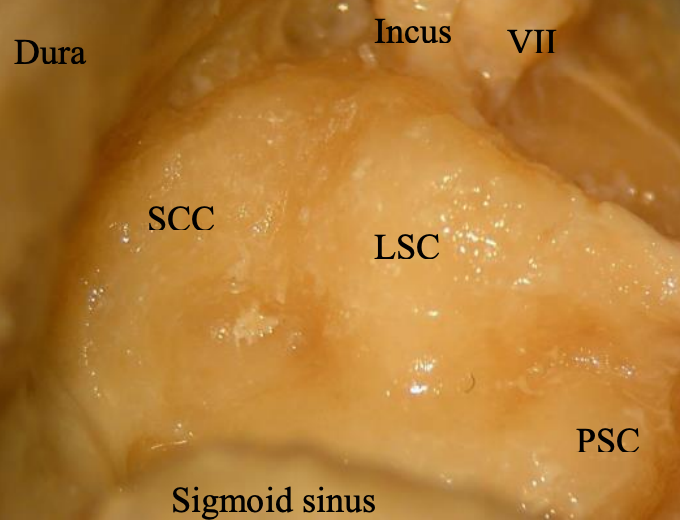
Figure 18: Relations of VIIn to short process of incus; superior semicircular canal (SCC); lateral semicircular canal (LSC); posterior semicircular canal (PSC); dura; and sigmoid sinus
- The superior landmarks for the mastoid segment of the facial nerve are the lateral semicircular canal, to which the facial nerve runs anteroinferiorly, and the posterior semicircular canal, to which the nerve runs 2.5 mm anterior to. The figure below is a cadaver dissection which demonstrates the relationship between the lateral semicircular canal, posterior semicircular canal and facial nerve (Figure 18)
- Therefore, if it is necessary to lengthen the burr, then change to a rough diamond or diamond burr (Figure 16)
- Follow the sinodural plate posteriorly up to the sinodural angle, which is the area between the sigmoid sinus and dura
- Like the dural plate, the sinus plate is identified by the change in color of the bone and a change in the pitch of the burr
- Skeletonize the sigmoid sinus; do not expose the sigmoid sinus but leave a covering of bone over the sinus (Figure 17)
- The lateral and posterior semicircular canals are identified and the retrolabyrinthine air cells are exenterated
- Next identify the facial nerve
- The superior landmarks for the mastoid segment of the facial nerve are the lateral semicircular canal, to which the facial nerve runs anteroinferiorly, and the posterior semicircular canal, to which the nerve runs 2.5 mm anterior to. The figure below is a cadaver dissection which demonstrates the relationship between the lateral semicircular canal, posterior semicircular canal and facial nerve (Figure 18)
- Finding the facial nerve along digastric ridge and the stylomastoid fibers is a very safe way of identifying the facial nerve away from any mastoid pathology
- It requires proper drilling technique and can easily be learned in the temporal bone laboratory
- When searching for the mastoid segment of facial the nerve, a large (4-5 mm) diamond burr is used
- Use ample irrigation to prevent thermal injury to the nerve
- The digastric ridge is the distal landmark for the mastoid segment of the facial nerve. It is a smooth convex bone found close to the mastoid tip. The digastric ridge can be difficult to find in poorly pneumatized temporal bones. Once the sigmoid sinus has been skeletonized the digastric ridge is found by drilling inferiorly to the sinus, close to the mastoid tip, from laterally to medially, in a horizontal direction.
- Periosteal fibers run anteriorly from the digastric ridge in a plane perpendicular to the ridge. The facial nerve can be located proximal to the stylomastoid foramen by drilling the last of these periosteal fibers. One often encounters the sensory branch of facial nerve (which innervates the posterior wall of the external auditory canal and a portion of the tympanic membrane) just above the stylomastoid foramen.
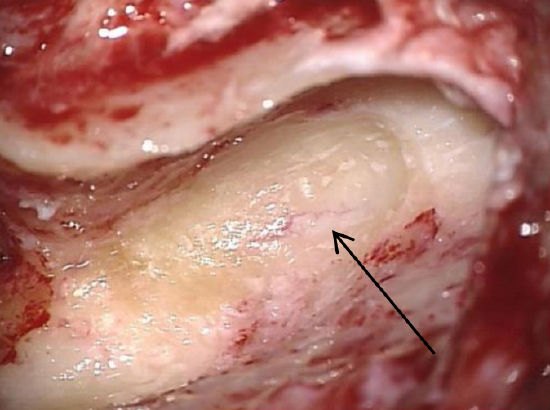
Figure 19: Distal portion of mastoid segment of facial nerve (arrow) is identified close to digastric ridge
- Skeletonize the nerve by drilling in a wide plane between the lateral semicircular canal proximally and the stylomastoid foramen distally, working from anteriorly to posteriorly (Figure 19)
- Always drill parallel to the course of the facial nerve and use lots of water for irrigation. Drill along the lateral aspect of the nerve; do not drill behind and medial to the fallopian canal
- Watch out for an early take-off of the chorda tympani close to the stylomastoid foramen
- Once the facial nerve has been identified, the retrofacial cells can be exenterated
Posterior tympanotomy
- The facial nerve is skeletonized leaving a thin shelf of bone covering the nerve
- It is followed proximally towards its pyramidal segment, just inferior to the lateral semicircular canal
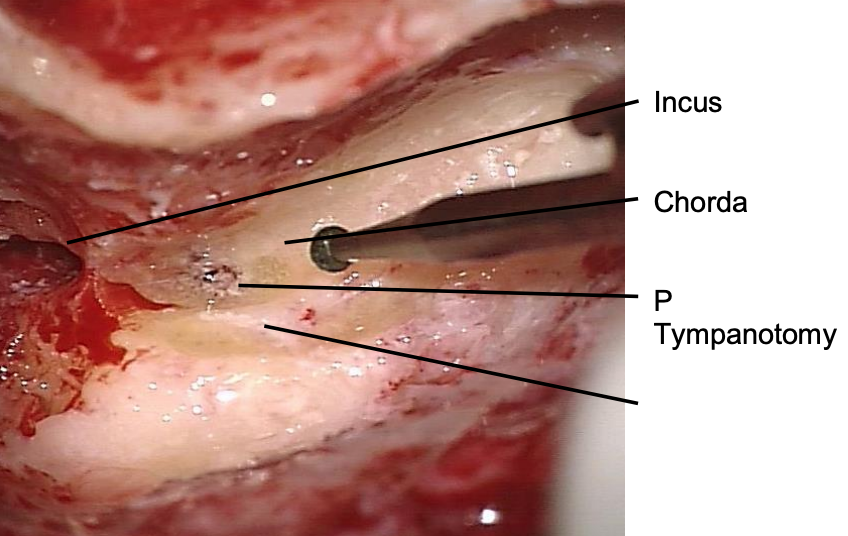
Figure 20: Landmarks for posterior tympanotomy are VIIn, chorda tympani and short process of incus
- The facial recess is approached by drilling away the bone situated between the pyramidal segment of the facial nerve posteriorly, the chorda tympani, and the fossa incudis superiorly (Figure 20)
- In the absence of disease in the facial recess, the stapes superstructure is visible through the tympanotomy
- For removal of cholesteatoma in facial recess one must work from both sides of the intact posterior external auditory canal wall
Epitympanotomy
- If the cholesteatoma does not extend significantly into the epitympanum, an epitympanotomy (atticotomy) is performed
- This involves exposure of the head of the malleus and the incus to remove soft tissue from the epitympanum
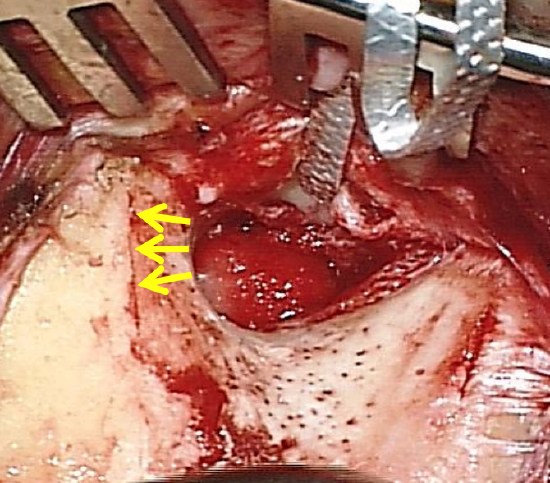
Figure 21: Direction of drilling with epitympanotomy or epitympanectomy
- The lateral wall of the epitympanum or attic is removed with a diamond burr; drilling is commenced at 12 o’clock relative to the ear canal, taking care not to make drill contact with the malleus or incus which is immediately medial to the outer attic wall, or to breach the dural plate above (Figure 21)
Epitympanectomy
- This is indicated when cholesteatoma extends medial to the ossicles or overlies the lateral semicircular canal; in cases of bony erosion of the ossicles due to cholesteatoma, the ossicles need to be removed
- Only recently, KTP laser evaporation of cholesteatoma matrix has been discussed
- The incus is removed by mobilizing it with a 2.5 mm. 45° hook and rotating it laterally, taking care not to injure the underlying facial nerve
- The malleus head is severed with a malleus nipper applied across its neck. The malleus nipper is held anteriorly between the thumb and index finger to stabilize it when the malleus head is divided
- The head of the malleus is removed leaving the tensor tympani tendon intact
- Clear cholesteatoma from the epitympanum
- Detailed knowledge of facial nerve anatomy is crucial to avoid injury to the nerve when drilling or removing cholesteatoma in the epitympanum
- The tympanic and labyrinthine segments and geniculum all lie in this very confined space and may be dehiscent
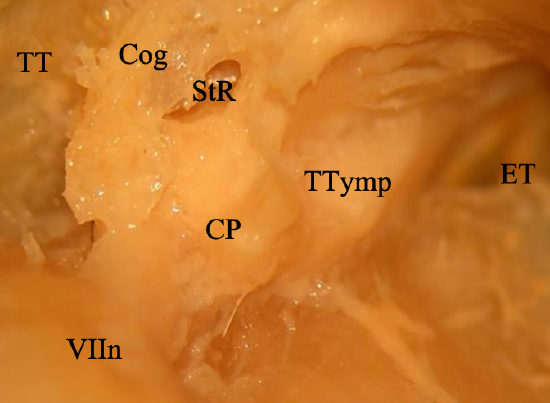
Figure 22: Anatomy of anterior epitympanic recess: Facial nerve (VIIn); Tegmen tympani (TT); Cog; Supratubal recess StR; Cochleariform process (CP); Eustachian tube (ET)
- The tympanic segment lies in the floor of the anterior epitympanic recess (Figure 22)
- The cochleariform process is a fairly consistent landmark and the nerve lies directly superior to it; the semicanal of the tensor tympani is sometimes mistaken for the facial nerve; however, this canal ends at the cochleariform process (Figure 22)
- The cog is a bony process in the anterior epitympanum which extends from the tegmen tympani and points to the facial nerve (Figure 22)

Figure 23: View of epitympanum with cog and cochleariform process drilled away: Tympanic (VII.T) and Labyrinthine (VII.L) segments of facial nerve and Geniculate Ganglion (GG) and Greater Superficial Petrosal nerve (GSP); Superior Semicircular Canal (SSC); Lateral Semicircular Canal (LSC); Dura; Tensor Tympani tendon (cut) (TeT)
- Figure 23 above shows the geniculate ganglion and greater superficial petrosal nerve once the Cog and cochleariform process have been drilled away
Key points: Completed closed mastoidoepitympanectomy (Figure 24)
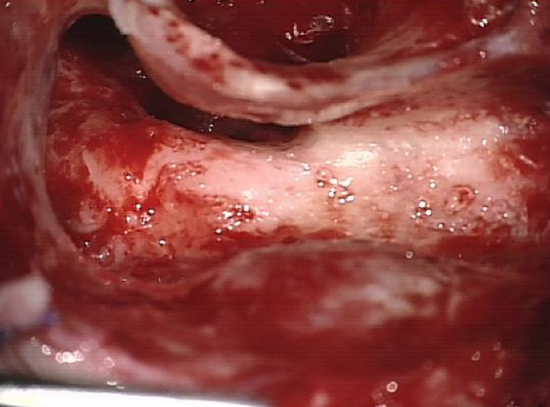
Figure 24: Completed closed mastoidoepitympanectomy
- The posterior canal wall should not be too thin
- Avoid drilling too far anteriorly while exposing the facial nerve and fenestrating the posterior wall of the external auditory canal
- Avoid fenestrating the posterosuperior canal wall
- Identifying the facial nerve along its course in the mastoid is the best way of avoiding injury to the nerve
- Most injuries occur when the facial nerve has not been adequately visualized
Ossiculoplasty
Refer to the chapter on ossiculoplasty and incus interposition for detailed surgical steps.
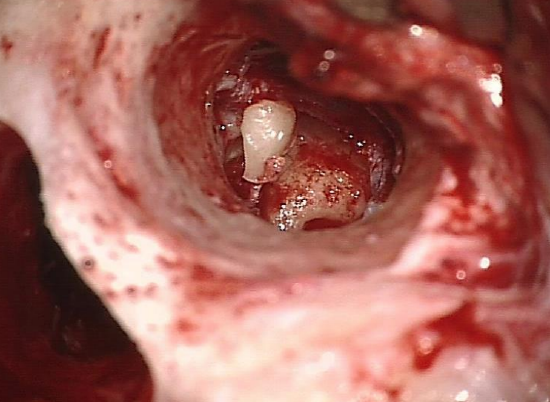
Figure 25: Incus interposition
The following conditions should be present in order to proceed to an incus interposition at the time of the primary surgery (Figure 25)
- Malleus handle present
- Stapes superstructure intact
- Footplate mobile
- Choleasteatoma limited and could be removed entirely
- Incus free of cholesteatoma
- Anterior third or half of the eardrum is preserved and defines the proper plane
Second-stage surgery is done at 6-12 months to ensure stabilization of the graft in cases of perforation; to verify eradication of cholesteatoma; and to assess whether there is good middle ear ventilation and whether eustachian tube dysfunction is present,
Posterior canal wall reconstruction
- Conchal or tragal cartilage is used to reconstruct the posterosuperior canal wall
- The cartilage is cut into 2-3 thin pieces (use a new 10 or 20 #blade)
- These pieces are aligned to slightly overlap each other
Tympanic membrane reconstruction
Refer to chapter on Myringoplasty and tympanoplasty for detailed surgical steps.
- Temporalis fascia or cartilage is harvested
- If there is diseased middle ear mucosa or retraction of the pars tensa, then silastic sheeting (1 mm thickness) is introduced into the tympanic cavity and protympanum to prevent adhesions between the graft and the promontory
- The graft always lies medial to the handle of malleus (if present); therefore, a slit must be made to accommodate the tensor tendon
Wound closure and packing
- The meatal skin flap is replaced and gelfoam pledgets are placed strategically over the meatal skin flap and fascia to secure it over the tympanic sulcus
- The external canal is packed with a strip of gauze impregnated with antibiotic ointment
- An easyflow drain or tube of a suction drain (without suction!) is placed in the mastoid cavity through a separate skin incision and the wound is closed in layers
- A mastoid pressure bandage is applied for 1 day
Open Mastoidoepitympanectomy (MET)
Skin incision: As for Closed MET
Periosteal flap: A small periosteal flap is made in order to preserve the soft tissue for myosubcutaneous occipital flap
Canalplasty: As for Closed MET
Inspection of middle ear and division of incudostapedial joint: As for Closed MET
Antrotomy
- As for Closed MET
- With Open MET you may already have lowered the posterosuperior canal wall
Mastoidectomy and epitympanectomy
- Radical exenteration and exteriorization of all cell tracts, including retrofacial, retrolabyrinthine, supra-labyrinthine, and supratubal cell tracts
- A common error is not to saucerise the cavity; this limits exposure and creates a larger cavity
- The more bone one removes, the smaller the cavity
- Incomplete exenteration will result in a discharging cavity
- Never leave bony overhangs
Lower the facial ridge over the mastoid segment of facial nerve
- A high facial ridge may cause a discharging mastoid cavity
- Therefore, it is important to skeletonize the facial nerve in order to lower the facial ridge sufficiently
- Lower the facial ridge with a large diamond burr and continuous suction irrigation
- Skeletonize the facial nerve, keeping the nerve intact within the bony fallopian canal, but lowering the bone to the level of the facial nerve
- The course of the nerve can clearly be identified inferior to the lateral semicircular canal, anterior to the posterior canal, and along the stylomastoid periosteal fibers at the level of the digastric ridge
Removal of mastoid tip
- Removal of the mastoid tip will help reduce the size of the cavity by allowing soft tissue to collapse into the cavity
- The stylomastoid foramen is medial to the digastric ridge
- Anteriorly where it extends into the external ear canal, the drill therefore remains lateral to the digastric ridge
- The mastoid tip is weakened when one drills with a diamond drill lateral to the digastric ridge to expose the muscle at its attachment along the mastoid tip and will develop a fracture line
- A rongeur is used to remove the mobilized mastoid tip by rotating it outwards
- The remaining soft tissue attachment can be cut with scissors pointing to the bone
Tympanoplasty
See chapter on Myringoplasty and tympanoplasty for detailed technique. Note that if the tympanic membrane and annulus are deficient then a tympanic sulcus is drilled out with a small diamond burr in order to support the fascial graft.
Obliteration of mastoid cavity
The mastoid cavity is small after exteriorization of a poorly pneumatized mastoid and does not require obliteration. However following exenteration of all tracts in a highly pneumatized mastoid, one may be left with a large cavity; in such cases obliteration is necessary to create a dry cavity.
Mastoid obliteration with myosubcutaneous occipital flap
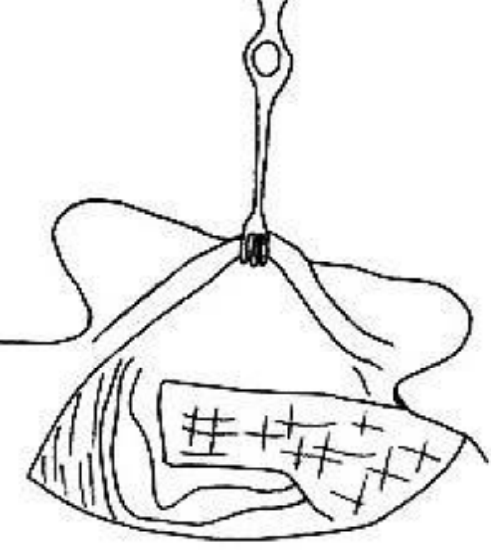
Figure 26: Inferiorly-based myosubcutaneous occipital flap
- This is an inferiorly-based flap based on the occipital artery which is rotated into the mastoid cavity (Figure 26)
- The flap comprises subcutaneous fascia and muscle
- It extends superiorly behind the mastoidectomy cavity from the mastoid tip where it is pedicled; the pedicle has to be kept wide (3.5 cm) enough so that blood supply is adequate
- The tip of the flap is just below the level of the temporalis muscle; the length is approximately 7.5 cm
- Elevate the retroauricular skin from the subcutaneous fascia using electrocautery
- Use a mastoid raspatory to elevate the flap from the bone
- Mastoid emissary veins may be encountered; bleeding is stopped with bipolar coagulation and/or diamond drilling of the bony foramen with a large diamond burr without irrigation
- Vicryl 2/0 sutures are used to suture the flap to the exposed digastric muscle to hold the flap in place in the mastoid cavity
Meatoplasty
Failure to do a meatoplasty with an open cavity can lead to a chronic draining ear. A meatoplasty is therefore routinely performed because for exteriorization and selfcleansing
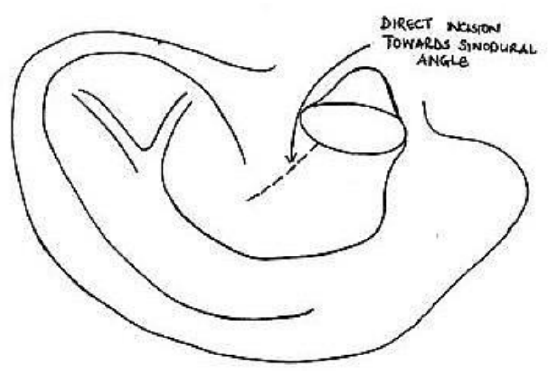
Figure 27: Initial incision
- A #11 blade is inserted into the external ear canal and is directed posterosuperiorly toward the sinodural angle; the concha is incised through both skin and cartilage (Figure 27)
- Hold the skin with forceps and using curved scissors, separate the skin from the conchal cartilage; it is important to direct the curvature of the scissors towards the cartilage and not upwards towards the skin as this may injure the skin
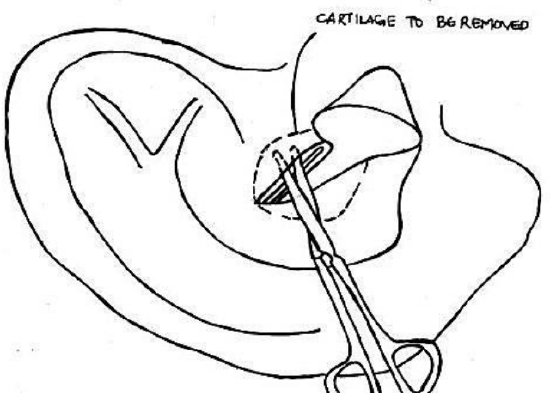
Figure 28: Exposing cartilage, and illustrating cartilage to be removed
- Once enough cartilage has been exposed, excise cartilage circumferentially with tympanoplasty scissors; this results in 2 crescent-shaped pieces of cartilage (Figure 28)
- The opening is approximately the size of the surgeon’s finger
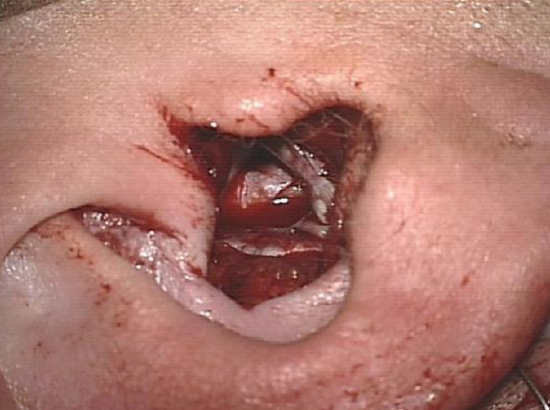
Figure 29: Completed meatoplasty
- The conchal skin flaps are inverted by placing 2/0 Vicryl sutures through the skin flaps and suturing them to the temporal muscle superiorly and to the mastoid soft tissues inferiorly. It may be necessary to place more sutures to improve the shape of the meatal opening (Figure 29)
- It is important that there are no exposed edges of the cartilage as this can lead to perichondritis
Wound closure and packing
- The retroauricular wound is closed in two layers using 2/0 Vicryl for subcutaneous tissue and skin clips or 3/0 Nylon for the skin. An easy-flow drain may be inserted
- Gelfoam is placed medially in the ear canal
- Gauze impregnated with Terracortril ointment is used to fill the lateral portion of the mastoid cavity and ear
- A mastoid pressure dressing is applied
Postoperative care (Figure 30)
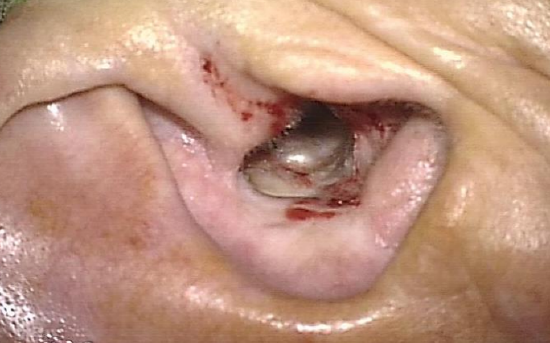
Figure 30: Epithelialized mastoid cavity and meatoplasty 4 weeks after surgery
- Mastoid drain removed after 24 hours
- Mastoid pressure bandage removed after 24 hours
- Sutures/clips removed after 7-10 days
- Ribbon gauze with Terracortil is changed every 2 weeks for 2 months
- After the ribbon gauze has been removed, topical eardrops (e.g. Otosporin) are applied for 2-4 weeks
Postoperative Imaging
- CT cannot accurately define cholesteatoma postoperatively, because the CT attenuation of cholesteatoma is not specific enough to differentiate it from granulation tissue or effusion
- Non-EPI MRI has better tissue differentiation for cholesteatoma and has a high sensitivity and specificity for cholesteatomas measuring >5 mm
- The senior author (T.L) recommends routine imaging, ideally with non- EPI diffusion weighted MRI, at 1 & 3 years following closed mastoidoepitympanectomy when there is concern about recurrent or residual cholesteatoma
References
Fisch U, May J. Tympanoplasty, Mastoidectomy, and Stapes Surgery. New York: Thieme; 1994
Jindal M, Riskalla A, Jiang D, Connor S, O'Connor AF. A systematic review of diffusion-weighted magnetic resonance imaging in the assessment of postoperative cholesteatoma. Otol Neurotol 2011; 32(8): 1243-9
Acknowledgements
This guide is based on the text by Prof Fisch (Tympanoplasty, Mastoidectomy, and Stapes Surgery) and personal experience of Prof Linder, as well as course material for the temporal and advanced temporal bone courses conducted annually by Prof Fisch and Prof Linder at the Department of Anatomy, University of Zurich, Switzerland
Author
Tashneem Harris MBChB, FCORL, MMED (Otol), Fisch Instrument Microsurgical Fellow
ENT Specialist
Division of Otolaryngology
University of Cape Town
Cape Town, South Africa
harristasneem@yahoo.com
Senior Author
Thomas Linder MD
Professor, Chairman and Head of Department of Otorhinolaryngology, Head, Neck and Facial Plastic Surgery
Lucerne Canton Hospital, Switzerland
thomas.linder@ksl.ch
Editor
Johan Fagan MBChB, FCS(ORL), MMed
Professor and Chairman
Division of Otolaryngology
University of Cape Town
Cape Town, South Africa
johannes.fagan@uct.ac.za