
8.4: Diagnostic Imaging- Example Scans
- Page ID
- 150574

\( \newcommand{\vecs}[1]{\overset { \scriptstyle \rightharpoonup} {\mathbf{#1}} } \)
\( \newcommand{\vecd}[1]{\overset{-\!-\!\rightharpoonup}{\vphantom{a}\smash {#1}}} \)
\( \newcommand{\dsum}{\displaystyle\sum\limits} \)
\( \newcommand{\dint}{\displaystyle\int\limits} \)
\( \newcommand{\dlim}{\displaystyle\lim\limits} \)
\( \newcommand{\id}{\mathrm{id}}\) \( \newcommand{\Span}{\mathrm{span}}\)
( \newcommand{\kernel}{\mathrm{null}\,}\) \( \newcommand{\range}{\mathrm{range}\,}\)
\( \newcommand{\RealPart}{\mathrm{Re}}\) \( \newcommand{\ImaginaryPart}{\mathrm{Im}}\)
\( \newcommand{\Argument}{\mathrm{Arg}}\) \( \newcommand{\norm}[1]{\| #1 \|}\)
\( \newcommand{\inner}[2]{\langle #1, #2 \rangle}\)
\( \newcommand{\Span}{\mathrm{span}}\)
\( \newcommand{\id}{\mathrm{id}}\)
\( \newcommand{\Span}{\mathrm{span}}\)
\( \newcommand{\kernel}{\mathrm{null}\,}\)
\( \newcommand{\range}{\mathrm{range}\,}\)
\( \newcommand{\RealPart}{\mathrm{Re}}\)
\( \newcommand{\ImaginaryPart}{\mathrm{Im}}\)
\( \newcommand{\Argument}{\mathrm{Arg}}\)
\( \newcommand{\norm}[1]{\| #1 \|}\)
\( \newcommand{\inner}[2]{\langle #1, #2 \rangle}\)
\( \newcommand{\Span}{\mathrm{span}}\) \( \newcommand{\AA}{\unicode[.8,0]{x212B}}\)
\( \newcommand{\vectorA}[1]{\vec{#1}} % arrow\)
\( \newcommand{\vectorAt}[1]{\vec{\text{#1}}} % arrow\)
\( \newcommand{\vectorB}[1]{\overset { \scriptstyle \rightharpoonup} {\mathbf{#1}} } \)
\( \newcommand{\vectorC}[1]{\textbf{#1}} \)
\( \newcommand{\vectorD}[1]{\overrightarrow{#1}} \)
\( \newcommand{\vectorDt}[1]{\overrightarrow{\text{#1}}} \)
\( \newcommand{\vectE}[1]{\overset{-\!-\!\rightharpoonup}{\vphantom{a}\smash{\mathbf {#1}}}} \)
\( \newcommand{\vecs}[1]{\overset { \scriptstyle \rightharpoonup} {\mathbf{#1}} } \)
\(\newcommand{\longvect}{\overrightarrow}\)
\( \newcommand{\vecd}[1]{\overset{-\!-\!\rightharpoonup}{\vphantom{a}\smash {#1}}} \)
\(\newcommand{\avec}{\mathbf a}\) \(\newcommand{\bvec}{\mathbf b}\) \(\newcommand{\cvec}{\mathbf c}\) \(\newcommand{\dvec}{\mathbf d}\) \(\newcommand{\dtil}{\widetilde{\mathbf d}}\) \(\newcommand{\evec}{\mathbf e}\) \(\newcommand{\fvec}{\mathbf f}\) \(\newcommand{\nvec}{\mathbf n}\) \(\newcommand{\pvec}{\mathbf p}\) \(\newcommand{\qvec}{\mathbf q}\) \(\newcommand{\svec}{\mathbf s}\) \(\newcommand{\tvec}{\mathbf t}\) \(\newcommand{\uvec}{\mathbf u}\) \(\newcommand{\vvec}{\mathbf v}\) \(\newcommand{\wvec}{\mathbf w}\) \(\newcommand{\xvec}{\mathbf x}\) \(\newcommand{\yvec}{\mathbf y}\) \(\newcommand{\zvec}{\mathbf z}\) \(\newcommand{\rvec}{\mathbf r}\) \(\newcommand{\mvec}{\mathbf m}\) \(\newcommand{\zerovec}{\mathbf 0}\) \(\newcommand{\onevec}{\mathbf 1}\) \(\newcommand{\real}{\mathbb R}\) \(\newcommand{\twovec}[2]{\left[\begin{array}{r}#1 \\ #2 \end{array}\right]}\) \(\newcommand{\ctwovec}[2]{\left[\begin{array}{c}#1 \\ #2 \end{array}\right]}\) \(\newcommand{\threevec}[3]{\left[\begin{array}{r}#1 \\ #2 \\ #3 \end{array}\right]}\) \(\newcommand{\cthreevec}[3]{\left[\begin{array}{c}#1 \\ #2 \\ #3 \end{array}\right]}\) \(\newcommand{\fourvec}[4]{\left[\begin{array}{r}#1 \\ #2 \\ #3 \\ #4 \end{array}\right]}\) \(\newcommand{\cfourvec}[4]{\left[\begin{array}{c}#1 \\ #2 \\ #3 \\ #4 \end{array}\right]}\) \(\newcommand{\fivevec}[5]{\left[\begin{array}{r}#1 \\ #2 \\ #3 \\ #4 \\ #5 \\ \end{array}\right]}\) \(\newcommand{\cfivevec}[5]{\left[\begin{array}{c}#1 \\ #2 \\ #3 \\ #4 \\ #5 \\ \end{array}\right]}\) \(\newcommand{\mattwo}[4]{\left[\begin{array}{rr}#1 \amp #2 \\ #3 \amp #4 \\ \end{array}\right]}\) \(\newcommand{\laspan}[1]{\text{Span}\{#1\}}\) \(\newcommand{\bcal}{\cal B}\) \(\newcommand{\ccal}{\cal C}\) \(\newcommand{\scal}{\cal S}\) \(\newcommand{\wcal}{\cal W}\) \(\newcommand{\ecal}{\cal E}\) \(\newcommand{\coords}[2]{\left\{#1\right\}_{#2}}\) \(\newcommand{\gray}[1]{\color{gray}{#1}}\) \(\newcommand{\lgray}[1]{\color{lightgray}{#1}}\) \(\newcommand{\rank}{\operatorname{rank}}\) \(\newcommand{\row}{\text{Row}}\) \(\newcommand{\col}{\text{Col}}\) \(\renewcommand{\row}{\text{Row}}\) \(\newcommand{\nul}{\text{Nul}}\) \(\newcommand{\var}{\text{Var}}\) \(\newcommand{\corr}{\text{corr}}\) \(\newcommand{\len}[1]{\left|#1\right|}\) \(\newcommand{\bbar}{\overline{\bvec}}\) \(\newcommand{\bhat}{\widehat{\bvec}}\) \(\newcommand{\bperp}{\bvec^\perp}\) \(\newcommand{\xhat}{\widehat{\xvec}}\) \(\newcommand{\vhat}{\widehat{\vvec}}\) \(\newcommand{\uhat}{\widehat{\uvec}}\) \(\newcommand{\what}{\widehat{\wvec}}\) \(\newcommand{\Sighat}{\widehat{\Sigma}}\) \(\newcommand{\lt}{<}\) \(\newcommand{\gt}{>}\) \(\newcommand{\amp}{&}\) \(\definecolor{fillinmathshade}{gray}{0.9}\)This section will provide some extra examples of diagnostic imagining scans. They are included purely to add to your knowledge about diagnostic imagining that you have already learned about in this chapter. They are also provided for those with interest in seeing and learning more detail about diagnostic imaging scans.
.
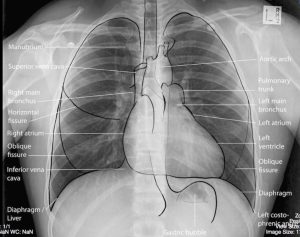
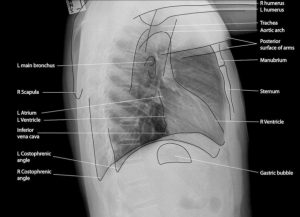
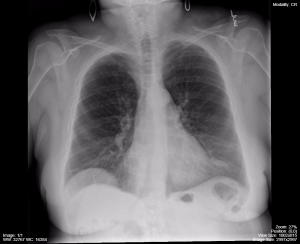
The two images above are chest X-rays (CXR) with an outline added to emphasize the normal physiological structures.
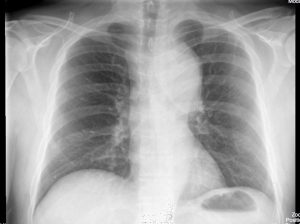
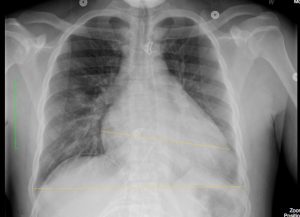
Figure 8.45 is a chest X-ray (CXR) of a patient with an enlarged aortic knob—the enlarged white area at the top of the chest. Figure 8.46 is a CXR of a patient with an enlarged heart.
Both images above show patients with atelectasis, a fully or partially collapsed lung. In Figure 8.47, one lung is fully collapsed (the white area), and in Figure 8.48, the lower portions of both lung are collapsed.
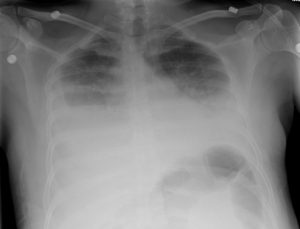
In Figure 8.49, the patient has large bilateral pleural effusions, a build-up of fluid in the lungs.
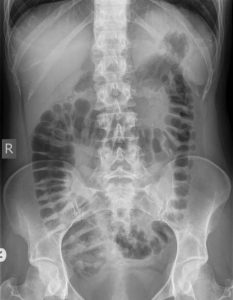
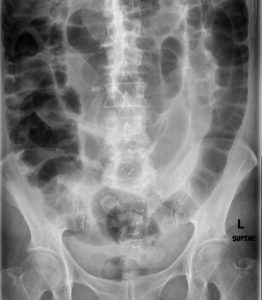
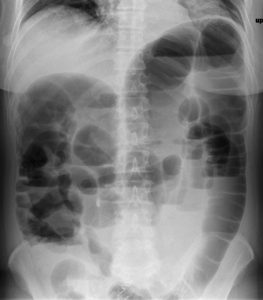
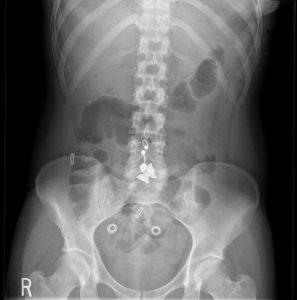
The two images below show normal abdominal X-rays; Figure 8.50 also includes the four abdominal quadrants written on the X-ray. These can then be compared to Figure 8.52 and 8.53 that show abdominal X-rays of a patient with generalized bowel dilation. Figure 8.54 which also shows a normal abdominal X-ray; however, you can see the presence of artifacts—a bellybutton piercing and buttons on the patient’s clothing. Finally, Figure 8.55 shows a patient with toxic megacolon.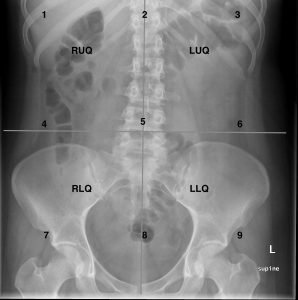

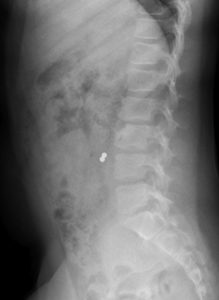
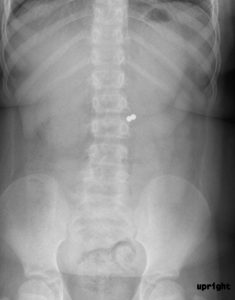
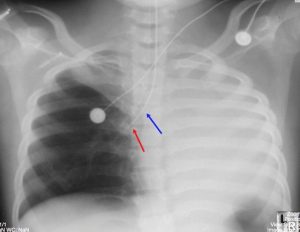
The two figures above are of the same pediatric patient. You can see that the child has swallowed a foreign object.
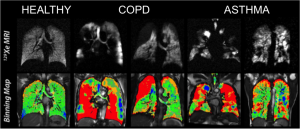
Figure 8.58 is an MRI showing the difference between healthy lungs, COPD lungs, and lungs affected by asthma.
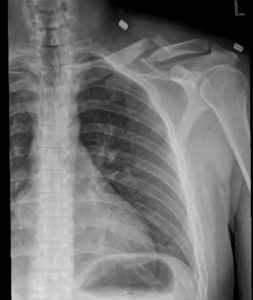
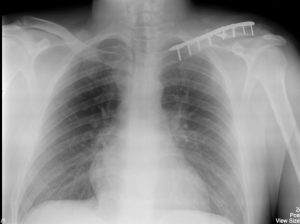
Both images above are of the same patient. Figure 8.59 is of the patient’s left shoulder pre-operatively with a clavicle fracture; the second image shows the patient post-op with the fracture repaired.
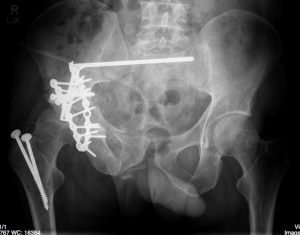
The two figures above are also of the same patient. Figure 8.61 is an X-ray of the pelvis pre-operatively for a fixation of a pelvic fracture; Figure 8f.62 shows the patient post-op with the fracture repaired.
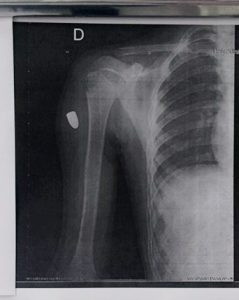
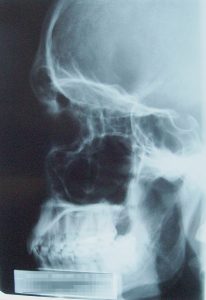
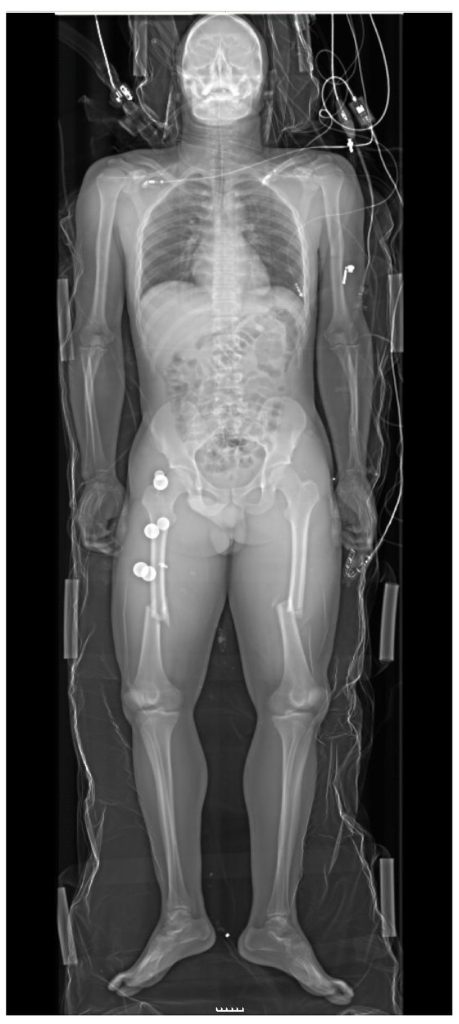
Figure 8.63 shows a pediatric patient with a bullet in their arm, and Figure 8. 64 is an X-ray of a patient with facial trauma. The final image below is a full-body X-ray of a patient with bilateral femur fractures.
Attribution
Unless otherwise indicated, material on this page has been adapted from the following resource:
Burbridge, B. (2017). Undergraduate diagnostic imaging fundamentals. University of Saskatchewan, Distance Education Unit. https://openpress.usask.ca/undergradimaging/ licensed under CC BY-NC-SA 4.0
Image Credits (images are listed in order of appearance)
Normal PA Chest x-ray, Labelled by #FOAMed Medical Education Resources by LITFL, CC BY-NC-SA 4.0
Normal Lateral Chest x-ray, Labelled by #FOAMed Medical Education Resources by LITFL, CC BY-NC-SA 4.0
Chest x-ray: AP, enlarged aortic knob by Dr. Brent Burbridge MD, CC BY-NC-SA 4.0
Chest x-ray with an enlarged heart shadow, method 2 by Dr. Brent Burbridge MD, CC BY-NC-SA 4.0
Resorptive Atelectasis by Dr. Brent Burbridge MD, CC BY-NC-SA 4.0
Post-Operative Atelectasis: Linear or Plate Like Atelectasis; Left Lower Lobe by Dr. Brent Burbridge MD, CC BY-NC-SA 4.0
Passive Atelectasis. Large Pleural Effusions by Dr. Brent Burbridge MD, CC BY-NC-SA 4.0
Abdomen Quadrants/Regions by Dr. Brent Burbridge MD, CC BY-NC-SA 4.0
Normal Abdominal x-ray by Dr. Brent Burbridge MD, CC BY-NC-SA 4.0
Abdominal x-ray, supine, revealing mild, generalized bowel dilation, generalized ileus by Dr. Brent Burbridge MD, CC BY-NC-SA 4.0
Abdominal x-ray, upright, revealing mild, generalized bowel dilation, generalized ileus by Dr. Brent Burbridge MD, CC BY-NC-SA 4.0
Artifacts on Abdomen x-ray by Dr. Brent Burbridge MD, CC BY-NC-SA 4.0
Abdominal X-Ray of Toxic Megacolon by Dr. Brent Burbridge MD, CC BY-NC-SA 4.0
Lateral abdominal x-ray of a foreign body by Dr. Brent Burbridge MD, CC BY-NC-SA 4.0
AP Abdominal X-ray, supine, of a foreign body by Dr. Brent Burbridge MD, CC BY-NC-SA 4.0
Xe Gas MRI of Healthy and Diseased Lungs by Duke University Xenon MRI Service Center, CC BY-SA 4.0
X-ray of the left shoulder, pre-operative, clavicle fracture by Dr. Brent Burbridge MD, CC BY-NC-SA 4.0
X-ray of the left shoulder, post-operative, clavicle fracture by Dr. Brent Burbridge MD, CC BY-NC-SA 4.0
X-ray of the pelvis, pre-operative, displaying a variety of pelvic fractures by Dr. Brent Burbridge MD, CC BY-NC-SA 4.0
X-ray of the pelvis, post-operative fixation of pelvic fractures by Dr. Brent Burbridge MD, CC BY-NC-SA 4.0
Ballistic trauma by Zisovska, CC BY-SA 4.0
X-Ray Skull facial trauma by Mnolf, CC BY-SA 3.0
Whole body radiograph in trauma by Dimitrios S. Evangelopoulos, Simone Deyle, Heinz Zimmermann, and Aristomenis K. Exadaktylos, CC BY 2.0