4.3: Aseptic Technique
- Page ID
- 44528
\( \newcommand{\vecs}[1]{\overset { \scriptstyle \rightharpoonup} {\mathbf{#1}} } \)
\( \newcommand{\vecd}[1]{\overset{-\!-\!\rightharpoonup}{\vphantom{a}\smash {#1}}} \)
\( \newcommand{\dsum}{\displaystyle\sum\limits} \)
\( \newcommand{\dint}{\displaystyle\int\limits} \)
\( \newcommand{\dlim}{\displaystyle\lim\limits} \)
\( \newcommand{\id}{\mathrm{id}}\) \( \newcommand{\Span}{\mathrm{span}}\)
( \newcommand{\kernel}{\mathrm{null}\,}\) \( \newcommand{\range}{\mathrm{range}\,}\)
\( \newcommand{\RealPart}{\mathrm{Re}}\) \( \newcommand{\ImaginaryPart}{\mathrm{Im}}\)
\( \newcommand{\Argument}{\mathrm{Arg}}\) \( \newcommand{\norm}[1]{\| #1 \|}\)
\( \newcommand{\inner}[2]{\langle #1, #2 \rangle}\)
\( \newcommand{\Span}{\mathrm{span}}\)
\( \newcommand{\id}{\mathrm{id}}\)
\( \newcommand{\Span}{\mathrm{span}}\)
\( \newcommand{\kernel}{\mathrm{null}\,}\)
\( \newcommand{\range}{\mathrm{range}\,}\)
\( \newcommand{\RealPart}{\mathrm{Re}}\)
\( \newcommand{\ImaginaryPart}{\mathrm{Im}}\)
\( \newcommand{\Argument}{\mathrm{Arg}}\)
\( \newcommand{\norm}[1]{\| #1 \|}\)
\( \newcommand{\inner}[2]{\langle #1, #2 \rangle}\)
\( \newcommand{\Span}{\mathrm{span}}\) \( \newcommand{\AA}{\unicode[.8,0]{x212B}}\)
\( \newcommand{\vectorA}[1]{\vec{#1}} % arrow\)
\( \newcommand{\vectorAt}[1]{\vec{\text{#1}}} % arrow\)
\( \newcommand{\vectorB}[1]{\overset { \scriptstyle \rightharpoonup} {\mathbf{#1}} } \)
\( \newcommand{\vectorC}[1]{\textbf{#1}} \)
\( \newcommand{\vectorD}[1]{\overrightarrow{#1}} \)
\( \newcommand{\vectorDt}[1]{\overrightarrow{\text{#1}}} \)
\( \newcommand{\vectE}[1]{\overset{-\!-\!\rightharpoonup}{\vphantom{a}\smash{\mathbf {#1}}}} \)
\( \newcommand{\vecs}[1]{\overset { \scriptstyle \rightharpoonup} {\mathbf{#1}} } \)
\(\newcommand{\longvect}{\overrightarrow}\)
\( \newcommand{\vecd}[1]{\overset{-\!-\!\rightharpoonup}{\vphantom{a}\smash {#1}}} \)
\(\newcommand{\avec}{\mathbf a}\) \(\newcommand{\bvec}{\mathbf b}\) \(\newcommand{\cvec}{\mathbf c}\) \(\newcommand{\dvec}{\mathbf d}\) \(\newcommand{\dtil}{\widetilde{\mathbf d}}\) \(\newcommand{\evec}{\mathbf e}\) \(\newcommand{\fvec}{\mathbf f}\) \(\newcommand{\nvec}{\mathbf n}\) \(\newcommand{\pvec}{\mathbf p}\) \(\newcommand{\qvec}{\mathbf q}\) \(\newcommand{\svec}{\mathbf s}\) \(\newcommand{\tvec}{\mathbf t}\) \(\newcommand{\uvec}{\mathbf u}\) \(\newcommand{\vvec}{\mathbf v}\) \(\newcommand{\wvec}{\mathbf w}\) \(\newcommand{\xvec}{\mathbf x}\) \(\newcommand{\yvec}{\mathbf y}\) \(\newcommand{\zvec}{\mathbf z}\) \(\newcommand{\rvec}{\mathbf r}\) \(\newcommand{\mvec}{\mathbf m}\) \(\newcommand{\zerovec}{\mathbf 0}\) \(\newcommand{\onevec}{\mathbf 1}\) \(\newcommand{\real}{\mathbb R}\) \(\newcommand{\twovec}[2]{\left[\begin{array}{r}#1 \\ #2 \end{array}\right]}\) \(\newcommand{\ctwovec}[2]{\left[\begin{array}{c}#1 \\ #2 \end{array}\right]}\) \(\newcommand{\threevec}[3]{\left[\begin{array}{r}#1 \\ #2 \\ #3 \end{array}\right]}\) \(\newcommand{\cthreevec}[3]{\left[\begin{array}{c}#1 \\ #2 \\ #3 \end{array}\right]}\) \(\newcommand{\fourvec}[4]{\left[\begin{array}{r}#1 \\ #2 \\ #3 \\ #4 \end{array}\right]}\) \(\newcommand{\cfourvec}[4]{\left[\begin{array}{c}#1 \\ #2 \\ #3 \\ #4 \end{array}\right]}\) \(\newcommand{\fivevec}[5]{\left[\begin{array}{r}#1 \\ #2 \\ #3 \\ #4 \\ #5 \\ \end{array}\right]}\) \(\newcommand{\cfivevec}[5]{\left[\begin{array}{c}#1 \\ #2 \\ #3 \\ #4 \\ #5 \\ \end{array}\right]}\) \(\newcommand{\mattwo}[4]{\left[\begin{array}{rr}#1 \amp #2 \\ #3 \amp #4 \\ \end{array}\right]}\) \(\newcommand{\laspan}[1]{\text{Span}\{#1\}}\) \(\newcommand{\bcal}{\cal B}\) \(\newcommand{\ccal}{\cal C}\) \(\newcommand{\scal}{\cal S}\) \(\newcommand{\wcal}{\cal W}\) \(\newcommand{\ecal}{\cal E}\) \(\newcommand{\coords}[2]{\left\{#1\right\}_{#2}}\) \(\newcommand{\gray}[1]{\color{gray}{#1}}\) \(\newcommand{\lgray}[1]{\color{lightgray}{#1}}\) \(\newcommand{\rank}{\operatorname{rank}}\) \(\newcommand{\row}{\text{Row}}\) \(\newcommand{\col}{\text{Col}}\) \(\renewcommand{\row}{\text{Row}}\) \(\newcommand{\nul}{\text{Nul}}\) \(\newcommand{\var}{\text{Var}}\) \(\newcommand{\corr}{\text{corr}}\) \(\newcommand{\len}[1]{\left|#1\right|}\) \(\newcommand{\bbar}{\overline{\bvec}}\) \(\newcommand{\bhat}{\widehat{\bvec}}\) \(\newcommand{\bperp}{\bvec^\perp}\) \(\newcommand{\xhat}{\widehat{\xvec}}\) \(\newcommand{\vhat}{\widehat{\vvec}}\) \(\newcommand{\uhat}{\widehat{\uvec}}\) \(\newcommand{\what}{\widehat{\wvec}}\) \(\newcommand{\Sighat}{\widehat{\Sigma}}\) \(\newcommand{\lt}{<}\) \(\newcommand{\gt}{>}\) \(\newcommand{\amp}{&}\) \(\definecolor{fillinmathshade}{gray}{0.9}\)In addition to using standard precautions and transmission-based precautions, aseptic technique (also called medical asepsis) is the purposeful reduction of pathogens to prevent the transfer of microorganisms from one person or object to another during a medical procedure. For example, a nurse administering parenteral medication or performing urinary catheterization uses aseptic technique. When performed properly, aseptic technique prevents contamination and transfer of pathogens to the patient from caregiver hands, surfaces, and equipment during routine care or procedures. The word “aseptic” literally means an absence of disease-causing microbes and pathogens. In the clinical setting, aseptic technique refers to the purposeful prevention of microbe contamination from one person or object to another. These potentially infectious, microscopic organisms can be present in the environment, on an instrument, in liquids, on skin surfaces, or within a wound.
There is often misunderstanding between the terms aseptic technique and sterile technique in the health care setting. Both asepsis and sterility are closely related, and the shared concept between the two terms is removal of harmful microorganisms that can cause infection. In the most simplistic terms, asepsis is creating a protective barrier from pathogens, whereas sterile technique is a purposeful attack on microorganisms. Sterile technique (also called surgical asepsis) seeks to eliminate every potential microorganism in and around a sterile field while also maintaining objects as free from microorganisms as possible. It is the standard of care for surgical procedures, invasive wound management, and central line care. Sterile technique requires a combination of meticulous hand washing, creation of a sterile field, using long-lasting antimicrobial cleansing agents such as betadine, donning sterile gloves, and using sterile devices and instruments.
Principles of Aseptic Non-Touch Technique
Aseptic non-touch technique (ANTT) is the most commonly used aseptic technique framework in the health care setting and is considered a global standard. There are two types of ANTT: surgical-ANTT (sterile technique) and standard-ANTT.
Aseptic non-touch technique starts with a few concepts that must be understood before it can be applied. For all invasive procedures, the “ANTT-approach” identifies key parts and key sites throughout the preparation and implementation of the procedure. A key part is any sterile part of equipment used during an aseptic procedure, such as needle hubs, syringe tips, needles, and dressings. A key site is any nonintact skin, potential insertion site, or access site used for medical devices connected to the patients. Examples of key sites include open wounds and insertion sites for intravenous (IV) devices and urinary catheters.
ANTT includes four underlying principles to keep in mind while performing invasive procedures:
- Always wash hands effectively.
- Never contaminate key parts.
- Touch non-key parts with confidence.
- Take appropriate infective precautions.
Preparing and Preventing Infections Using Aseptic Technique
When planning for any procedure, careful thought and preparation of many infection control factors must be considered beforehand. While keeping standard precautions in mind, identify anticipated key sites and key parts to the procedure. Consider the degree to which the environment must be managed to reduce the risk of infection, including the expected degree of contamination and hazardous exposure to the clinician. Finally, review the expected equipment needed to perform the procedure and the level of key part or key site handling. See Table \(\PageIndex{1}\) for an outline of infection control measures when performing a procedure.
| Infection Control Measure | Key Considerations | Examples |
|---|---|---|
| Environmental control |
|
|
| Hand hygiene |
|
|
| Personal protective equipment (PPE) |
|
|
| Aseptic field management | Determine level of aseptic field needed and how it will be managed before the procedure begins:
|
General aseptic field:
IV irrigation Dry dressing changes Critical aseptic field: Urinary catheter placement Central line dressing change Sterile dressing change |
| Non-touch technique |
|
|
| Sequencing |
|
|
Use of Gloves and Sterile Gloves
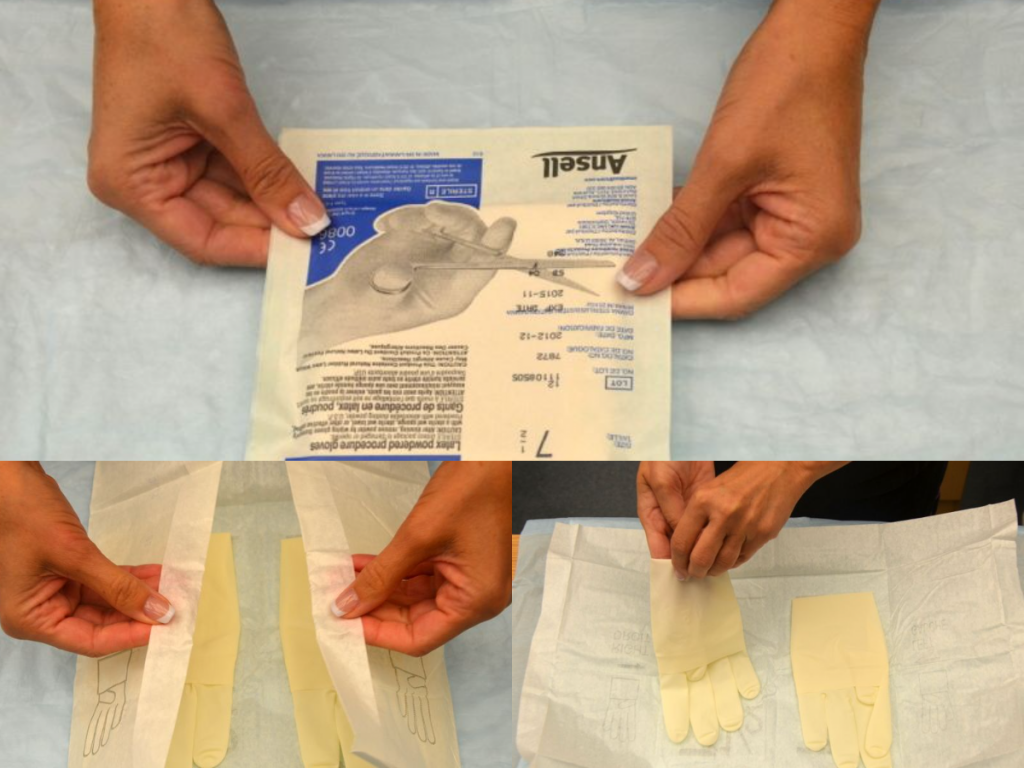
There are two different levels of medical-grade gloves available to health care providers: clean (exam) gloves and sterile (surgical) gloves. Generally speaking, clean gloves are used whenever there is a risk of contact with body fluids or contaminated surfaces or objects. Examples include starting an intravenous access device or emptying a urinary catheter collection bag. Alternatively, sterile gloves meet FDA requirements for sterilization and are used for invasive procedures or when contact with a sterile site, tissue, or body cavity is anticipated. Sterile gloves are used in these instances to prevent transient flora and reduce resident flora contamination during a procedure, thus preventing the introduction of pathogens. For example, sterile gloves are required when performing central line dressing changes, insertion of urinary catheters, and during invasive surgical procedures. See Figure \(\PageIndex{1}\)[1] for images of a nurse opening and removing sterile gloves from packaging.
See the “Checklist for Applying and Removing Sterile Gloves” for details on how to apply sterile gloves.

- "Book-pictures-2015-199-001-300x241.jpg," "Book-pictures-2015-215.jpg," and "Book-pictures-2015-219.jpg" by British Columbia Institute of Technology are licensed under CC BY 4.0. Access for free at https://opentextbc.ca/clinicalskills/chapter/sterile-gloving/↵
- RegisteredNurseRN. (2017, April 28). Sterile gloving nursing technique | Don/donning sterile gloves tips. [Video]. YouTube. All rights reserved. Video used with permission. https://youtu.be/lumZOF-METc↵


