19.2: Blood Glucose Monitoring
- Page ID
- 44670
\( \newcommand{\vecs}[1]{\overset { \scriptstyle \rightharpoonup} {\mathbf{#1}} } \)
\( \newcommand{\vecd}[1]{\overset{-\!-\!\rightharpoonup}{\vphantom{a}\smash {#1}}} \)
\( \newcommand{\dsum}{\displaystyle\sum\limits} \)
\( \newcommand{\dint}{\displaystyle\int\limits} \)
\( \newcommand{\dlim}{\displaystyle\lim\limits} \)
\( \newcommand{\id}{\mathrm{id}}\) \( \newcommand{\Span}{\mathrm{span}}\)
( \newcommand{\kernel}{\mathrm{null}\,}\) \( \newcommand{\range}{\mathrm{range}\,}\)
\( \newcommand{\RealPart}{\mathrm{Re}}\) \( \newcommand{\ImaginaryPart}{\mathrm{Im}}\)
\( \newcommand{\Argument}{\mathrm{Arg}}\) \( \newcommand{\norm}[1]{\| #1 \|}\)
\( \newcommand{\inner}[2]{\langle #1, #2 \rangle}\)
\( \newcommand{\Span}{\mathrm{span}}\)
\( \newcommand{\id}{\mathrm{id}}\)
\( \newcommand{\Span}{\mathrm{span}}\)
\( \newcommand{\kernel}{\mathrm{null}\,}\)
\( \newcommand{\range}{\mathrm{range}\,}\)
\( \newcommand{\RealPart}{\mathrm{Re}}\)
\( \newcommand{\ImaginaryPart}{\mathrm{Im}}\)
\( \newcommand{\Argument}{\mathrm{Arg}}\)
\( \newcommand{\norm}[1]{\| #1 \|}\)
\( \newcommand{\inner}[2]{\langle #1, #2 \rangle}\)
\( \newcommand{\Span}{\mathrm{span}}\) \( \newcommand{\AA}{\unicode[.8,0]{x212B}}\)
\( \newcommand{\vectorA}[1]{\vec{#1}} % arrow\)
\( \newcommand{\vectorAt}[1]{\vec{\text{#1}}} % arrow\)
\( \newcommand{\vectorB}[1]{\overset { \scriptstyle \rightharpoonup} {\mathbf{#1}} } \)
\( \newcommand{\vectorC}[1]{\textbf{#1}} \)
\( \newcommand{\vectorD}[1]{\overrightarrow{#1}} \)
\( \newcommand{\vectorDt}[1]{\overrightarrow{\text{#1}}} \)
\( \newcommand{\vectE}[1]{\overset{-\!-\!\rightharpoonup}{\vphantom{a}\smash{\mathbf {#1}}}} \)
\( \newcommand{\vecs}[1]{\overset { \scriptstyle \rightharpoonup} {\mathbf{#1}} } \)
\(\newcommand{\longvect}{\overrightarrow}\)
\( \newcommand{\vecd}[1]{\overset{-\!-\!\rightharpoonup}{\vphantom{a}\smash {#1}}} \)
\(\newcommand{\avec}{\mathbf a}\) \(\newcommand{\bvec}{\mathbf b}\) \(\newcommand{\cvec}{\mathbf c}\) \(\newcommand{\dvec}{\mathbf d}\) \(\newcommand{\dtil}{\widetilde{\mathbf d}}\) \(\newcommand{\evec}{\mathbf e}\) \(\newcommand{\fvec}{\mathbf f}\) \(\newcommand{\nvec}{\mathbf n}\) \(\newcommand{\pvec}{\mathbf p}\) \(\newcommand{\qvec}{\mathbf q}\) \(\newcommand{\svec}{\mathbf s}\) \(\newcommand{\tvec}{\mathbf t}\) \(\newcommand{\uvec}{\mathbf u}\) \(\newcommand{\vvec}{\mathbf v}\) \(\newcommand{\wvec}{\mathbf w}\) \(\newcommand{\xvec}{\mathbf x}\) \(\newcommand{\yvec}{\mathbf y}\) \(\newcommand{\zvec}{\mathbf z}\) \(\newcommand{\rvec}{\mathbf r}\) \(\newcommand{\mvec}{\mathbf m}\) \(\newcommand{\zerovec}{\mathbf 0}\) \(\newcommand{\onevec}{\mathbf 1}\) \(\newcommand{\real}{\mathbb R}\) \(\newcommand{\twovec}[2]{\left[\begin{array}{r}#1 \\ #2 \end{array}\right]}\) \(\newcommand{\ctwovec}[2]{\left[\begin{array}{c}#1 \\ #2 \end{array}\right]}\) \(\newcommand{\threevec}[3]{\left[\begin{array}{r}#1 \\ #2 \\ #3 \end{array}\right]}\) \(\newcommand{\cthreevec}[3]{\left[\begin{array}{c}#1 \\ #2 \\ #3 \end{array}\right]}\) \(\newcommand{\fourvec}[4]{\left[\begin{array}{r}#1 \\ #2 \\ #3 \\ #4 \end{array}\right]}\) \(\newcommand{\cfourvec}[4]{\left[\begin{array}{c}#1 \\ #2 \\ #3 \\ #4 \end{array}\right]}\) \(\newcommand{\fivevec}[5]{\left[\begin{array}{r}#1 \\ #2 \\ #3 \\ #4 \\ #5 \\ \end{array}\right]}\) \(\newcommand{\cfivevec}[5]{\left[\begin{array}{c}#1 \\ #2 \\ #3 \\ #4 \\ #5 \\ \end{array}\right]}\) \(\newcommand{\mattwo}[4]{\left[\begin{array}{rr}#1 \amp #2 \\ #3 \amp #4 \\ \end{array}\right]}\) \(\newcommand{\laspan}[1]{\text{Span}\{#1\}}\) \(\newcommand{\bcal}{\cal B}\) \(\newcommand{\ccal}{\cal C}\) \(\newcommand{\scal}{\cal S}\) \(\newcommand{\wcal}{\cal W}\) \(\newcommand{\ecal}{\cal E}\) \(\newcommand{\coords}[2]{\left\{#1\right\}_{#2}}\) \(\newcommand{\gray}[1]{\color{gray}{#1}}\) \(\newcommand{\lgray}[1]{\color{lightgray}{#1}}\) \(\newcommand{\rank}{\operatorname{rank}}\) \(\newcommand{\row}{\text{Row}}\) \(\newcommand{\col}{\text{Col}}\) \(\renewcommand{\row}{\text{Row}}\) \(\newcommand{\nul}{\text{Nul}}\) \(\newcommand{\var}{\text{Var}}\) \(\newcommand{\corr}{\text{corr}}\) \(\newcommand{\len}[1]{\left|#1\right|}\) \(\newcommand{\bbar}{\overline{\bvec}}\) \(\newcommand{\bhat}{\widehat{\bvec}}\) \(\newcommand{\bperp}{\bvec^\perp}\) \(\newcommand{\xhat}{\widehat{\xvec}}\) \(\newcommand{\vhat}{\widehat{\vvec}}\) \(\newcommand{\uhat}{\widehat{\uvec}}\) \(\newcommand{\what}{\widehat{\wvec}}\) \(\newcommand{\Sighat}{\widehat{\Sigma}}\) \(\newcommand{\lt}{<}\) \(\newcommand{\gt}{>}\) \(\newcommand{\amp}{&}\) \(\definecolor{fillinmathshade}{gray}{0.9}\)Blood glucose monitoring is performed on patients with diabetes mellitus and other conditions that cause elevated blood sugar levels. Diabetes mellitus is a common medical condition that affects the body’s ability to produce insulin in the pancreas and use insulin at the cellular level. There are two types of diabetes mellitus, type 1 and type 2. Type 1 diabetes mellitus is an autoimmune disease that damages the beta cells of the pancreas so they do not produce insulin; thus, synthetic insulin must be administered by injection or infusion. It typically begins in childhood or adolescence. Type 2 diabetes mellitus accounts for approximately 95 percent of all cases and is highly correlated with obesity and inactivity. During type 2 diabetes, the cells of the body become resistant to the effects of insulin, and the pancreas increases its production of insulin. However, over time, the pancreas may no longer be able to produce insulin. In many cases, type 2 diabetes can be managed by moderate weight loss, regular physical activity, and a healthy diet. However, if blood glucose levels cannot be controlled with healthy lifestyle choices, oral diabetic medication is prescribed and eventually, the administration of insulin may be required.[1] Prediabetes is a medical condition where blood sugar levels are higher than normal, but not high enough yet to be diagnosed as type 2 diabetes. Approximately one in three American adults have prediabetes. Gestational diabetes is a type of diabetes that occurs during pregnancy in women who did not have diabetes before they were pregnant.
Diabetic patients require frequent blood glucose monitoring to administer customized medication therapy to prevent long-term complications from occurring. Hospitalized patients who do not have diabetes may also require frequent blood glucose monitoring due to elevations that can occur as a result of the stress of hospitalization, surgical procedures, and side effects of medications. Additionally, patients receiving enteral feedings typically have their blood glucose monitored every six hours. Health care providers prescribe the frequency of blood glucose monitoring; testing is typically performed before meals and at bedtime. For some patients, a standardized sliding-scale insulin protocol may be prescribed with instructions on the medication administration record (MAR) for administration of insulin based on their blood glucose results.[2],[3] See Table \(\PageIndex{1}\) for an example of a sliding-scale insulin protocol.
Table \(\PageIndex{1}\): Sample Sliding-Scale Insulin Protocol
Instructions: Check patient’s blood sugar before meals, at bedtime, and as needed for symptoms of hypoglycemia or hyperglycemia. Use the following table to administer insulin lispro PRN.
| Blood Sugar Range | Lispro Insulin Instructions |
|---|---|
| Less than 70 | Hold all insulin and initiate hypoglycemia protocol. |
| 70-150 | 0 units |
| 151-174 | 2 units |
| 175-199 | 4 units |
| 200-224 | 6 units |
| 225-249 | 8 units |
| 250-274 | 10 units |
| 275-299 | 12 units |
| Greater than 300 | Administer 14 units and call the provider. |
Hypoglycemia
When caring for patients with diabetes mellitus and monitoring their blood glucose readings, it is important to continually monitor for signs of hypoglycemia. Hypoglycemia is defined as blood sugar readings less than 70 and signs and symptoms such as the following:
- Shakiness
- Feeling nervous or anxious
- Sweating, chills, and clamminess
- Irritability or impatience
- Confusion
- Fast heartbeat
- Feeling light-headed or dizzy
- Hunger
- Nausea
- Color draining from the skin (pallor)
- Feeling sleepy
- Feeling weak or having no energy
- Blurred/impaired vision
- Tingling or numbness in the lips, tongue, or cheeks
- Headaches
- Coordination problems or clumsiness
- Nightmares or crying out during sleep
- Seizures[4]
A low blood sugar level triggers the release of epinephrine (adrenaline), the “fight-or-flight” hormone. Epinephrine causes the symptoms of hypoglycemia such as a rapid heartbeat, sweating, and anxiety. If a patient’s blood sugar level continues to drop, the brain has impaired functioning. This may lead to seizures and a coma.[5]
If a nurse suspects hypoglycemia is occuring, a blood sugar reading should be obtained and appropriate actions taken. Most agencies have a hypoglycemia protocol based on the “15-15 Rule.” The 15-15 rule is to provide 15 grams of carbohydrate and recheck the blood glucose after 15 minutes. If the reading is still below 70 mg/dL, another serving of 15 grams of carbohydrate should be provided and the process continued until the blood sugar is above 70 mg/dL. Fifteen grams of carbohydrate includes options like 4 ounces of juice or regular soda, hard candy, or glucose tablets. If a patient is experiencing severe hypoglycemia and cannot swallow, a glucagon injection or intravenous administration of dextrose may be required.[6]
Hyperglycemia
Hyperglycemia is defined as elevated blood glucose and often causes signs and symptoms such as frequent urination and increased thirst. Hyperglycemia occurs when the patient’s body does not produce enough insulin or cannot use the insulin properly at the cellular level. There are many potential causes of hyperglycemia, such as not receiving enough medication to effectively control blood glucose, eating more than planned, exercising less than planned, or increased stress from an illness, surgery, hospitalization, or other life events.
If a patient’s blood glucose is greater than 240 mg/dL, their urine is typically checked for ketones. Ketones indicate a condition called ketoacidosis may be occurring. Ketoacidosis occurs in patients whose pancreas is no longer creating insulin, so fats are broken down for energy and waste products called ketones are produced. If the kidneys cannot effectively eliminate ketones in the urine, they build up in the blood and cause ketoacidosis. Ketoacidosis is a life-threatening condition that requires immediate notification of the provider for treatment. Symptoms of ketoacidosis include fruity-smelling breath, nausea, vomiting, very dry mouth, and shortness of breath. Treatment of ketoacidosis often requires the administration of intravenous insulin while the patient is closely monitored in a critical care inpatient unit.[7]
For more information about diabetes mellitus, measuring blood sugar levels, and diabetic medications, visit the “Endocrine” chapter in Open RN Nursing Pharmacology.
Glucometer Use
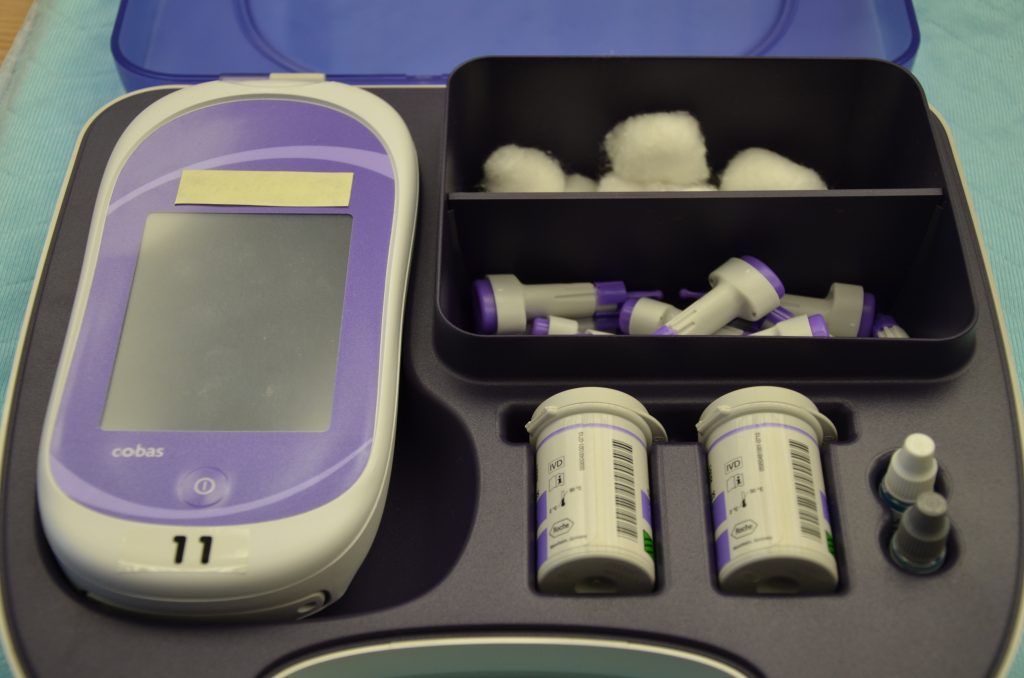
It is typically the responsibility of a nurse to perform bedside blood glucose readings, but in some agencies, this procedure may be delegated to trained nursing assistants or medical assistants. See Figure \(\PageIndex{1}\)[8] for an image of a standard bedside glucometer kit that contains a glucometer, lancets, reagent strips, and calibration drops. Prior to performing a blood glucose test, read the manufacturer’s instructions and agency policy because they may vary across devices and sites. Ensure the glucometer has been calibrated per agency policy.[9]

Before beginning the procedure, determine if there are any conditions present that could affect the reading. For example, is the patient fasting? Has the patient already begun eating? Is the patient demonstrating any symptoms of hypoglycemia or hyperglycemia? Keep your patient safe by applying your knowledge of diabetes, the medication being administered, and the uniqueness of the patient to make appropriate clinical judgments regarding the procedure and associated medication administration.[10]
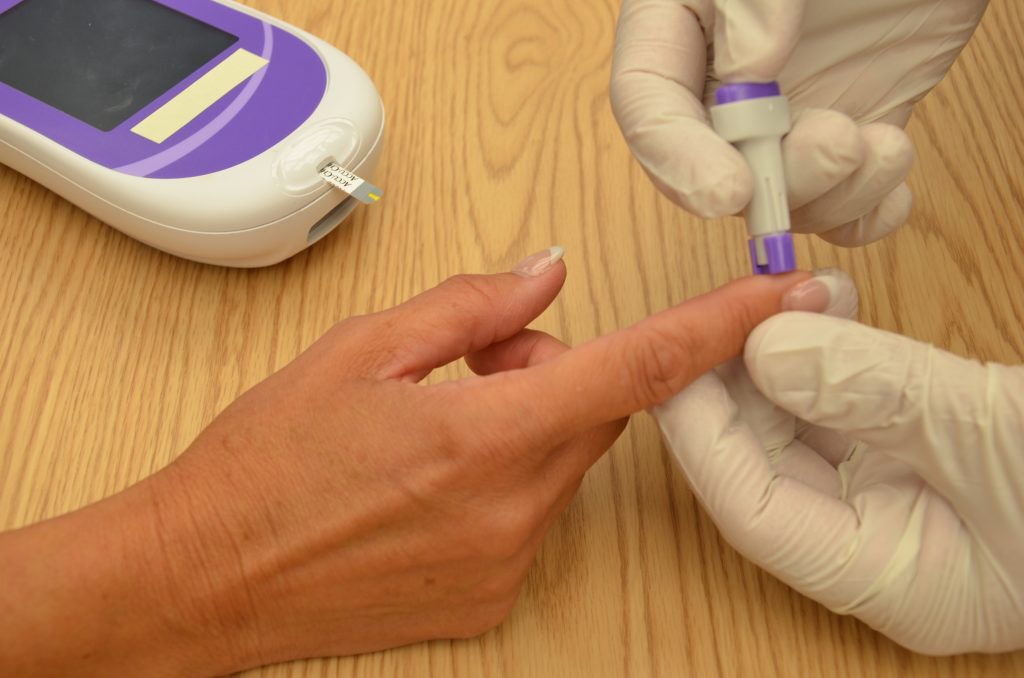
See the “Checklist for Blood Glucose Monitoring” for details regarding the procedure. It is often important to keep the patient’s hand warm and in a dependent position to promote vasodilation and obtain a good blood sample. If necessary, warm compresses can be applied for 10 minutes prior to the procedure to promote vasodilation. Follow the manufacturer’s instructions to prepare the glucometer for measurement. After applying clean gloves, clean the patient’s skin with an alcohol wipe for 30 seconds, allow the site to dry, and then puncture the skin using the lancet. See Figure \(\PageIndex{2}\)[11] for an image of performing a skin puncture using a lancet.

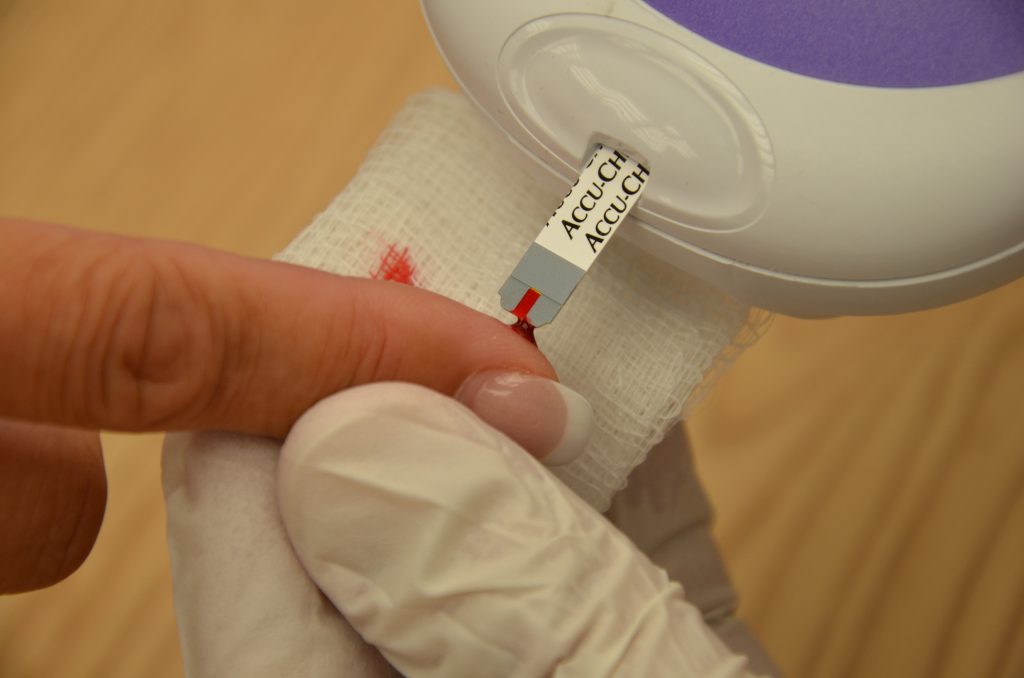
If needed, gently squeeze above the site to obtain a large drop of blood. Do not milk or massage the finger because it may introduce excess tissue fluid and hemolyze the specimen. Wipe away the first drop of blood and use the second drop for the blood sample. Follow agency policy and manufacturer instructions regarding placement of the drop of blood for absorption on the reagent strip. See Figure \(\PageIndex{3}\)[12] for an image of a nurse absorbing the patient’s drop of blood on the reagent strip. Timeliness is essential in gathering an appropriate specimen before clotting occurs or the glucometer times out.

Cleanse the glucometer and document the blood glucose results according to agency policy. Report any concerns about patient symptoms or blood sugar results according to agency policy.
Life Span Considerations
Blood glucose samples should be taken from the heel of newborns and infants up to the age of six months. When obtaining a sample from the heel, the sample is taken from the medial or lateral plantar surface.
- This work is a derivative of Nursing Pharmacology by Open RN licensed under CC BY 4.0. ↵
- This work is a derivative of Clinical Procedures for Safer Patient Care by British Columbia Institute of Technology and is licensed under CC BY 4.0↵
- Donihi, A. C., DiNardo, M. M., DeVita, M. A., & Korytkowski, M. T. (2006). Use of a standardized protocol to decrease medication errors and adverse events related to sliding scale insulin. Quality & Safety in Health Care, 15(2), 89–91. doi.org/10.1136/qshc.2005.014381↵
- American Diabetes Association. (n.d.). Hypoglycemia (Low blood sugar). https://diabetes.org/living-with-diabetes/hypoglycemia-low-blood-glucose/symptoms-treatment↵
- American Diabetes Association. (n.d.). Hypoglycemia (Low blood sugar). https://diabetes.org/living-with-diabetes/hypoglycemia-low-blood-glucose/severe↵
- American Diabetes Association. (n.d.). Hypoglycemia (Low blood sugar). https://diabetes.org/living-with-diabetes/hypoglycemia-low-blood-glucose/severe↵
- American Diabetes Association. (n.d.). Hyperglycemia (High blood glucose). https://diabetes.org/about-diabetes/complications/ketoacidosis-dka/dka-ketoacidosis-ketones↵
- “DSC_0718.jpg” by British Columbia Institute of Technology is licensed under CC BY 4.0. Access for free at https://opentextbc.ca/clinicalskills/chapter/8-2-glucometer-use/. ↵
- This work is a derivative of Clinical Procedures for Safer Patient Care by British Columbia Institute of Technology and is licensed under CC BY 4.0↵
- This work is a derivative of Clinical Procedures for Safer Patient Care by British Columbia Institute of Technology and is licensed under CC BY 4.0↵
- “DSC_1130.jpg” by British Columbia Institute of Technology is licensed under CC BY 4.0. Access for free at https://opentextbc.ca/clinicalskills/chapter/8-2-glucometer-use/. ↵
- “DSC_1141.jpg” by British Columbia Institute of Technology is licensed under CC BY 4.0. Access for free at https://opentextbc.ca/clinicalskills/chapter/8-2-glucometer-use/. ↵
- RegisteredNurseRN. (2015, August 12). How to prick finger tips with a lancet device for checking a blood sugar | Nursing skills. [Video]. YouTube. All rights reserved. Video used with permission. https://youtu.be/JPJ4l7QZ9eM↵


