
1.9: Maintaining Balance — Homeostasis and the Power of Negative Feedback
- Page ID
- 120121

\( \newcommand{\vecs}[1]{\overset { \scriptstyle \rightharpoonup} {\mathbf{#1}} } \)
\( \newcommand{\vecd}[1]{\overset{-\!-\!\rightharpoonup}{\vphantom{a}\smash {#1}}} \)
\( \newcommand{\dsum}{\displaystyle\sum\limits} \)
\( \newcommand{\dint}{\displaystyle\int\limits} \)
\( \newcommand{\dlim}{\displaystyle\lim\limits} \)
\( \newcommand{\id}{\mathrm{id}}\) \( \newcommand{\Span}{\mathrm{span}}\)
( \newcommand{\kernel}{\mathrm{null}\,}\) \( \newcommand{\range}{\mathrm{range}\,}\)
\( \newcommand{\RealPart}{\mathrm{Re}}\) \( \newcommand{\ImaginaryPart}{\mathrm{Im}}\)
\( \newcommand{\Argument}{\mathrm{Arg}}\) \( \newcommand{\norm}[1]{\| #1 \|}\)
\( \newcommand{\inner}[2]{\langle #1, #2 \rangle}\)
\( \newcommand{\Span}{\mathrm{span}}\)
\( \newcommand{\id}{\mathrm{id}}\)
\( \newcommand{\Span}{\mathrm{span}}\)
\( \newcommand{\kernel}{\mathrm{null}\,}\)
\( \newcommand{\range}{\mathrm{range}\,}\)
\( \newcommand{\RealPart}{\mathrm{Re}}\)
\( \newcommand{\ImaginaryPart}{\mathrm{Im}}\)
\( \newcommand{\Argument}{\mathrm{Arg}}\)
\( \newcommand{\norm}[1]{\| #1 \|}\)
\( \newcommand{\inner}[2]{\langle #1, #2 \rangle}\)
\( \newcommand{\Span}{\mathrm{span}}\) \( \newcommand{\AA}{\unicode[.8,0]{x212B}}\)
\( \newcommand{\vectorA}[1]{\vec{#1}} % arrow\)
\( \newcommand{\vectorAt}[1]{\vec{\text{#1}}} % arrow\)
\( \newcommand{\vectorB}[1]{\overset { \scriptstyle \rightharpoonup} {\mathbf{#1}} } \)
\( \newcommand{\vectorC}[1]{\textbf{#1}} \)
\( \newcommand{\vectorD}[1]{\overrightarrow{#1}} \)
\( \newcommand{\vectorDt}[1]{\overrightarrow{\text{#1}}} \)
\( \newcommand{\vectE}[1]{\overset{-\!-\!\rightharpoonup}{\vphantom{a}\smash{\mathbf {#1}}}} \)
\( \newcommand{\vecs}[1]{\overset { \scriptstyle \rightharpoonup} {\mathbf{#1}} } \)
\(\newcommand{\longvect}{\overrightarrow}\)
\( \newcommand{\vecd}[1]{\overset{-\!-\!\rightharpoonup}{\vphantom{a}\smash {#1}}} \)
\(\newcommand{\avec}{\mathbf a}\) \(\newcommand{\bvec}{\mathbf b}\) \(\newcommand{\cvec}{\mathbf c}\) \(\newcommand{\dvec}{\mathbf d}\) \(\newcommand{\dtil}{\widetilde{\mathbf d}}\) \(\newcommand{\evec}{\mathbf e}\) \(\newcommand{\fvec}{\mathbf f}\) \(\newcommand{\nvec}{\mathbf n}\) \(\newcommand{\pvec}{\mathbf p}\) \(\newcommand{\qvec}{\mathbf q}\) \(\newcommand{\svec}{\mathbf s}\) \(\newcommand{\tvec}{\mathbf t}\) \(\newcommand{\uvec}{\mathbf u}\) \(\newcommand{\vvec}{\mathbf v}\) \(\newcommand{\wvec}{\mathbf w}\) \(\newcommand{\xvec}{\mathbf x}\) \(\newcommand{\yvec}{\mathbf y}\) \(\newcommand{\zvec}{\mathbf z}\) \(\newcommand{\rvec}{\mathbf r}\) \(\newcommand{\mvec}{\mathbf m}\) \(\newcommand{\zerovec}{\mathbf 0}\) \(\newcommand{\onevec}{\mathbf 1}\) \(\newcommand{\real}{\mathbb R}\) \(\newcommand{\twovec}[2]{\left[\begin{array}{r}#1 \\ #2 \end{array}\right]}\) \(\newcommand{\ctwovec}[2]{\left[\begin{array}{c}#1 \\ #2 \end{array}\right]}\) \(\newcommand{\threevec}[3]{\left[\begin{array}{r}#1 \\ #2 \\ #3 \end{array}\right]}\) \(\newcommand{\cthreevec}[3]{\left[\begin{array}{c}#1 \\ #2 \\ #3 \end{array}\right]}\) \(\newcommand{\fourvec}[4]{\left[\begin{array}{r}#1 \\ #2 \\ #3 \\ #4 \end{array}\right]}\) \(\newcommand{\cfourvec}[4]{\left[\begin{array}{c}#1 \\ #2 \\ #3 \\ #4 \end{array}\right]}\) \(\newcommand{\fivevec}[5]{\left[\begin{array}{r}#1 \\ #2 \\ #3 \\ #4 \\ #5 \\ \end{array}\right]}\) \(\newcommand{\cfivevec}[5]{\left[\begin{array}{c}#1 \\ #2 \\ #3 \\ #4 \\ #5 \\ \end{array}\right]}\) \(\newcommand{\mattwo}[4]{\left[\begin{array}{rr}#1 \amp #2 \\ #3 \amp #4 \\ \end{array}\right]}\) \(\newcommand{\laspan}[1]{\text{Span}\{#1\}}\) \(\newcommand{\bcal}{\cal B}\) \(\newcommand{\ccal}{\cal C}\) \(\newcommand{\scal}{\cal S}\) \(\newcommand{\wcal}{\cal W}\) \(\newcommand{\ecal}{\cal E}\) \(\newcommand{\coords}[2]{\left\{#1\right\}_{#2}}\) \(\newcommand{\gray}[1]{\color{gray}{#1}}\) \(\newcommand{\lgray}[1]{\color{lightgray}{#1}}\) \(\newcommand{\rank}{\operatorname{rank}}\) \(\newcommand{\row}{\text{Row}}\) \(\newcommand{\col}{\text{Col}}\) \(\renewcommand{\row}{\text{Row}}\) \(\newcommand{\nul}{\text{Nul}}\) \(\newcommand{\var}{\text{Var}}\) \(\newcommand{\corr}{\text{corr}}\) \(\newcommand{\len}[1]{\left|#1\right|}\) \(\newcommand{\bbar}{\overline{\bvec}}\) \(\newcommand{\bhat}{\widehat{\bvec}}\) \(\newcommand{\bperp}{\bvec^\perp}\) \(\newcommand{\xhat}{\widehat{\xvec}}\) \(\newcommand{\vhat}{\widehat{\vvec}}\) \(\newcommand{\uhat}{\widehat{\uvec}}\) \(\newcommand{\what}{\widehat{\wvec}}\) \(\newcommand{\Sighat}{\widehat{\Sigma}}\) \(\newcommand{\lt}{<}\) \(\newcommand{\gt}{>}\) \(\newcommand{\amp}{&}\) \(\definecolor{fillinmathshade}{gray}{0.9}\)Homeostasis is maintained by the body’s responses to adverse stimuli, ensuring maintenance of an optimal physiological environment.
- Define the concept of homeostasis and explain its importance for maintaining a stable internal environment.
- Identify key physiological variables (e.g., temperature, blood pressure, blood glucose) that are regulated to maintain homeostasis.
- Describe the roles of sensors, control centers, and effectors in maintaining homeostasis.
- Explain how homeostasis is a dynamic process involving constant monitoring and adjustment, rather than a static "set point."
The Concept of Homeostasis
Homeostasis is the process the body uses to keep its internal environment stable, even when conditions outside (or inside) the body change. Factors like body temperature, blood pH, blood pressure, and fluid levels must stay within a narrow, healthy range for the body to function properly.
The body constantly monitors these internal conditions and makes adjustments as needed. Most of these adjustments happen through negative feedback loops, which are the body’s main tool for maintaining balance. These loops work by detecting a change and triggering a response that reverses or counteracts that change, helping to bring things back to normal.
All homeostatic systems rely on three key parts that work together:
-
Sensor (or receptor): This part detects a change in the environment — either inside or outside the body. For example, peripheral chemoreceptors can sense changes in the pH of your blood.
-
Control center (or integrating center): This part receives the information from the sensor and decides how to respond. The hypothalamus in the brain is a great example — it helps regulate body temperature, heart rate, blood pressure, hunger, and even sleep cycles.
-
Effector: This is the organ or tissue that carries out the response to restore balance. For instance, if your blood pressure drops, your kidneys may retain more water to help bring it back up.
These three components — sensor, control center, and effector — are the foundation of every homeostatic response. To coordinate these complex changes, the body uses feedback loops. As mentioned above, most of the time, these are negative feedback loops, which act to reverse a change and bring things back to normal. In certain situations, positive feedback loops temporarily amplify a change until a specific goal is reached. See the next page for an overview of positive feedback loops.
Negative Feedback
Negative feedback is the body’s way of fixing a problem by turning things down or reversing a change. It helps bring body systems back to their normal range when something goes off track, or in other words: the output of a negative feedback system reduces the activity that causes that output.
A great example is blood pressure regulation. Your blood vessels have special sensors called baroreceptors that can tell if your blood pressure is too high or too low. These sensors send a message to the hypothalamus, a part of your brain that acts like a smart control center, managing many subconscious, automatic body functions. The hypothalamus always monitors and adjusts things to help you stay healthy and stable, meaning to maintain homeostasis.
If your blood pressure is too high, the hypothalamus tells your heart, blood vessels, and kidneys (the effectors) to take action. Your heart rate slows down, your blood vessels widen (vasodilation), and your kidneys let go of more water. All of these changes help bring your blood pressure back down to normal.
If your blood pressure is too low, the process works in the opposite direction. Your blood vessels tighten (vasoconstriction), your heart beats faster, and your kidneys hold on to more water. Again, this brings your blood pressure back up to where it should be.
It is called “negative feedback” because the body reverses the direction of the change to bring things back into balance.
Examples of Negative Feedback to Maintain Homeostasis
1) Hypothalamic – Pituitary – Adrenal (HPA) Axis
When your body is under stress — whether it is physical, emotional, or even from skipping meals — it needs to respond in a way that keeps you functioning. One of the key systems that kicks into action is called the HPA axis. It is a chain reaction involving three major parts of your body: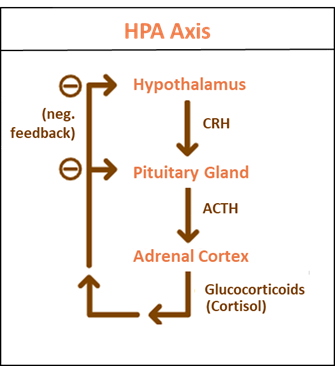
-
CRH (Corticotropin-Releasing Hormone) is released by the hypothalamus.
-
CRH travels to the pituitary gland (also in the brain), which then releases ACTH (Adrenocorticotropic Hormone) into the bloodstream.
-
ACTH travels through your blood to the adrenal glands (which sit on top of your kidneys), signaling them to release glucocorticoids, the most important of which is cortisol — often called the "stress hormone."
This whole process looks like a chain of command. Cortisol helps your body deal with stress by increasing blood sugar (for energy), suppressing non-essential functions (like digestion or reproduction), and reducing inflammation.
Once enough cortisol is in your bloodstream, it signals the hypothalamus and pituitary to stop making CRH and ACTH — this is a classic example of a negative feedback loop. The system shuts itself off when the job is done, so you do not end up with too much cortisol, which could be harmful over time.
Stress → Hypothalamus releases CRH → Pituitary releases ACTH → Adrenal glands release glucocorticoids (like cortisol)
 2) Body Temperature Control
Temperature control is another great example of a negative feedback loop. Peripheral (skin) and central thermoreceptors sense an increase or decrease in body temperature and send that information to the hypothalamus, the brain’s temperature control center. If the temperature is too high or too low, the hypothalamus sends signals to various effectors to bring the body back to its normal temperature—about 37°C (98.6°F).
🥵 If the body gets too hot, the hypothalamus:
-
Triggers sweat glands to release sweat, cooling the skin
-
Causes vasodilation, where blood vessels near the surface widen to release more heat
🥶 If the body gets too cold, the hypothalamus:
-
Makes muscles shiver to generate heat
-
Causes vasoconstriction, narrowing the blood vessels to keep heat inside the body
This process is more complex than it seems, because the hypothalamus can actually change the set point. For example, during a fever, it raises the body’s temperature on purpose to help fight off infection.
Both internal changes (like an infection) and external factors (like cold weather) can trigger negative feedback responses that help the body maintain a safe and stable temperature.
See the image on the right to review how your body uses negative feedback to control temperature.
💡 Key Takeaways:
✅ Homeostasis is the body’s built-in balancing act.
It uses sensors, a control center (usually the brain), and effectors (like organs or glands) to monitor and adjust internal conditions (like temperature and blood pressure) so they stay within a healthy range.
✅ Negative feedback is the body’s main strategy to stay stable.
When something changes (like body temp or blood pressure), the body responds by reversing that change—bringing things back to normal. This “fix-it” system is used constantly to maintain balance and health.
✅ Negative feedback loops shut themselves off when the job is done.
This makes them self-regulating and helps prevent overcorrection. For example, when cortisol levels rise enough to deal with stress, the body stops producing more, a perfect example of a built-in “off switch.”