
2: Basic Lab Equipment
- Page ID
- 109418
\( \newcommand{\vecs}[1]{\overset { \scriptstyle \rightharpoonup} {\mathbf{#1}} } \)
\( \newcommand{\vecd}[1]{\overset{-\!-\!\rightharpoonup}{\vphantom{a}\smash {#1}}} \)
\( \newcommand{\dsum}{\displaystyle\sum\limits} \)
\( \newcommand{\dint}{\displaystyle\int\limits} \)
\( \newcommand{\dlim}{\displaystyle\lim\limits} \)
\( \newcommand{\id}{\mathrm{id}}\) \( \newcommand{\Span}{\mathrm{span}}\)
( \newcommand{\kernel}{\mathrm{null}\,}\) \( \newcommand{\range}{\mathrm{range}\,}\)
\( \newcommand{\RealPart}{\mathrm{Re}}\) \( \newcommand{\ImaginaryPart}{\mathrm{Im}}\)
\( \newcommand{\Argument}{\mathrm{Arg}}\) \( \newcommand{\norm}[1]{\| #1 \|}\)
\( \newcommand{\inner}[2]{\langle #1, #2 \rangle}\)
\( \newcommand{\Span}{\mathrm{span}}\)
\( \newcommand{\id}{\mathrm{id}}\)
\( \newcommand{\Span}{\mathrm{span}}\)
\( \newcommand{\kernel}{\mathrm{null}\,}\)
\( \newcommand{\range}{\mathrm{range}\,}\)
\( \newcommand{\RealPart}{\mathrm{Re}}\)
\( \newcommand{\ImaginaryPart}{\mathrm{Im}}\)
\( \newcommand{\Argument}{\mathrm{Arg}}\)
\( \newcommand{\norm}[1]{\| #1 \|}\)
\( \newcommand{\inner}[2]{\langle #1, #2 \rangle}\)
\( \newcommand{\Span}{\mathrm{span}}\) \( \newcommand{\AA}{\unicode[.8,0]{x212B}}\)
\( \newcommand{\vectorA}[1]{\vec{#1}} % arrow\)
\( \newcommand{\vectorAt}[1]{\vec{\text{#1}}} % arrow\)
\( \newcommand{\vectorB}[1]{\overset { \scriptstyle \rightharpoonup} {\mathbf{#1}} } \)
\( \newcommand{\vectorC}[1]{\textbf{#1}} \)
\( \newcommand{\vectorD}[1]{\overrightarrow{#1}} \)
\( \newcommand{\vectorDt}[1]{\overrightarrow{\text{#1}}} \)
\( \newcommand{\vectE}[1]{\overset{-\!-\!\rightharpoonup}{\vphantom{a}\smash{\mathbf {#1}}}} \)
\( \newcommand{\vecs}[1]{\overset { \scriptstyle \rightharpoonup} {\mathbf{#1}} } \)
\(\newcommand{\longvect}{\overrightarrow}\)
\( \newcommand{\vecd}[1]{\overset{-\!-\!\rightharpoonup}{\vphantom{a}\smash {#1}}} \)
\(\newcommand{\avec}{\mathbf a}\) \(\newcommand{\bvec}{\mathbf b}\) \(\newcommand{\cvec}{\mathbf c}\) \(\newcommand{\dvec}{\mathbf d}\) \(\newcommand{\dtil}{\widetilde{\mathbf d}}\) \(\newcommand{\evec}{\mathbf e}\) \(\newcommand{\fvec}{\mathbf f}\) \(\newcommand{\nvec}{\mathbf n}\) \(\newcommand{\pvec}{\mathbf p}\) \(\newcommand{\qvec}{\mathbf q}\) \(\newcommand{\svec}{\mathbf s}\) \(\newcommand{\tvec}{\mathbf t}\) \(\newcommand{\uvec}{\mathbf u}\) \(\newcommand{\vvec}{\mathbf v}\) \(\newcommand{\wvec}{\mathbf w}\) \(\newcommand{\xvec}{\mathbf x}\) \(\newcommand{\yvec}{\mathbf y}\) \(\newcommand{\zvec}{\mathbf z}\) \(\newcommand{\rvec}{\mathbf r}\) \(\newcommand{\mvec}{\mathbf m}\) \(\newcommand{\zerovec}{\mathbf 0}\) \(\newcommand{\onevec}{\mathbf 1}\) \(\newcommand{\real}{\mathbb R}\) \(\newcommand{\twovec}[2]{\left[\begin{array}{r}#1 \\ #2 \end{array}\right]}\) \(\newcommand{\ctwovec}[2]{\left[\begin{array}{c}#1 \\ #2 \end{array}\right]}\) \(\newcommand{\threevec}[3]{\left[\begin{array}{r}#1 \\ #2 \\ #3 \end{array}\right]}\) \(\newcommand{\cthreevec}[3]{\left[\begin{array}{c}#1 \\ #2 \\ #3 \end{array}\right]}\) \(\newcommand{\fourvec}[4]{\left[\begin{array}{r}#1 \\ #2 \\ #3 \\ #4 \end{array}\right]}\) \(\newcommand{\cfourvec}[4]{\left[\begin{array}{c}#1 \\ #2 \\ #3 \\ #4 \end{array}\right]}\) \(\newcommand{\fivevec}[5]{\left[\begin{array}{r}#1 \\ #2 \\ #3 \\ #4 \\ #5 \\ \end{array}\right]}\) \(\newcommand{\cfivevec}[5]{\left[\begin{array}{c}#1 \\ #2 \\ #3 \\ #4 \\ #5 \\ \end{array}\right]}\) \(\newcommand{\mattwo}[4]{\left[\begin{array}{rr}#1 \amp #2 \\ #3 \amp #4 \\ \end{array}\right]}\) \(\newcommand{\laspan}[1]{\text{Span}\{#1\}}\) \(\newcommand{\bcal}{\cal B}\) \(\newcommand{\ccal}{\cal C}\) \(\newcommand{\scal}{\cal S}\) \(\newcommand{\wcal}{\cal W}\) \(\newcommand{\ecal}{\cal E}\) \(\newcommand{\coords}[2]{\left\{#1\right\}_{#2}}\) \(\newcommand{\gray}[1]{\color{gray}{#1}}\) \(\newcommand{\lgray}[1]{\color{lightgray}{#1}}\) \(\newcommand{\rank}{\operatorname{rank}}\) \(\newcommand{\row}{\text{Row}}\) \(\newcommand{\col}{\text{Col}}\) \(\renewcommand{\row}{\text{Row}}\) \(\newcommand{\nul}{\text{Nul}}\) \(\newcommand{\var}{\text{Var}}\) \(\newcommand{\corr}{\text{corr}}\) \(\newcommand{\len}[1]{\left|#1\right|}\) \(\newcommand{\bbar}{\overline{\bvec}}\) \(\newcommand{\bhat}{\widehat{\bvec}}\) \(\newcommand{\bperp}{\bvec^\perp}\) \(\newcommand{\xhat}{\widehat{\xvec}}\) \(\newcommand{\vhat}{\widehat{\vvec}}\) \(\newcommand{\uhat}{\widehat{\uvec}}\) \(\newcommand{\what}{\widehat{\wvec}}\) \(\newcommand{\Sighat}{\widehat{\Sigma}}\) \(\newcommand{\lt}{<}\) \(\newcommand{\gt}{>}\) \(\newcommand{\amp}{&}\) \(\definecolor{fillinmathshade}{gray}{0.9}\)Learning Objectives
Course Competency:
Use basic lab equipment.
Learning Objectives:
- Demonstrate pipetting skills
- Use lab glassware
- Operate centrifuges
- Demonstrate use of balances
Introduction
It is important to know the names and functions of different kinds of laboratory equipment so that procedures are done safely and completed successfully. Each piece of laboratory equipment is designed to do a different job. Although some of the equipment may be used in other areas, we will focus on how it is typically used within a clinical lab.
Glassware
Glassware
Laboratory glassware can be made of different quality glass.
- Flint glass - inexpensive, disposable. Used in test tubes.
- Borosilicate glass - high heat resistance. Used in beakers and flasks. Pyrex and Kimax are brand names.
- Quartz - high quality glass used when light transmission is important. Used in cuvettes for spectrophotometers.
Plasticware
Plastics used in the lab can also be made of different types and used at different temperatures. Polyethylene, polystyrene, and polypropylene are examples of plastics used in labware.
Critical vs. NonCritical Measurements
Some labware, such as beakers and graduated cylinders, are used to make estimated measurements. They are termed noncritical measurements. When labware is designed to strict standards of accuracy, these are termed critical measurements. Volumetric flasks and volumetric pipets are examples of glassware that are used in critical measurements.
Types of Glassware
- Beakers – a beaker can hold liquids or solids. They can be used for pouring chemicals into other containers. Heat-resistant beakers can be used for heating liquids.
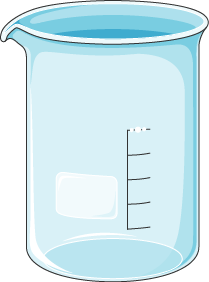
Figure \(\PageIndex{1}\): Beaker. (Copyright Servier Medical Art by Les Laboratoires Servier; CC BY 4.0)
- Flasks – there are several types of flasks, including the Erlenmeyer flask. It can be used to hold and heat liquids. This flask has a triangular shape when viewed from the side. The volumetric flask is used for critical measurements and can only measure one volume.

Figure \(\PageIndex{2}\): Erlenmeyer flask. (Copyright Servier Medical Art by Les Laboratoires Servier; CC BY 4.0) 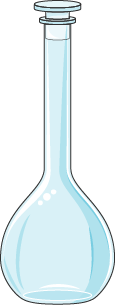
Figure \(\PageIndex{3}\): Volumetric flask. (Copyright Servier Medical Art by Les Laboratoires Servier; CC BY 4.0)
- Test tubes – used to hold smaller amounts of chemicals or patient samples or for biochemical tests. They can be made of glass or plastic and are used frequently in the lab. There are several sizes and shapes of test tubes.

Figure \(\PageIndex{4}\): Various kinds of test tubes. (Adaptation of Servier Medical Art by Les Laboratoires Servier; CC BY 4.0) - Graduated Cylinders – used to measure liquids. In the clinical setting, they are typically used to measure the volume of 24-hour urine collections or for measuring the total volume of semen. It is important to read the volume level and the bottom of the meniscus (the curved surface of the liquid as it adheres to the sides)

Figure \(\PageIndex{5}\): Graduated cylinder. (Copyright Servier Medical Art by Les Laboratoires Servier; CC BY 4.0)
Pipetting
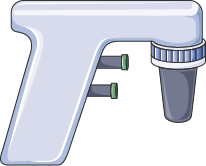
Many sizes and types of pipets are used in the clinical laboratory. It is essential that laboratorians know how to operate different pipettes and be able to select the appropriate pipette for the task being performed.
Pipettes are filled by suction by using a bulb or a mechanical pipette-aid. The upper end of the pipette is fitted to the pipette-aid to draw up the liquid.
.png?revision=1)

TD vs TC
Pipettes are calibrated either To Deliver (TD) or To Contain (TC).
To Deliver pipettes are designed to empty by gravity and will deliver the volume marked on the pipette. There will be a small amount of fluid that remains in the tip. If the pipette has a frosted band etched into the top, it is a blowout pipette. This means that the last bit of fluid needs to be expelled from the tip of the pipette. This can be done by using the pipette aid and blowing out the last drop of liquid into the receiving vessel. Most serological pipette have a frosted band and the last drop should be blown out. Volumetric pipettes typically do NOT have a frosted band and they are calibrated so that the last drop should remain in the tip of the pipette.
To Contain pipettes are calibrated to contain the volume indicated on the pipette. These pipettes must be rinsed to be sure that the appropriate volume is delivered. Micropipettes are examples of TC pipettes.
Serological/Graduated Pipettes
Serological/graduated pipettes are used when more than 1 ml volumes are needed. They can be made of glass or polystyrene plastic. These pipettes are marked in uniform increments. They can transfer the capacity of the pipette or a portion of the total volume. The pipette selected should be closest to the volume needed in the task. For example, if you need to measure 4 ml and there is a 5 ml and a 10 ml serological pipette available, you should select the 5 ml pipette to measure the 4 ml.
Operation:
- Attach suction aid
- Aspirate liquid into pipette to the line of the volume required.
- With a tissue, wipe excess fluid on outside of pipette taking care not to remove any from the tip
- Holding the pipette near vertical, place in receiving vessel with tip placed against the inner surface
- Release suction and allow liquid to flow into the container.
- The last remaining drop is forced out using the pipette aid.

Volumetric Pipettes
Volumetric pipettes are used when critical measurements are required. They are only able to measure one volume of liquid. They have a unique shape with a bulb in the center.
Operation:
- Attach suction aid
- Aspirate liquid into pipette to line above the center bulb
- With a tissue, wipe excess fluid on outside of pipette taking care not to remove any from the tip
- Holding the pipette near vertical, place in receiving vessel with tip placed against the inner surface
- Release suction and allow liquid to flow into the container
- Leave tip in contact with the surface for a few seconds to allow complete drainage
- A small drop will remain in the tip of the pipette

Transfer/Disposable Pipettes
Transfer pipettes are used to dispense small amounts of liquids. They are typically disposable and plastic. They are also used when drops of sample are required.

Introduction to Micropipetting
The ability to measure very small amounts, microliters (µl), of liquid reagents is a fundamental skill needed in the laboratory. Scientists use a device called a micropipette to measure these very small volumes with accuracy.

Choosing and Setting the Micropipette
There are several sizes of micropipettes used in the clinical laboratory. Micropipettes can broadly be divided into two groups: variable and fixed volume.
Variable volume micropipettes allow the laboratorian to adjust the volume within a certain range. Common variable micropipettes in the clinical laboratory are labeled 1000 µl, 100 µl, 50 µl, 20 µl, and 10 µl. They can be adjusted up to the volume listed on them. For example, the 1000 µl pipette can measure between 100-1000 µl. The 100 µl pipette can measure between 10 and 100 µl, the 10 µl can measure between 1 and 10 µl, etc. It is important to select a pipette that is the closest to the volume you want to measure. For example, if you were asked to measure 15 µl, you should use the 20 µl variable pipette adjusted to a volume of 15 µl. Even though the 50 µl and the 100 µl can be adjusted to a volume of 15 µl, the pipette that should be selected is the 20 µl.
To adjust the volume of a variable micropipette, you utilize the dial. Some micropipettes require that you push in a small button while turning the dial. There should be no resistance when attempting to turn the dial and adjust the pipet.
Another type of micropipette is the fixed volume micropipette. These pipettes can only measure one volume. In a lab, there are typically a set of these types of pipettes.

Both variable and fixed volume micropipettes utilize a disposable tip. It is important to use the correct tip for the pipette you are using.

Basic Operation of a Micropipette
- Adjust volume of pipette by turning the dial.
- Hold the micropipette in your dominant hand, and securely place the end into the proper size tip. Once the tip is on, be careful not to touch the tip to anything.
- With your nondominant hand, hold the container of the liquid that you are needing to measure at eye level.
- Push the micropipette operating button down to the first stop and hold your thumb in this position.
- Place the tip of the pipette into the liquid. Be sure that the tip is below the surface of the liquid (approximately 1 cm) so that you don't draw up any air.
- Gently release your thumb from the plunger to draw fluid into the tip.
- Examine the tip to confirm that the tip has liquid and that no bubbles are present. If there is liquid on the exterior of the tip, carefully wipe the tip with a Kim wipe. Do not hold the wipe near the tip as this will draw out some of the fluid and make your measurement inaccurate.
- Place the original container back into the rack.
- Dispense the liquid in the tip into the receiving vessel by slowly pushing the button to the first stop. After a brief pause (1 second), press the button to the second stop. This forces the last bit of liquid out of the pipette tip (blow-out).
- Dispose of the tip. Some pipettes do this with a button and with others you must remove the tip manually.
Pipetting Tips1
- Pre-Rinse - Aspirate and then expel the liquid into the pipette tip several times.
- Consistency - Maintain consistent rhythm, speed, and technique when depressing and releasing the operational button.
- Angle - Keep the angle of immersion as close to vertical as possible. Pull the pipette straight out of the container being sure not to touch the sides.
- Tip Immersion Time and Aspiration Rate - Be sure to keep the pipette tip immersed in the liquid for enough time to allow the tip to fill. This is especially important for viscous liquids.
- Depth - The correct tip immersion depth improves pipetting accuracy. If the tip is immersed too far, more liquid is aspirated. If the tip is not immersed far enough, air can be drawn in, resulting in inaccurate volume. Resting the tip against the walls or bottom of the container restricts entry of the sample.
Table \(\PageIndex{1}\): Relationship between Pipette Volume and Immersion Depth2 Pipette Volume Immersion Depth 2 and 10 µl 1 mm 20 and 100 µl 2-3 mm 200 and 1000 µl 3-6 mm 5000 µl and 10 ML 6-10 mm
Watch "How to pipette correctly – a short step-by-step introduction into proper pipetting" by Eppendorf for demonstration of effective pipetting techniques.
Additional tips available at "The Fundamentals of Pipetting" by ThermoFisher Scientific [archived link here].
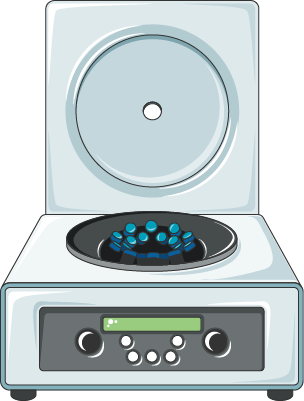
Centrifuge
Centrifuges are common pieces of equipment used in laboratories. They use centrifugal force to separate substances based on density. Fluids such as blood or urine are spun at a high speed within a container. Tubes spin around a central rotor. It is critical that the load is balanced before starting the centrifuge. Tubes of the same size and equal volume must be placed across the rotor from one another. Tubes should remain capped and the lid of the centrifuge must remain closed for the entire time. The speed (revolutions per minute or RPM) and the time of centrifugation will change depending on the samples being spun/separated. For example, urine and blood samples require different speeds and times. Follow the procedure at your institution. To properly care for this important piece of equipment, maintenance needs to be performed. This includes checking the rotation speed, checking the timer, and promptly cleaning up any spills.
There are several types of centrifuges used in the clinical lab:
- Clinical Centrifuge – General centrifuge used for spinning blood and urine samples
- Serological Centrifuge – Smaller centrifuge used in blood banking to spin smaller test tubes
- Microcentrifuge – Used to spin small microcentrifuge tubes at high speed
Balance
Balances are another piece of equipment used in laboratories although not nearly as commonly as a centrifuge. They are used to measure the weight of a substance. Always follow the manufacturer’s instructions for operation. In general, keep balances clean and protect them from jarring. Keep in a location free from drafts and vibration. Ensure that the balance reads zero when the weighing area is empty. Tare (set the balance to zero) with the empty weighing container on the weighing pan.
References
1 Pipetting tips include original content and content adapted from Pushparaj P. N. (2020). Revisiting the Micropipetting Techniques in Biomedical Sciences: A Fundamental Prerequisite in Good Laboratory Practice. Bioinformation, 16(1), 8–12. https://pmc.ncbi.nlm.nih.gov/articles/PMC6986936/. CC BY 4.0.
2 Mettler-Toledo (n.d.). "Rainin Classic Manual Pipette: Operating Instructions." MT.com. https://www.mt.com/dam/RAININ/PDFs/UserManuals/rainin_classic_manual_EN.pdf
Except where otherwise noted, content on this page includes original content and content adapted from: