
2.8: Incus- and Malleostapedotomy
- Page ID
- 17699

\( \newcommand{\vecs}[1]{\overset { \scriptstyle \rightharpoonup} {\mathbf{#1}} } \)
\( \newcommand{\vecd}[1]{\overset{-\!-\!\rightharpoonup}{\vphantom{a}\smash {#1}}} \)
\( \newcommand{\id}{\mathrm{id}}\) \( \newcommand{\Span}{\mathrm{span}}\)
( \newcommand{\kernel}{\mathrm{null}\,}\) \( \newcommand{\range}{\mathrm{range}\,}\)
\( \newcommand{\RealPart}{\mathrm{Re}}\) \( \newcommand{\ImaginaryPart}{\mathrm{Im}}\)
\( \newcommand{\Argument}{\mathrm{Arg}}\) \( \newcommand{\norm}[1]{\| #1 \|}\)
\( \newcommand{\inner}[2]{\langle #1, #2 \rangle}\)
\( \newcommand{\Span}{\mathrm{span}}\)
\( \newcommand{\id}{\mathrm{id}}\)
\( \newcommand{\Span}{\mathrm{span}}\)
\( \newcommand{\kernel}{\mathrm{null}\,}\)
\( \newcommand{\range}{\mathrm{range}\,}\)
\( \newcommand{\RealPart}{\mathrm{Re}}\)
\( \newcommand{\ImaginaryPart}{\mathrm{Im}}\)
\( \newcommand{\Argument}{\mathrm{Arg}}\)
\( \newcommand{\norm}[1]{\| #1 \|}\)
\( \newcommand{\inner}[2]{\langle #1, #2 \rangle}\)
\( \newcommand{\Span}{\mathrm{span}}\) \( \newcommand{\AA}{\unicode[.8,0]{x212B}}\)
\( \newcommand{\vectorA}[1]{\vec{#1}} % arrow\)
\( \newcommand{\vectorAt}[1]{\vec{\text{#1}}} % arrow\)
\( \newcommand{\vectorB}[1]{\overset { \scriptstyle \rightharpoonup} {\mathbf{#1}} } \)
\( \newcommand{\vectorC}[1]{\textbf{#1}} \)
\( \newcommand{\vectorD}[1]{\overrightarrow{#1}} \)
\( \newcommand{\vectorDt}[1]{\overrightarrow{\text{#1}}} \)
\( \newcommand{\vectE}[1]{\overset{-\!-\!\rightharpoonup}{\vphantom{a}\smash{\mathbf {#1}}}} \)
\( \newcommand{\vecs}[1]{\overset { \scriptstyle \rightharpoonup} {\mathbf{#1}} } \)
\( \newcommand{\vecd}[1]{\overset{-\!-\!\rightharpoonup}{\vphantom{a}\smash {#1}}} \)
\(\newcommand{\avec}{\mathbf a}\) \(\newcommand{\bvec}{\mathbf b}\) \(\newcommand{\cvec}{\mathbf c}\) \(\newcommand{\dvec}{\mathbf d}\) \(\newcommand{\dtil}{\widetilde{\mathbf d}}\) \(\newcommand{\evec}{\mathbf e}\) \(\newcommand{\fvec}{\mathbf f}\) \(\newcommand{\nvec}{\mathbf n}\) \(\newcommand{\pvec}{\mathbf p}\) \(\newcommand{\qvec}{\mathbf q}\) \(\newcommand{\svec}{\mathbf s}\) \(\newcommand{\tvec}{\mathbf t}\) \(\newcommand{\uvec}{\mathbf u}\) \(\newcommand{\vvec}{\mathbf v}\) \(\newcommand{\wvec}{\mathbf w}\) \(\newcommand{\xvec}{\mathbf x}\) \(\newcommand{\yvec}{\mathbf y}\) \(\newcommand{\zvec}{\mathbf z}\) \(\newcommand{\rvec}{\mathbf r}\) \(\newcommand{\mvec}{\mathbf m}\) \(\newcommand{\zerovec}{\mathbf 0}\) \(\newcommand{\onevec}{\mathbf 1}\) \(\newcommand{\real}{\mathbb R}\) \(\newcommand{\twovec}[2]{\left[\begin{array}{r}#1 \\ #2 \end{array}\right]}\) \(\newcommand{\ctwovec}[2]{\left[\begin{array}{c}#1 \\ #2 \end{array}\right]}\) \(\newcommand{\threevec}[3]{\left[\begin{array}{r}#1 \\ #2 \\ #3 \end{array}\right]}\) \(\newcommand{\cthreevec}[3]{\left[\begin{array}{c}#1 \\ #2 \\ #3 \end{array}\right]}\) \(\newcommand{\fourvec}[4]{\left[\begin{array}{r}#1 \\ #2 \\ #3 \\ #4 \end{array}\right]}\) \(\newcommand{\cfourvec}[4]{\left[\begin{array}{c}#1 \\ #2 \\ #3 \\ #4 \end{array}\right]}\) \(\newcommand{\fivevec}[5]{\left[\begin{array}{r}#1 \\ #2 \\ #3 \\ #4 \\ #5 \\ \end{array}\right]}\) \(\newcommand{\cfivevec}[5]{\left[\begin{array}{c}#1 \\ #2 \\ #3 \\ #4 \\ #5 \\ \end{array}\right]}\) \(\newcommand{\mattwo}[4]{\left[\begin{array}{rr}#1 \amp #2 \\ #3 \amp #4 \\ \end{array}\right]}\) \(\newcommand{\laspan}[1]{\text{Span}\{#1\}}\) \(\newcommand{\bcal}{\cal B}\) \(\newcommand{\ccal}{\cal C}\) \(\newcommand{\scal}{\cal S}\) \(\newcommand{\wcal}{\cal W}\) \(\newcommand{\ecal}{\cal E}\) \(\newcommand{\coords}[2]{\left\{#1\right\}_{#2}}\) \(\newcommand{\gray}[1]{\color{gray}{#1}}\) \(\newcommand{\lgray}[1]{\color{lightgray}{#1}}\) \(\newcommand{\rank}{\operatorname{rank}}\) \(\newcommand{\row}{\text{Row}}\) \(\newcommand{\col}{\text{Col}}\) \(\renewcommand{\row}{\text{Row}}\) \(\newcommand{\nul}{\text{Nul}}\) \(\newcommand{\var}{\text{Var}}\) \(\newcommand{\corr}{\text{corr}}\) \(\newcommand{\len}[1]{\left|#1\right|}\) \(\newcommand{\bbar}{\overline{\bvec}}\) \(\newcommand{\bhat}{\widehat{\bvec}}\) \(\newcommand{\bperp}{\bvec^\perp}\) \(\newcommand{\xhat}{\widehat{\xvec}}\) \(\newcommand{\vhat}{\widehat{\vvec}}\) \(\newcommand{\uhat}{\widehat{\uvec}}\) \(\newcommand{\what}{\widehat{\wvec}}\) \(\newcommand{\Sighat}{\widehat{\Sigma}}\) \(\newcommand{\lt}{<}\) \(\newcommand{\gt}{>}\) \(\newcommand{\amp}{&}\) \(\definecolor{fillinmathshade}{gray}{0.9}\)OPEN ACCESS ATLAS OF OTOLARYNGOLOGY, HEAD & NECK OPERATIVE SURGERY
INCUS- & MALLEOSTAPEDOTOMY
Tashneem Harris & Thomas Linder
Stapedotomy refers to the calibrated fenestration of a fixed footplate and insertion of a prosthesis. Prof Ugo Fisch first introduced the terms incus-stapedotomy where the prosthesis is attached to the long process of the incus, vs. malleostapedotomy where the prosthesis is attached to the malleus handle.1 The surgical steps of both procedures as described by Prof Fisch will be described.
Otosclerosis is the most common indication for stapedotomy. Histology of temporal bone specimens show that there may be a fairly high incidence (up to 30%) of additional malleal fixation in otosclerosis.2 Hyalinization and ossification of the anterior malleal ligament are related to the duration of otosclerosis.2 Fixation of the malleus head and incus body are usually found in narrow external ear canals. The reported incidence of malleal fixation in clinical studies varies significantly for both primary (0.6-6%)3,4 and revision surgery (3-37%).5,6 In a recent study (unpublished data) conducted by the senior author (T.L), the incidence was found to be 5% with primary surgery.
The best way to assess mobility of the ossicles and the anterior malleal ligament is by visual assessment of the mobility of the ossicles on direct palpation. This requires adequate surgical exposure; it is difficult to assess via a limited transcanal approach. Partial fixation may be overlooked when using a limited approach.
It is the practice of the senior author (T.L) to routinely use the endaural approach and to systematically expose the anterior malleal ligament as this allows for proper assessment and identification of impaired ossicular mobility at the time of the primary surgery. If there is even partial fixity of the malleus or incus at primary surgery, then a malleostapedotomy is performed. The rationale behind the endaural approach with an enlarged tympanomeatal flap and partial anterosuperior canalplasty as described by Fisch is primarily to improve surgical exposure in order to properly assess ossicular mobility.7
Indication for surgery
Patients with otosclerosis and a conductive hearing loss with an air-bone gap (ABG) of >20 dB are candidates for surgery.
Goals of surgery
The aim of surgery is to achieve maximum hearing gain with minimal damage to the membranous labyrinth; it may be considered in 3 different categories depending on the cochlear reserve of the patient:
- To achieve normal hearing in patients with normal cochlear reserve (<10 dB postoperative air-bone gap)
- To achieve serviceable hearing in patients with minimal reduction in cochlear reserve and possibly to eliminate the need for a hearing aid
- To improve hearing aid satisfaction
Note that patients with advanced otosclerosis and poor cochlear reserve who no longer benefit from amplification are candidates for cochlear implantation.
Preoperative evaluation
Otomicroscopy: A normal stable tympanic membrane without retraction pockets should be confirmed in otomicroscopy.
Tuning fork tests: Tuning fork tests are a simple means to confirm a conductive hearing loss and can help confirm the validity of the audiogram. They only assess a single frequency (commonly 440Hz) at a time and should be done by the surgeon.
Audiological evaluation
- Audiometric testing should be recent (15 dB at 2 kHz)
- Enables the surgeon to decide which ear requires surgery8
- It includes pure tone audiometry which typically indicates conductive hearing loss involving the lower frequencies with a Carhart notch at 2 kHz
- The size of the ABG provides an indication of the gain that may be achieved by surgery7
- A typical audiogram for otosclerosis has a larger ABG in the low frequencies and good sound transmission at high frequencies (4 kHz). A consistent pancochlear ABG is not typical for otosclerosis!
- A Carhart notch is characterized by the apparent elevation of bone conduction threshold of 15 dB at 2 kHz and is the hallmark audiologic sign of otosclerosis
- One can accurately determine the degree of secondary cochlear loss by making allowance for the Carhart notch when interpreting bone conduction thresholds; if the bone conduction threshold is larger than 15 dB at 2 kHZ it suggests underlying cochlear otosclerosis. This can help the clinician with preoperative counseling about the anticipated outcome of surgery
- In the absence of a Carhart notch it is important to exclude other causes of conductive hearing loss which may mimic otosclerosis
- Speech discrimination is especially useful to determine the presence of cochlear otosclerosis when the ABG is >15 dB at 2 kHz)
Tympanometry: Type A curve
Stapedial reflexes: Absent in otosclerosis
High Resolution CT (HRCT)
It is important to emphasize at this point that otosclerosis is a clinical diagnosis made on history, audiometric findings and confirmed at surgery. However, the role of HRCT in preoperative planning and patient counseling cannot be underplayed.
HRCT (0.5 mm) is useful (but not mandatory) because it can help to confirm the presence of otosclerosis9; it may identify other middle ear disorders which may mimic otosclerosis or be coexistent; it may confirm cochlear involvement by the otosclerotic focus; it is useful to assess postoperative failures and complications e.g. sensorineural hearing loss (SNHL) or disabling vertigo and may identify problems which need to be managed promptly e.g. too long a prosthesis.10
The absence of a Carhart notch suggests another cause for the conductive hearing loss. There have also been numerous case reports and series of superior semicircular canal dehiscence and other pathology which may mimic otosclerosis and are unmasked by stapedotomy (stapedial reflex is present in cases of dehiscence only).11,12,13,14
It is the practice of the senior author (T.L.) to do a HRCT scan (0.5 mm-1 mm) whenever patients have the following features on pure tone audiogram:
- Conductive hearing loss but absent Carhart notch
- Equal ABG across all frequencies
- Mixed hearing loss
- All cases of revision stapes surgery
The following pathologies can be excluded with preoperative HRCT scan:
- Conductive hearing loss with an absent stapedial reflex:
- Fixation of head of malleus to lateral tympanic wall
- Fixation of incus or erosion of incus
- Congenital ossicular deformity
- Round window atresia
- Tympanosclerosis causing obliteration of footplate
- Conductive hearing loss with an intact stapedial reflex:
- A 3rd window: superior or posterior semicircular canal dehiscence
- Tympanic facial nerve neuroma blocking the stapes
- Gusher syndrome: enlarged internal auditory meatus, enlarged endolymphatic aqueduct
- Anomalous facial nerve
CT scan checklist prior to performing stapedotomy
- Can one see an otosclerotic focus (fissula ante fenestrum)?
- Is there obliteration of the oval and round windows?
- Is there cochlear otosclerosis? (It is possible to have fairly extensive cochlear otosclerosis with minimally reduced hearing loss)
- Is there a risk of a CSF gusher (enlarged aqueduct, enlarged internal auditory meatus)?
- Is there semicircular canal dehiscence?
- What is the position of the tympanic segment of the facial nerve?
- Are there any other ossicular abnormalities e.g. fixation of the malleus to the lateral wall of the epitympanum?
- Is there a stapedial artery?
CT checklist for revision surgery
- Is the prosthesis in the correct position or is it displaced?
- In cases of vertigo, what is the depth of insertion into the vestibule?
- Is there evidence of obliterative otosclerosis, particularly of the round window, which may have been missed at the primary surgery?
- Is there superior canal dehiscence or any other 3rd window?
- Is there additional fixation of the malleus and/or incus?
Anesthesia
- General or local anesthesia may be used
- Performing the procedure under local anesthesia depends on the patient and level of experience and level of comfort of the surgeon
- Antibiotics are not routinely used
- Antiemetics are administered intraoperatively
Surgical steps
Endaural approach (right ear)
- Infiltrate the site of the endaural skin incision with local anesthetic (lidocaine 1% and adrenaline diluted to 1:200 000)
- Insert a nasal speculum in the external ear canal to improve exposure
Infiltrate the skin of the external ear canal anteriorly and posteriorly

Figure 1: Helicotragal incision
- A helicotragal incision is made using a #15 blade (Figure 1)
- It is vital to achieve adequate hemostasis at this point to avoid subsequent troublesome bleeding
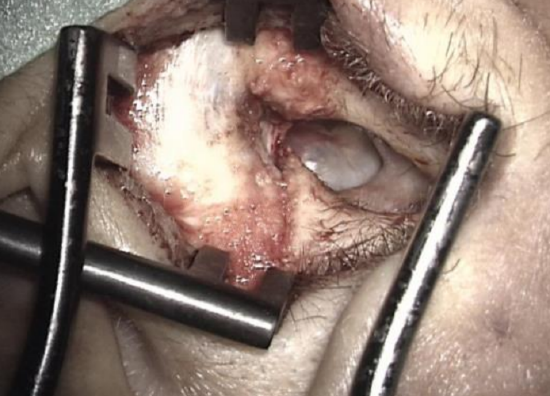
Figure 2: Exposing the ear with two retractors
- Place two endaural retractors in the entrance of the external ear canal. The 1st retractor is placed vertically; the 2nd is placed horizontally (Figure 2)
Meatal skin flap
- Make a posterior incision in the skin of the ear canal using a #11 blade, starting at the annulus at 7 o’clock (5 o’clock for left ear) and ascending upwards to end at 12 o’clock
- A 2nd incision starts anterior to the lateral process of the malleus at 3 o’clock (right ear) and passes above the tympanosquamous suture to meet the end of the endaural incision at 12 o’clock
- It is important that the tympanomeatal flap is made long enough anteriorly and that the incision stays medial to the cartilage plates
- An endaural raspatory is used to separate the skin and soft tissue from the bone both anteriorly and posteriorly
- The meatal skin flap is elevated using a Fisch microraspatory and an otosclerosis suction with adrenaline gauze to separate the soft tissue from the bone as atraumatically as possible. The working end of the Fisch micro-raspatory is held at right angles to the bone and the shoulder of the instrument pushes the adrenaline gauze strip towards the soft tissue. The suction never touches the tympanomeatal flap, but sucks on the gauze
Anterosuperior canalplasty
- The exposure may occasionally be limited by a very prominent tympanosquamous suture which requires removal with a curette or a diamond drill
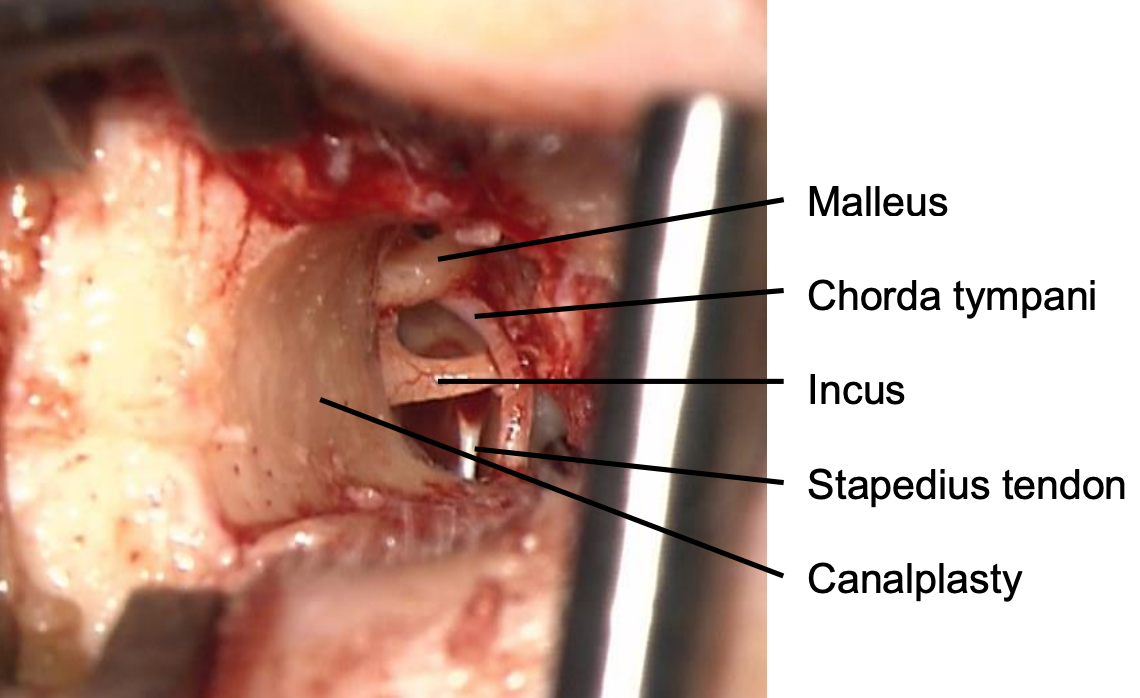
Figure 3: Anterosuperior canalplasty improves exposure
- In cases where there is a very prominent anterior bony overhang which prevents adequate exposure of the anterior tympanic spine, a limited anterior canalplasty is performed using a 3 mm diamond burr (Figure 3).
- It is very important that all bony work is done before raising the tympanic part of the tympanomeatal flap to avoid contamination of the middle ear with bone dust
Exposure of oval window
- Elevate the tympanomeatal flap towards the posterior tympanic spine in order to elevate the annulus from the sulcus
- The pars flaccida is elevated until the lateral process of the malleus and the anterior malleal ligament are visible
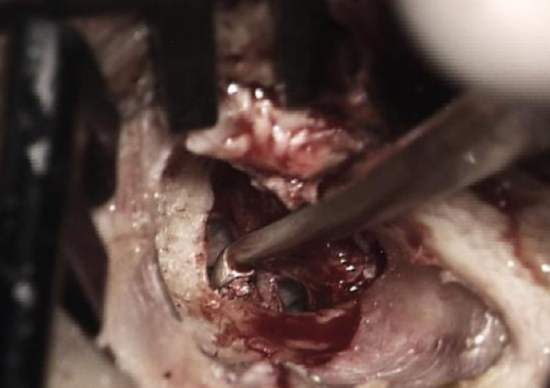
Figure 4: Small curette used to remove posterior tympanic spine
- A small curette is used to remove the posterior tympanic spine taking care to avoid damage to the underlying chorda tympani (Figure 4)

Figure 5: Correct handling of curette
- Remove the rim of bone obscuring the inferior portion of the incudomallear joint with a curette. It is important when using the curette, to avoid subluxing the incus. The small end of the curette is used. The index finger of the non-dominant hand stabilizes the curette anteriorly (Figure 5)
- Always preserve chorda tympani. It is mobilized but kept attached to the tympanic membrane; this facilitates retraction of the chorda away from the surgical field
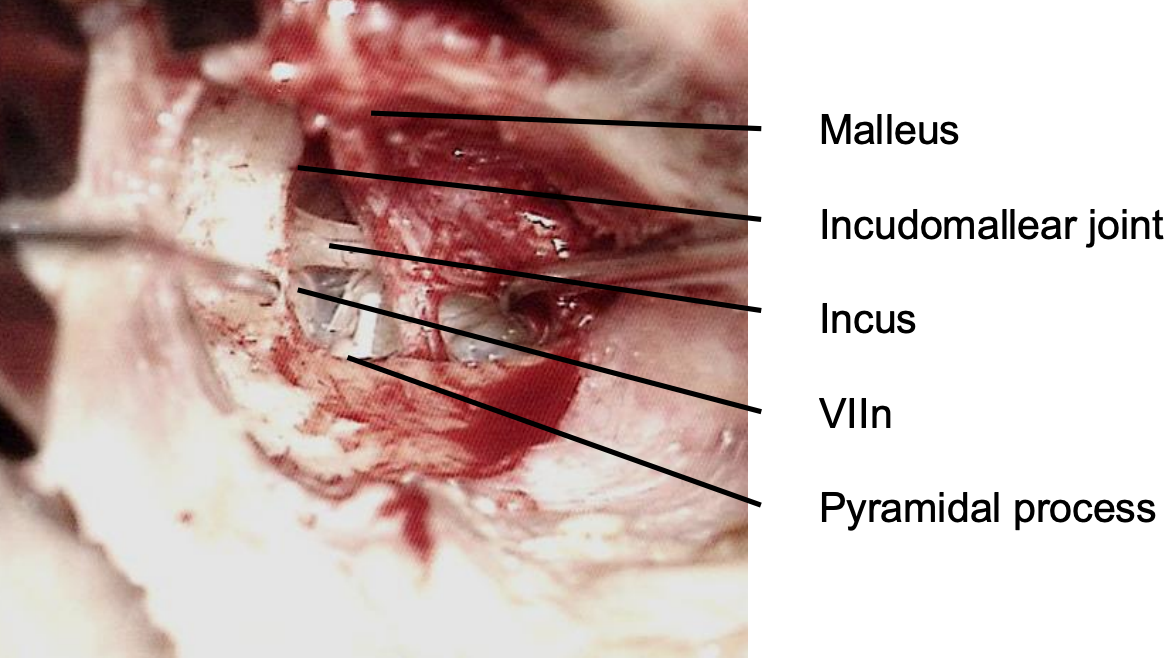
Figure 6: Final correct exposure
- z
- Inspecting the round window is important to exclude obliterative otosclerosis reaching the round window membrane and rarely, congenital round window atresia11
Checking mobility of ossicular chain

Figure 7: Checking mobility of lateral ossicular chain
- Check the mobility of the malleus and incus with a 1.5mm, 45° hook (Figure 7)
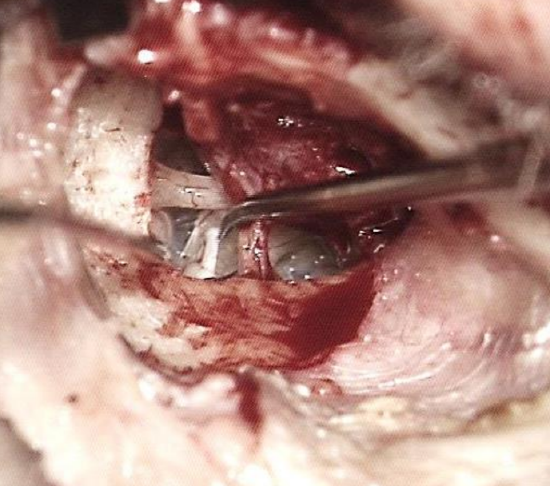
Figure 8: Checking mobility of stapes
- Check the mobility of the stapes (Figure 8)
- If malleus and/or incus are fixed, then proceed to malleostapedotomy
- If the malleus and incus are mobile and the stapes is fixed then, using the 1.5 mm 45° hook, elevate the malleus handle to determine where the incudostapedial joint is
- Use a joint knife to separate the incudostapedial joint
- Check mobility of the stapes again
Removal of stapes arch
- Cut the stapes tendon with fine Bellucci scissors
- Cut the posterior crus of the stapes with (left or right) crurotomy scissors
- Exposure of the pyramidal process is essential to provide sufficient space for the crurotomy scissors
- Fracture the anterior crus at the level of the footplate, using a 2.5 mm, 45° hook
- To fracture the anterior crus, insert the 2.5 mm, 45° hook between the incus and the malleus neck, close to the footplate. The tip of the hook is close to the level of the footplate, even if the entire anterior crus is not visible
- The hook is rotated towards the promontory
- If correctly fractured, the stapes superstructure has a long anterior and a short posterior crus
- Bleeding may occur from the mucosa when the superstructure is removed, in which case gelfoam with Ringer’s lactate or diluted adrenaline solution is placed over the footplate to achieve hemostasis (wait 2-3 minutes)
Determining length of prosthesis
- Accurate measurement of the length of the prosthesis is crucial
- A piston that is too long can contact or even pierce the underlying membranous labyrinth
- A piston that is too short will be displaced easily when the patient sneezes or performs a Valsalva maneuver
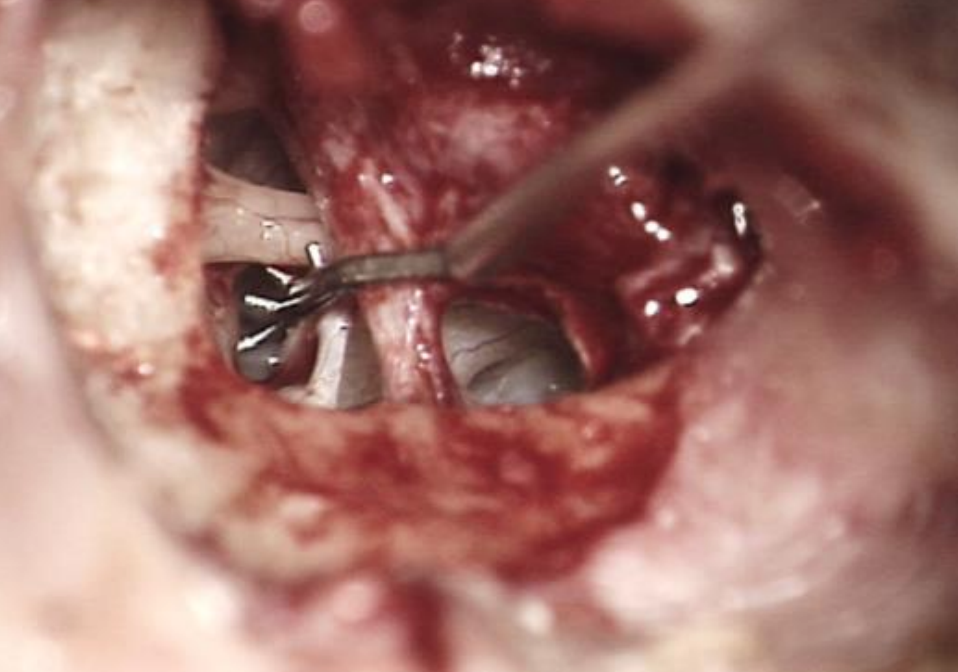
Figure 9: Measuring rod used to determine length of prosthesis
- A malleable measuring rod is used to determine the distance between the footplate and the lateral surface of the long process of the incus (Figure 9)
- Add 0.5 mm to the measured distance to account for the protrusion of the prosthesis into the vestibule
Trimming prosthesis
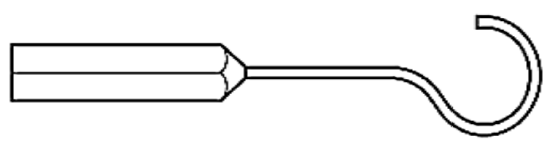
Figure 10: Teflon-wire prosthesis
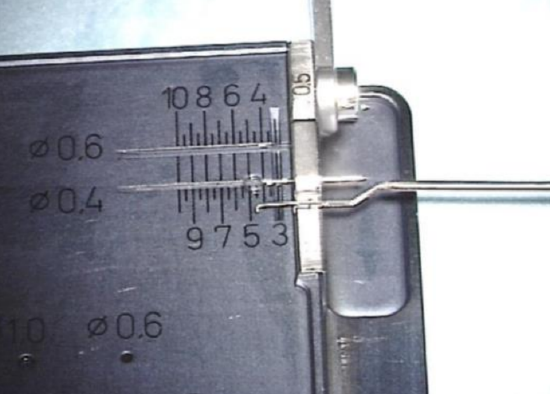
Figure 11: Cutting block
- The Storz titanium stapes piston is placed on a special cutting block which holds the prosthesis (Figures 10, 11)
- The trimmed prosthesis is handled with watchmaker’s forceps and placed upright in the 4 mm hole of the cutting block while proceeding to stapedotomy
- The Storz titanium stapes piston is hygroscopic and is therefore easier to work with when wet. Therefore, the cutting block is moistened with a few drops of water before placing the piston on it
Perforating the footplate
- A set of four manual perforators are (0.3-0.6 mm) are used to make the stapedotomy
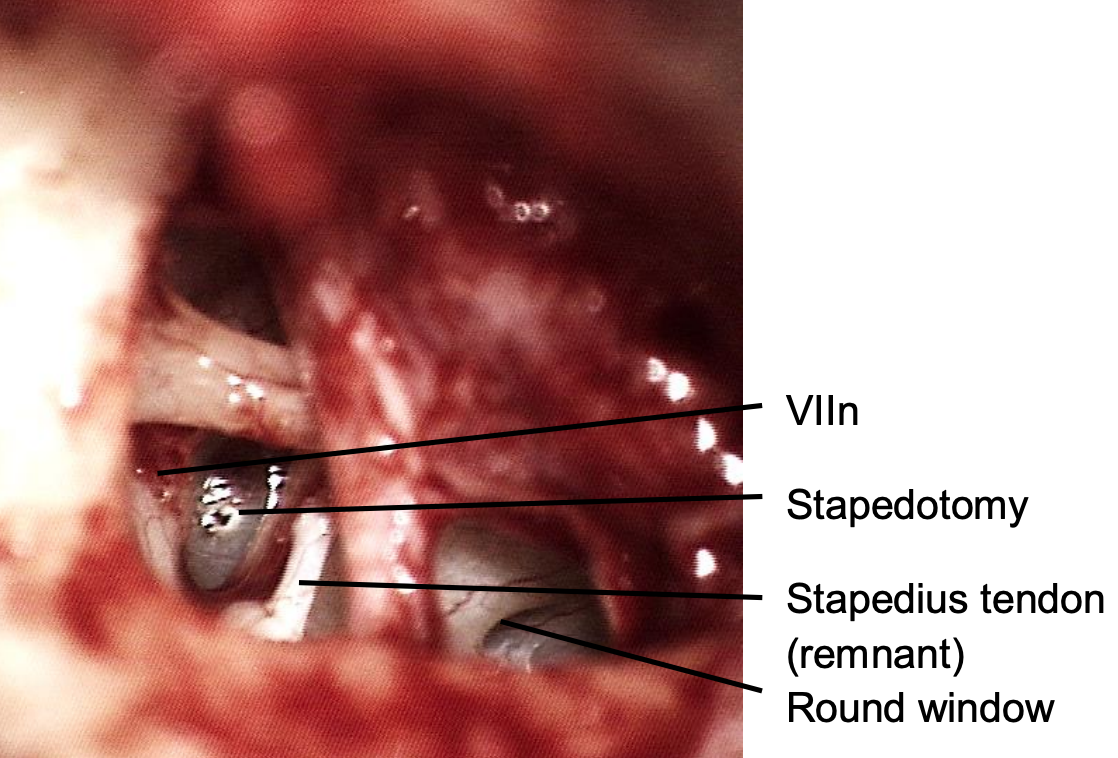
Figure 12: Initial small stapedotomy
- Start with the smallest perforator (0.3 mm) and ensure that there is no evidence of a CSF gusher before enlarging the stapedotomy with the larger perforators (Figure 12)
- The safest place to make the stapedotomy opening is in the posterior two-thirds of the stapes footplate (see below)
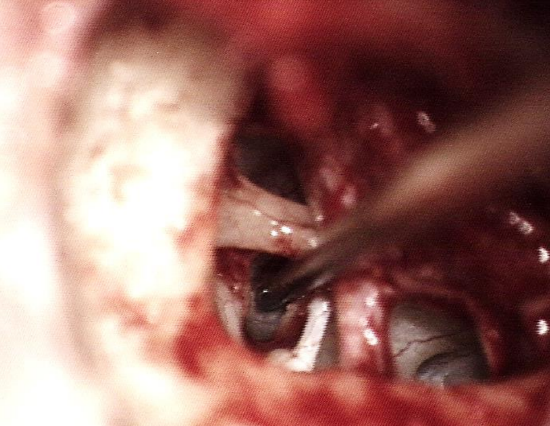
Figure 13: Making the final 0.5 mm stapedotomy
- For a 0.4 mm prosthesis the ideal diameter is a stapedotomy of 0.5 mm (Figure 13)
- The tip of the perforator is gently applied to the footplate without using any force at all
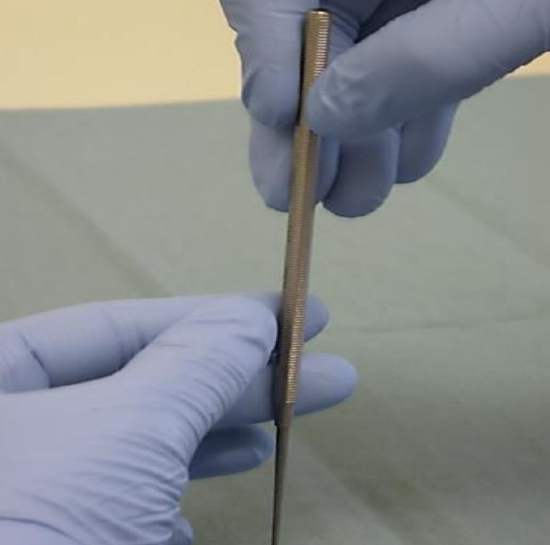
Figure 14: The perforator is gently rotated between the thumb and index finger of the right hand while the left hand stabilizes it
- The perforator is held vertically to the stapes footplate and is gently rotated between the thumb and index finger of the right hand while the left hand stabilizes it (Figure 14)
- The tip of the perforator only partially enters the vestibule as the stapedotomy opening is created by the shoulder of the perforator
Additional important points and clinical scenarios
Safest position for stapedotomy
- The risk of stapedotomy is damage to the membranous utricle and saccule which lie in close proximity to the stapes footplate
- Surgeons should know the safety margins required to perform the procedure without damaging the underlying vestibule
- The minimum distances to the utricle are at the posterior (0.58 mm) and superior (0.62 mm) borders of the footplate; therefore placing a prosthesis to a depth of 0.5 mm in this region of the footplate will place the utricle at risk of injury15
- The minimum distance to the saccule is at the anterior border of the footplate (0.76-1 mm)14
- All other measurements from the footplate to the underlying membranous utricle and saccule are >1 mm
- The safest area for manipulation is therefore the central third in the inferior segment of the footplate
Choice of instrument for stapedotomy
- In the senior author’s (T.L.) experience, the type of footplate is important when selecting a perforator
- An alternative to manual perforators is laser or a Skeeter drill. Lasers that have been used for stapes surgery include CO2, KTP, Argon, Diode and Erbium:YAG lasers
- When one encounters a biscuit (thick) footplate, or a thick footplate which is only partially fixed, then there is a risk of causing a floating footplate
- If the footplate is too thick, then it is preferable to use a drill
Footplate fracture during stapedotomy
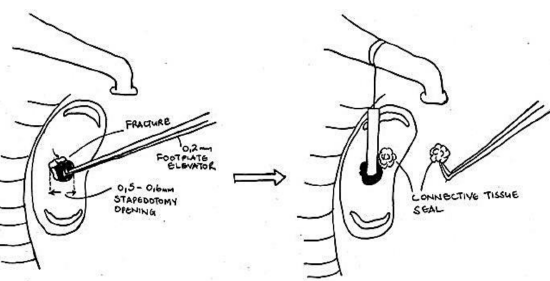
Figure 15: Carefully elevate bony fragments with 0.2mm footplate elevator
- If only small bony fragments surround the stapedotomy opening and the opening is of the desired size, then one can carefully elevate the fragments with a 0.2 mm footplate elevator to avoid the fragments from entering the vestibule and causing vertigo postoperatively (Figure 15)
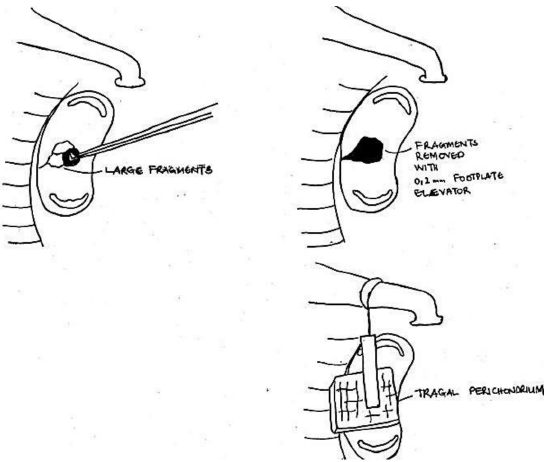
Figure 16: Partial stapedectomy sealed with a graft before inserting prosthesis
- If the footplate has been fractured but the stapedotomy is still too small and it is not possible to enlarge the opening without displacing the bony fragments, then the fractured segments can be removed with either a 0.2 mm footplate elevator or a 0.5 mm, 45° hook, such that a partial or total stapedectomy is performed. A graft is then placed over the (partial) stapedectomy before inserting the prosthesis (Figure 16)
Floating footplate
The footplate may become completely mobile before the stapedotomy has been made. Management options in this situation are:
- Proceed with the stapedotomy using a laser
- Proceed with a total stapedectomy and seal the oval window a graft (perichondrium / vein / fascia) before placing the piston prosthesis
- Postpone the surgery for one year if the stapes superstructure is still intact; the annular ligament will progressively become refixed due to otosclerosis
Inserting and crimping the prosthesis
- The prosthesis is picked up with a large crocodile forceps from its hole in the cutting block by its wire loop
- For first-time correct placement of the loop over the long process of the incus it is essential to pick up the prosthesis at the correct angle
- The prosthesis is placed onto the footplate with the loop over the incus
- One can estimate at this point whether the prosthesis is too long and needs to be shortened, or too short and needs to be replaced
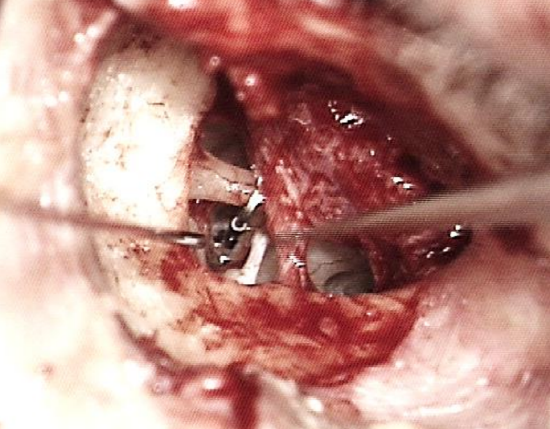
Figure 17: The loop is hooked over incus with the piston resting on the footplate
- Using a 1 mm, 45° hook, move the loop of the prosthesis along the long process of the incus to guide the shaft of the piston towards the stapedotomy opening (Figure 17)
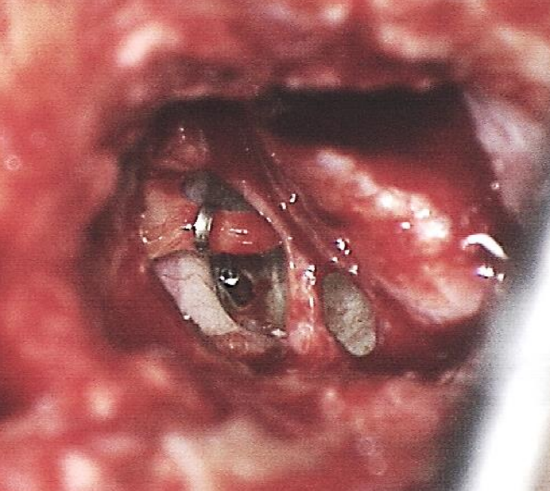
Figure 18: Crimped prosthesis with piston in stapedotomy; note position of facial nerve immediately adjacent to the prosthesis
- Once the piston is positioned within the stapedotomy opening, the loop of the prosthesis is crimped with a large smooth crocodile forceps to achieve a more stable coupling of the prosthesis to the incus; this is repeated with smaller smooth crocodile forceps (Figure 18)
- Using a 1.5 mm 45° hook, check the mobility of the ossicular chain with the prosthesis in place
- There should be no free movement of the prosthesis on the incus when the incus is moved
Crimping technique
- To achieve good results correct crimping is absolutely essential
- Loose coupling of the prosthesis to the incus will result in reduced sound transmission and inferior acoustic results16
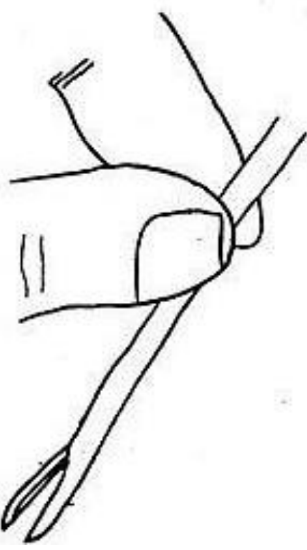
Figure 19: Crocodile forceps is held with right hand and stabilized with left hand using thumb and index finger
- To crimp the loop of the prosthesis, the crocodile forceps is held with the right hand and stabilized with the left hand using the thumb and the index finger (Figure 19)
- It may be necessary to remove the horizontal retractor in order to gain more space to crimp the prosthesis correctly
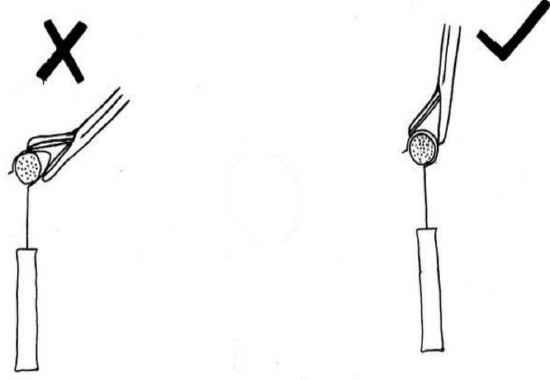
Figure 20: Crimping is performed from the most superior part of the loop
- Crimping is performed from the most superior part loop, so that the prosthesis loop makes even contact with the incus (Figure 20)
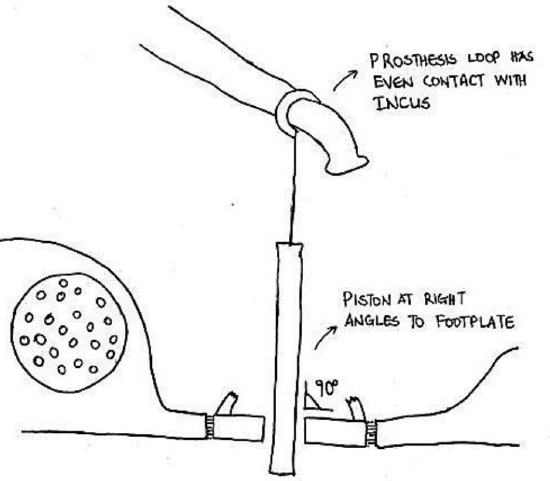
Figure 21: Prosthesis must be at right angles to footplate for optimal hearing results
- Correct angulation of the piston relative to the footplate is crucial to achieve good acoustic results. The piston must be at right angles to the footplate to avoid contact of the piston with the bony edges of the stapedotomy which will result in attenuation of vibration and reduced sound transmission17 (Figure 21)
- Kwok, Fisch et al reported that crimping results depend on the instrument used for crimping and the material of the stapes prosthesis, but not on the surgeon. The straight crocodile forceps was shown in their study to produce better crimping results than the McGee crimper17
Sealing stapedotomy opening
Connective tissue placed around the piston serves as a seal to prevent perilymph leakage. Once the seal has matured it also prevents displacement of the piston. The connective tissue seal also increases the sound transmitting area, so that a 4 mm piston is equivalent to the surface area of a 6 mm piston, therefore improving sound transmission and achieving better acoustic results. If one performs tympanometry at 2 weeks and no vertigo is induced, then the seal is adequate and it is safe for patients to fly.
- Connective tissue from the endaural incision is used to seal the stapedotomy opening
- Use a 1.5 mm, 45° hook to place pieces of connective tissue around the stapedotomy
- Venous blood taken from the patient at the beginning of the procedure is stored at 3-4°C to prevent the blood from clotting until it is needed; this blood is now used to seal the stapedotomy opening
Repositioning tympanomeatal flap
- The tympanomeatal flap is repositioned
- If any small tears in the tympanomeatal flap are noticed, then temporalis fascia is harvested and underlay grafting is done
Packing and wound closure
- Gelfoam pledgets are placed in the bony canal to secure the meatal part of the flap
- Do not place gelfoam pledgets over the tympanic membrane as they could swell and displace the prosthesis inwards causing vertigo
- Two pieces of Ivalon® are placed in the external ear canal
- The endaural incision is closed with 4/0 nylon sutures. One subcutaneous stitch may help in readapting the wound edges
- An outer strip of gauze which has been impregnated with antibiotic ointment (Terracortril) is placed in the lateral part of the external ear canal
Postoperative care
- Outer gauze dressing is removed after one week together with the Ivalon® ear wick
- Postoperative audiograms are done at 1-2 months, 1 year and 5 years
Reversal of stapedotomy
Fisch described reversing the steps of the stapedotomy procedure in order to reduce complications relating both to the incus (luxations/subluxations) and footplate (subluxations/fractures/floating footplate). The point of departure for the following description of the surgery is exposure of the oval window as previously described.
- Check ossicular chain mobility and confirm stapes fixation
- Determine prosthesis length and trim the prosthesis accordingly
- Stapedotomy is performed
- Introduce the prosthesis and crimp it to the incus with the stapes arch still intact
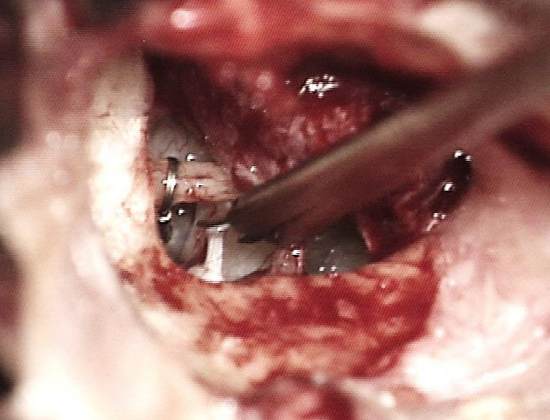
Figure 22: Stapedius tendon and posterior crus being cut with stapes prosthesis already in final position and crimped to incus
- Cut the stapedius tendon and remove the arch of the stapes (Figure 22)
- Check the mobility of the ossicular chain with the prosthesis in place
- Seal the stapedotomy opening as previously described
Malleostapedotomy
This is a technique whereby both the incus and stapes are replaced by a single prosthesis in order to establish a direct connection between the malleus and the vestibule. It is indicated for stapes fixation with pathology of the incus and/or malleus head that rules out an incus-stapedotomy.
Surgical exposure
The initial surgical steps relating to endaural approach, elevation of a tympanomeatal flap, and exposure are identical to that we have already described in this chapter for incus-stapedotomy. The point of departure of the description of the surgery that follows is exposure of ossicular chain and oval window.
- Elevate the annulus, starting at the posterior tympanic spine
- The chorda tympani is left attached to the tympanic membrane
- The tympanic membrane is reflected until the anterior malleal process and ligament are exposed
- Assess the mobility of the malleus using a 1.5 mm 45° hook
- Use a joint knife to separate the incudostapedial joint
- Mobility of the malleus and incus is reassessed
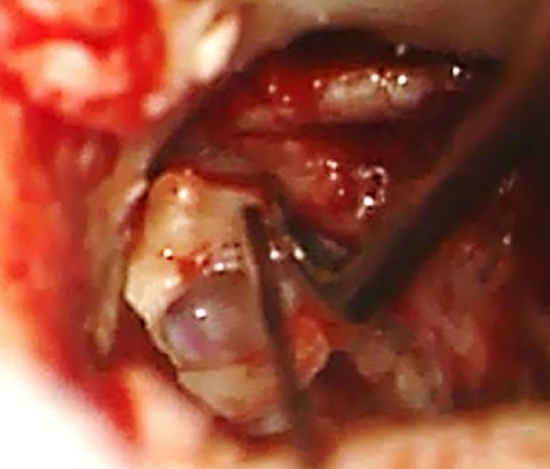
Figure 23: Elevating Shrapnell’s membrane from proximal part of handle of malleus
- Use a 2.5 mm 45° hook to elevate Shrapnell’s membrane from the proxymal part of the handle of the malleus (just 1 mm distal to the lateral malleal process) (Figure 23)
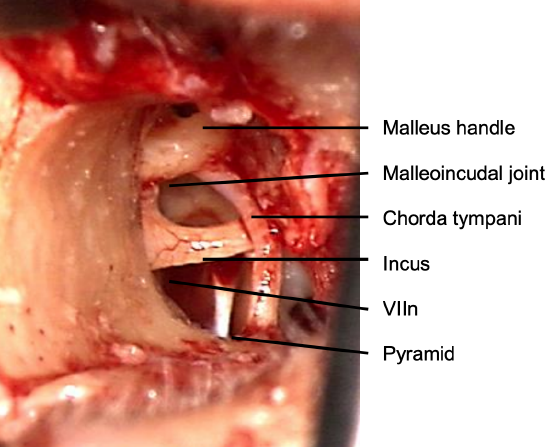
Figure 24: Final view of middle ear structures before proceeding to remove incus
- The final exposure for malleostapedotomy includes the pyramidal process, oval window niche, tympanic segment of facial nerve, inferior part of the incudomallear joint and anterior malleal process and ligament (Figure 24)
Removal of incus and malleal head

Figure 25: Removing incus with crocodile forceps
- Laterally rotate and mobilize the incus with a 1.5 mm 45° hook, and remove it with crocodile forceps (Figure 25)
- If the incus is bulky then the long process of the incus is cut with a malleus nipper so as not to injure chorda tympani
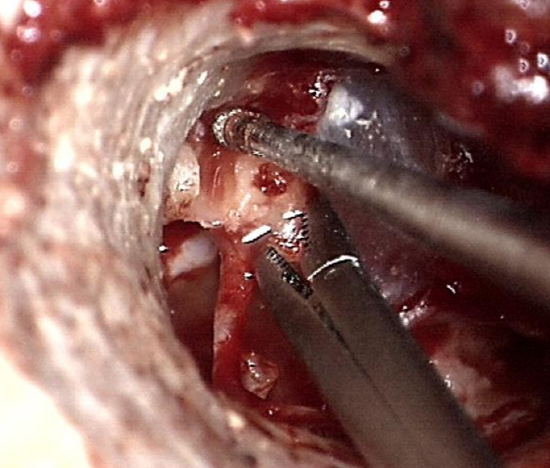
Figure 26: Diamond burr being used to excise neck and anterior process of malleus so that malleus head may be removed
- If the ligament of the malleus is ossified, then a 0.8 mm diamond burr is used to excise the neck and anterior process; separate the chorda tympani from the under surface of the neck of malleus with a 2.5 mm, 45° hook before drilling (Figure 26)
- The malleus head is then removed
Removal of arch of stapes
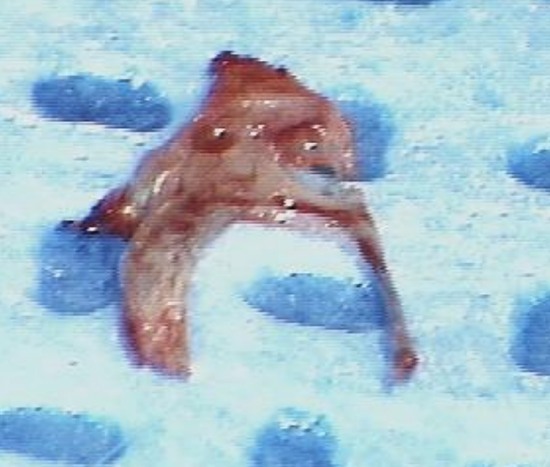
Figure 27: Anterior and posterior crura have been cut close to footplate
Crurotomy scissors are used to cut the anterior and posterior crura close to the footplate. Note in Figure 27 that the anterior and posterior crura are equal length; in incus-stapedotomy the posterior crus would be shorter than the anterior crus.
Preparation of prosthesis
- A 0.4mm diameter titanium piston with a total length of 8.5 mm is used
- The distance between the stapes footplate and the lateral surface of the malleus handle (just below the lateral process) is measured with a malleable measuring rod; 0.5 mm is added to this measurement
- Using the technique described for incus-stapedotomy the desired length is achieved by cutting the prosthesis on a special cutting block
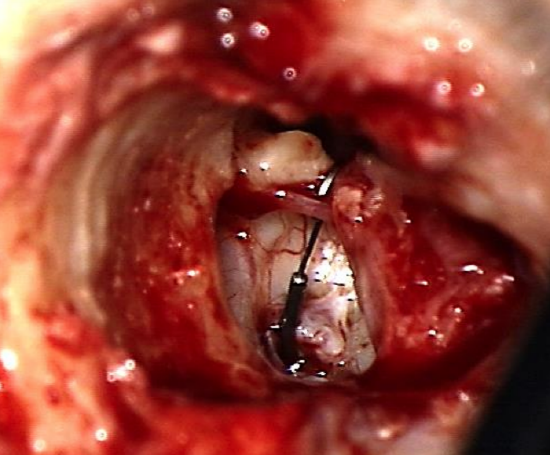
Figure 28: Prosthesis placed in middle ear to check its length
- To confirm the correct length, the prosthesis is introduced into the middle ear with a large crocodile forceps, so that it extends between the malleus handle and stapes footplate (Figure 28)
- If the prosthesis extends above the malleus handle by 0.5 mm, then the length is correct. A prosthesis that is too long may need to be cut shorter. If is too short then it needs to be replaced.
- To accommodate the slightly off-center position of the malleus relative to the stapes footplate, the shaft of the piston must be adapted so that it will lie perpendicular to the stapes footplate
- The loop of the prosthesis it must be enlarged in order to fit over the malleus handle by stretching it open by moving it along 1.5 mm, 45° hook with a watchmaker’s forceps
- The loop may need to be adapted so that it is oriented at 90° to the malleus handle
Performing the stapedotomy
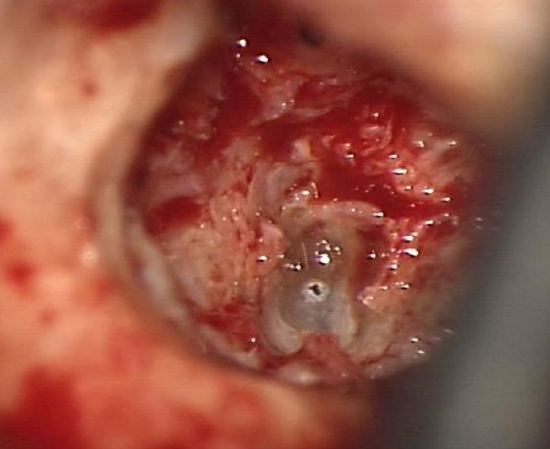
Figure 29: Initial small stapedotomy
- A perforation is made between the middle and inferior 1/3 of the footplate with a manual perforator or laser as for incus-stapedotomy (Figure 29)
Introducing and crimping the prosthesis
- Accurate crimping is crucial to obtain good results; the larger exposure afforded by the approach described facilitates accurate crimping
- The prosthesis is picked up by its loop with a large alligator forceps at the required angle and placed on the footplate
- The loop of the prosthesis is placed over the malleus just distal to the lateral malleal process
- The loop is crimped to the malleus by applying the alligator forceps perpendicularly to the handle of the malleus. A McGee Crimper/Wire Closure Forceps may be helpful to deal with the angle between the stapedotomy and malleus

Figure 30: The loop is perpendicular to malleus handle and shaft is perpendicular to footplate
- If correctly crimped, the loop of the prosthesis should be perpendicular to the inclination of the malleus handle and the shaft should be perpendicular to the stapes footplate (Figure 30)
Sealing the stapedotomy
The stapedotomy opening is sealed with connective tissue from the endaural incision and blood taken from the patient as described for incus stapedotomy.
Repositioning the tympanomeatal flap and wound closure: As for incusstapedotomy
Postoperative care
- As for incus-stapedotomy
- Patients can fly after 2 weeks (as for incus-stapedotomy)
- Patients who have undergone malleostapedotomy are not permitted to scuba dive
References
- Fisch U, May J. Tympanoplasty, Mastoidectomy and Stapes Surgery. New York: Thieme; 1994.
- Nandapalan V, Pollak A, Langner A, Fisch U. The anterior and superior malleal ligaments in otosclerosis. Otol Neurotol. 2002;23(6):854-61
- Vincent R, Sperling NM, Oates J, Jindal M. Surgical findings and longterm hearing results in 3,050 stapedotomies for primary otosclerosis: a prospective study with the otologyneurotology database. Otol Neurotol. 2006;27(8 Suppl 2):S25-47
- Vincent R, Lopez A, Sperling NM. Malleus Ankylosis: A Clinical, Audiometric, Histologic, and Surgical Study of 123 Cases. Am J Otol. 1999; 20:717- 25
- Dalchow CV, Dünne AA, Sesterhenn A, Teymoortash A, Werner JA. Malleostapedotomy: The Marburg experience. Adv Otorhinolaryngol. 2007;65:215-21
- Fisch U, Acar GO, Huber AM. Malleostapedotomy in revision surgery for otosclerosis. Otol. Neurotol. 2001;22: 776-85
- Linder TE, Fisch U. A checklist for surgical exposure in stapes surgery: how to avoid misapprehension. Adv Otorhinolaryngol. 2007;65:158-63
- Probst R. Audiological evaluation of patients with otosclerosis. In Otosclerosis and stapes surgery. Arnold W, Häusler R (eds): otosclerosis and stapes surgery. Adv Otorhinolaryngol. Basel Karger, 2007, vol 65, pp 119-26
- Ayacha D. Lejeune D, Williams. Imaging of postoperative complications of stapes surgery. In Otosclerosis and Stapes Surgery. Arnold W, Häusler R (eds): Otosclerosis and Stapes Surgery. Adv Otorhinolaryngol. Basel Karger, 2007, vol 65, 308-13
- Linder TE, Ma F, Huber A. Round window atresia and ist effect on sound transmission. Otol Neurotol. 2003; 24(2):259-63
- Van Rompaey V, Offeciers E, De Foer B, Somers T. Jugular bulb diverticulum dehiscence towards the vestibular aqueduct in a patient with otosclerosis. J Laryngol Otol. 2012 Mar;126(3):313-5
- Neyt P, Govaere F, Forton GE. Simultaneous true stapes fixation and bilateral bony dehiscence between the internal carotid artery and the apex of the cochlea: the ultimate pitfall. Otol Neurotol. 2011.32(6):909-13
- Merchant SN, Rosowski JJ, McKenna MJ. Superior semicircular canal dehiscence mimicking otosclerotic hearing loss in Otosclerosis and stapes surgery. Adv Otorhinolaryngol. Basel Karger, 2007, vol 65, 137-45
- Pauw BK, Pollak AM, Fisch U. Utricle, saccule, and cochlear duct in relation to stapedotomy. A histologic human temporal bone study. Ann Otol Rhinol Laryngol.1991;100(12):966-70
- Huber AM, MA F, Felix H, Linder T. Stapes prosthesis attachment: the effect of crimping on sound transfer in otosclerosis surgery. Laryngoscope. 2003;113(5):853-8
- Hüttenbrink KB. Biomechanics of stapesplasty: A review. Otol Neurotol. 2003;24:548-59
- Kwok P, Fisch U, Strutz J, May J: Stapes surgery: how precisely do different prosthesis attach to the long process of the incus with different instruments and different surgeons? Otol Neurotol 2002;23:289-95
Acknowledgements
This guide is based on the text by Professor Fisch (Tympanoplasty, Mastoidectomy, and Stapes Surgery) and personal experience of Professor Linder, as well as course materials for the advanced temporal bone course conducted annually by Professors Fisch and Linder at the Department of Anatomy, University of Zurich, Switzerland
Author
Tashneem Harris MBChB, FCORL, MMed (Otol), Fisch Instrument Microsurgical Fellow
ENT Specialist
Division of Otolaryngology
University of Cape Town
Cape Town, South Africa
harristasneem@yahoo.com
Senior Author
Thomas Linder, M.D.
Professor, Chairman and Head of Department of Otorhinolaryngology, Head, Neck and Facial Plastic Surgery
Lucerne Canton Hospital, Switzerland
thomas.linder@ksl.ch
Editor
Johan Fagan MBChB, FCS(ORL), MMed
Professor and Chairman
Division of Otolaryngology
University of Cape Town
Cape Town, South Africa
johannes.fagan@uct.ac.za