
1.4: Microscopes
- Page ID
- 52719
\( \newcommand{\vecs}[1]{\overset { \scriptstyle \rightharpoonup} {\mathbf{#1}} } \)
\( \newcommand{\vecd}[1]{\overset{-\!-\!\rightharpoonup}{\vphantom{a}\smash {#1}}} \)
\( \newcommand{\id}{\mathrm{id}}\) \( \newcommand{\Span}{\mathrm{span}}\)
( \newcommand{\kernel}{\mathrm{null}\,}\) \( \newcommand{\range}{\mathrm{range}\,}\)
\( \newcommand{\RealPart}{\mathrm{Re}}\) \( \newcommand{\ImaginaryPart}{\mathrm{Im}}\)
\( \newcommand{\Argument}{\mathrm{Arg}}\) \( \newcommand{\norm}[1]{\| #1 \|}\)
\( \newcommand{\inner}[2]{\langle #1, #2 \rangle}\)
\( \newcommand{\Span}{\mathrm{span}}\)
\( \newcommand{\id}{\mathrm{id}}\)
\( \newcommand{\Span}{\mathrm{span}}\)
\( \newcommand{\kernel}{\mathrm{null}\,}\)
\( \newcommand{\range}{\mathrm{range}\,}\)
\( \newcommand{\RealPart}{\mathrm{Re}}\)
\( \newcommand{\ImaginaryPart}{\mathrm{Im}}\)
\( \newcommand{\Argument}{\mathrm{Arg}}\)
\( \newcommand{\norm}[1]{\| #1 \|}\)
\( \newcommand{\inner}[2]{\langle #1, #2 \rangle}\)
\( \newcommand{\Span}{\mathrm{span}}\) \( \newcommand{\AA}{\unicode[.8,0]{x212B}}\)
\( \newcommand{\vectorA}[1]{\vec{#1}} % arrow\)
\( \newcommand{\vectorAt}[1]{\vec{\text{#1}}} % arrow\)
\( \newcommand{\vectorB}[1]{\overset { \scriptstyle \rightharpoonup} {\mathbf{#1}} } \)
\( \newcommand{\vectorC}[1]{\textbf{#1}} \)
\( \newcommand{\vectorD}[1]{\overrightarrow{#1}} \)
\( \newcommand{\vectorDt}[1]{\overrightarrow{\text{#1}}} \)
\( \newcommand{\vectE}[1]{\overset{-\!-\!\rightharpoonup}{\vphantom{a}\smash{\mathbf {#1}}}} \)
\( \newcommand{\vecs}[1]{\overset { \scriptstyle \rightharpoonup} {\mathbf{#1}} } \)
\( \newcommand{\vecd}[1]{\overset{-\!-\!\rightharpoonup}{\vphantom{a}\smash {#1}}} \)
\(\newcommand{\avec}{\mathbf a}\) \(\newcommand{\bvec}{\mathbf b}\) \(\newcommand{\cvec}{\mathbf c}\) \(\newcommand{\dvec}{\mathbf d}\) \(\newcommand{\dtil}{\widetilde{\mathbf d}}\) \(\newcommand{\evec}{\mathbf e}\) \(\newcommand{\fvec}{\mathbf f}\) \(\newcommand{\nvec}{\mathbf n}\) \(\newcommand{\pvec}{\mathbf p}\) \(\newcommand{\qvec}{\mathbf q}\) \(\newcommand{\svec}{\mathbf s}\) \(\newcommand{\tvec}{\mathbf t}\) \(\newcommand{\uvec}{\mathbf u}\) \(\newcommand{\vvec}{\mathbf v}\) \(\newcommand{\wvec}{\mathbf w}\) \(\newcommand{\xvec}{\mathbf x}\) \(\newcommand{\yvec}{\mathbf y}\) \(\newcommand{\zvec}{\mathbf z}\) \(\newcommand{\rvec}{\mathbf r}\) \(\newcommand{\mvec}{\mathbf m}\) \(\newcommand{\zerovec}{\mathbf 0}\) \(\newcommand{\onevec}{\mathbf 1}\) \(\newcommand{\real}{\mathbb R}\) \(\newcommand{\twovec}[2]{\left[\begin{array}{r}#1 \\ #2 \end{array}\right]}\) \(\newcommand{\ctwovec}[2]{\left[\begin{array}{c}#1 \\ #2 \end{array}\right]}\) \(\newcommand{\threevec}[3]{\left[\begin{array}{r}#1 \\ #2 \\ #3 \end{array}\right]}\) \(\newcommand{\cthreevec}[3]{\left[\begin{array}{c}#1 \\ #2 \\ #3 \end{array}\right]}\) \(\newcommand{\fourvec}[4]{\left[\begin{array}{r}#1 \\ #2 \\ #3 \\ #4 \end{array}\right]}\) \(\newcommand{\cfourvec}[4]{\left[\begin{array}{c}#1 \\ #2 \\ #3 \\ #4 \end{array}\right]}\) \(\newcommand{\fivevec}[5]{\left[\begin{array}{r}#1 \\ #2 \\ #3 \\ #4 \\ #5 \\ \end{array}\right]}\) \(\newcommand{\cfivevec}[5]{\left[\begin{array}{c}#1 \\ #2 \\ #3 \\ #4 \\ #5 \\ \end{array}\right]}\) \(\newcommand{\mattwo}[4]{\left[\begin{array}{rr}#1 \amp #2 \\ #3 \amp #4 \\ \end{array}\right]}\) \(\newcommand{\laspan}[1]{\text{Span}\{#1\}}\) \(\newcommand{\bcal}{\cal B}\) \(\newcommand{\ccal}{\cal C}\) \(\newcommand{\scal}{\cal S}\) \(\newcommand{\wcal}{\cal W}\) \(\newcommand{\ecal}{\cal E}\) \(\newcommand{\coords}[2]{\left\{#1\right\}_{#2}}\) \(\newcommand{\gray}[1]{\color{gray}{#1}}\) \(\newcommand{\lgray}[1]{\color{lightgray}{#1}}\) \(\newcommand{\rank}{\operatorname{rank}}\) \(\newcommand{\row}{\text{Row}}\) \(\newcommand{\col}{\text{Col}}\) \(\renewcommand{\row}{\text{Row}}\) \(\newcommand{\nul}{\text{Nul}}\) \(\newcommand{\var}{\text{Var}}\) \(\newcommand{\corr}{\text{corr}}\) \(\newcommand{\len}[1]{\left|#1\right|}\) \(\newcommand{\bbar}{\overline{\bvec}}\) \(\newcommand{\bhat}{\widehat{\bvec}}\) \(\newcommand{\bperp}{\bvec^\perp}\) \(\newcommand{\xhat}{\widehat{\xvec}}\) \(\newcommand{\vhat}{\widehat{\vvec}}\) \(\newcommand{\uhat}{\widehat{\uvec}}\) \(\newcommand{\what}{\widehat{\wvec}}\) \(\newcommand{\Sighat}{\widehat{\Sigma}}\) \(\newcommand{\lt}{<}\) \(\newcommand{\gt}{>}\) \(\newcommand{\amp}{&}\) \(\definecolor{fillinmathshade}{gray}{0.9}\)Information
Many important anatomical features, especially those that function at the tissue or cellular levels, are too small to be seen by the unaided eye. The compound microscope is a valuable tool for magnifying small sections of biological material so that otherwise inaccessible details can be resolved.
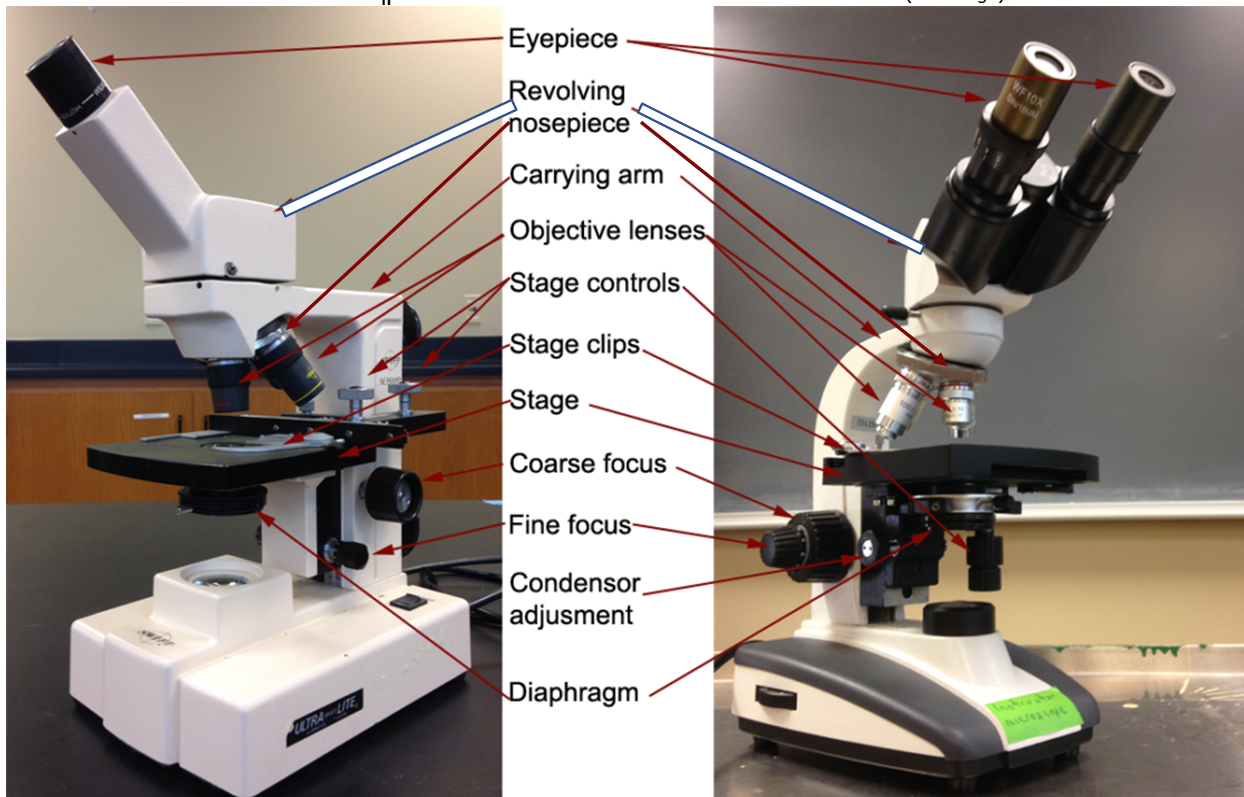
There are many different types of microscopes. We shall only learn about the compound light microscope. It uses visible light to visualize the specimen, but passes that light through two separate lens to magnify the image. The compound microscopes we will use in this course are sturdy instruments but they still have a lot of moving parts. They can be damaged and broken through misuse and mishandling. A large part of learning how to use the microscopes properly involves learning how to avoid damaging it. To do that, you first have to know which parts are which. Figure 1.12 identifies the key parts of the microscope that you need to be familiar with.
In Figure 1.12, there are two compound microscopes shown. The one on the left is monocular and the one on the right is binocular. Many of the parts of the two microscopes are in slightly different locations. Get used to this. Different brands and different models of microscopes position the key parts differently.
When you first sit in front of a microscope, you should always take a second to find the key parts, especially the focus knobs, the condenser adjustment knob (if present), and the stage control knobs. When viewing a specimen, your eyes will be at the eyepieces, and if you grab the wrong knob by accident, you can lose your image at best, and damage the microscope at worst. Don’t assume you remember where the key knobs are. You may have a different microscope than last time.
When storing a microscope you should always follow this list:
- Remove any slide found on the stage and return it to the slide box.
- Rotate the smallest lens or no lens into place above the stage. Lower the stage a few turns.
- Loosely coil the cord in your hand starting near the microscope and working toward the plug.
- Hang the coiled cord over one ocular lens.
- Look at the number on the back of the microscope, return that scope to its numbered box.
If there’s already a microscope in that numbered box, check its number and move it. If it is not numbered simply push it to the back of the box and place yours closer to the front. We have a few extra microscopes which we store in this fashion.
The eyepiece
This is where your eyes will be. If the microscope is binocular, use both eyepieces. With binocular microscopes, you almost always can adjust the width of the eyepieces to ensure they fit the spacing of your eyes. The eyepiece contains the eyepiece lens, one of the two lenses doing the actual magnifying in a compound microscope.
The carrying arm
When moving a microscope, even if it is just a few inches, always pick it up by the carrying arm. Do NOT drag the microscope: pick it up. The microscope will have rubber feet that prevent it from sliding, so if you try to drag it, it will shake and vibrate and possible damage parts. Never pick up the microscope by any part other than the carrying arm. The other parts are generally much more fragile and prone to breaking if you try.
The objective lenses
Most compound light microscopes will contain three to four objective lenses that can be rotated over the slide. Sometimes these lenses are just called objectives. When a particular objective has been fully rotated into position, you will hear or feel a click as that objective locks into place. The objective lens is the second of the two lenses doing the actual magnifying in a compound microscope, so if it is not snapped into proper position, you won’t see the proper image. Each objective lens can usually be unscrewed from its position in the rotating turret that houses it. Be careful you are rotating the turret, not unscrewing an objective. Do NOT unscrew the objectives from the turret. Each objective lens has a different magnifying power, so the image on your slide will be magnified to lesser or greater extents, depending on which objective lens you have chosen. Each objective’s magnification power will be written somewhere on the side of the objective, although sometimes it is hard to see the number. The magnification of an objective lens will always be a whole number. There will be other things written on the side of an objective, but the one that is a whole number greater than 1 will be the magnification. You can ignore everything else written there.
The stage
The stage is the platform that the slide will be clipped on to.
Stage clips
The slide will be held in place on the stage with stage clips. Most of the time, these will clip against the sides of the slide. They do not sit above or below the slide. They are spring-loaded to hold the slide edges and lock the slide in place so that the stage controls can move the position of the slide smoothly. If the slide is not clipped in place, you won’t be able to reposition the slide to find microscopic features of interest.
Stage Controls
These allow you to move your slide while you are viewing it, but only if the slide is properly clipped in with the stage clips. Always find where these are on your microscope before you start viewing your slide. They seem to never be in the same place in two different microscopes and if you just blindly grope for them while viewing your slide, you will likely do something unfortunate to your view or to the entire microscope. There are always two dials. One moves the slide left and right. The other moves the slide up and down. Sometimes they are on top of each other, as in the binocular microscope shown on the right in Figure \(\PageIndex{1}\) . Sometimes they are two separate dials, as in the monocular microscope shown on the left in Figure \(\PageIndex{1}\). Sometimes they are above the stage, as in the monocular microscope . Sometimes they are below the stage, as in the binocular scope . Spend a few seconds to find them every time before you sit down at a microscope.
Coarse focus
This is always the larger of the two focus knobs. You should usually only need to use the coarse focus knob once for each new slide. Use it with the lowest power objective to get the specimen approximately in focus. After that, only use the fine focus knob, even after you change to a higher-power objective. Sometimes the coarse focus knob is with the fine focus knob, as on the binocular microscope in Figure 1.12. Sometimes it is separate from the fine focus knob, as on the monocular microscope in Figure 1.12.
Fine focus
This is always the smaller of the two focus knobs. This is the focus know you will use over and over again in viewing slides. Don’t change the coarse focus after using it for the first time, only change the fine focus.
Condenser adjustment
Not all microscopes have a condenser adjustment knob. If there are only two knobs, as on the monocular microscope in Figure \(\PageIndex{1}\), those two are the coarse focus and the fine focus and you only have to keep those two separate. But if there is a third knob, it is the condenser adjustment knob. As a general rule, do NOT touch or adjust this knob. It controls how far the light condenser is from the slide, which should be properly adjusted before you use the microscope. If you move it, you will have it in the wrong position. If your scope has the knob, find out where it is and avoid it.
Diaphragm
This is directly under the hole in the stage where light passes through to the slide. It is controlled by a lever which opens and closes an iris to let more or less light through the slide. In some specimens there is not much contrast between the colors and shades of the different components being magnified. Changing how bright the view is by adjusting the diaphragm can allow you to better see some of the details you are trying to magnify.
- Pick up your microscope and physically move it to a new location. Bring it close enough that you can look into it comfortably from where you are sitting. Arrange it so that the stage is facing you and the eyepiece is rotated towards you. What part of the microscope did you grab in order to pick it up and move it?
- Where are the locations of the two stage adjustment knobs on your microscope?
- Where is the location of the coarse focus knob?
- Where is the location of the fine focus knob?
- Is there a condenser adjustment knob? If so, where is it located?
- Find the diaphragm lever. Looking in the hole in the center of the stage, what happens when you move the diaphragm leverclockwise?
- Still looking down at the hole in the center of the stage, what happens when you slide the diaphragm lever counter-clockwise?
Lab 1 Exercise \(\PageIndex{1}\)
There are compound microscopes in the large wooden boxes in the front of the room. The boxes and the scopes are numbered. Use any scope you like but please return it to the correctly numbered box. Carry out the activities listed below and fill in the blanks as you do so.
1. Pick up your microscope and physically move it to a new location. Bring it close enough that you can look into it comfortably from where you are sitting. Arrange it so that the stage is facing you and the eyepiece is rotated towards you. What part of the microscope did you grab in order to pick it up and move it?
2. Where are the locations of the two stage adjustment knobs on your microscope?
3. Where is the location of the coarse focus knob?
4. Where is the location of the fine focus knob?
5. Is there a condenser adjustment knob? If so, where is it located?
6. Find the diaphragm lever. Looking in the hole in the center of the stage, what happens when you move the diaphragm lever clockwise?
7. Still looking down at the hole in the center of the stage, what happens when you slide the diaphragm lever counter- clockwise?
LICENSES AND ATTRIBUTIONS
CC LICENSED CONTENT, ORIGINAL
A&P Labs. Authored by: Ross Whitwam. Provided by: Mississippi University for
Women. Located at: http://www.muw.edu/. License: CC BY-SA: Attribution-ShareAlike
Labelled compound light microscope. Authored by: Ross Whitwam. Provided by: Mississippi University for Women. Located at: http://www.muw.edu/. License: CC BY-SA: Attribution- ShareAlike
Magnification and Resolution
The reason for using a microscope is to magnify features to the point where new details can be resolved.
Magnification is the factor by which an image appears to be enlarged. It will be a whole number greater than 1 and is usually followed by an “x”, as in 10x magnification.
When you look through microscope eyepieces, you are seeing a virtual image because in reality, what you are looking at is not as large as it appears through the eyepieces, and because there can be some distortion of the image.
Resolution is the shortest distance between two points that can still be visually distinguished as separate. The resolution of a typical unaided human eye is about 200 µm. Using a microscope decreases the resolution to distances as short as 0.2 µm. Resolution is a property of the eye.
Resolving power is the ability of a lens to show two adjacent objects as discrete. Resolving power is a property of a lens.
Each lens in a microscope has a numerical aperture, or NA, value. This has to do with the angles of light that enter and exit a lens. Its applications are beyond the scope of this lab, but numerical aperture does influence the resolution possible with a particular lens, and so the NA value for the lens is usually printed on each objective. It will be a number less than 1.0, and you can ignore it for our purposes.
Each lens in a microscope also has a magnifying factor. This is the degree to which that lens magnifies an image. It will be a number larger than 1.0. For instance a 10x objective magnifies the image ten-fold. The magnifying factor for each objective always printed on it, and the magnifying factor for each eyepiece is usually printed on it. (If the eyepiece is missing a printed magnifying factor, you can usually assume it is 10x.)
The total magnification for any image viewed under a compound microscope is calculated by using the formula:
Total Magnification = eyepiece magnifying factor * objective magnifying factor
So, each time you switch objectives, you change the total magnification. Total magnification does not have units, but is usually indicated by an “x”, as in “total magnification = 100x.”
Lab 1 Exercise \(\PageIndex{2}\)
There are compound microscopes in the large wooden boxes in the front of the room. The boxes and the scopes are numbered. Use any scope you like but please return it to the correctly numbered box. Carry out the activities listed below and fill in the blanks as you do so.
1. Write down the magnification factor for the eyepiece lenses on the microscope in front of you.
2. Using the microscope in front of you, write out all the words and numbers written on each objective on your microscope. There are probably three objectives, but some microscopes might have four. Start with the smallest objective and move through them in order of increasing size
|
Objective one: |
|
Objective two: |
|
Objective three: |
|
Objective four: |
3. In the above list, for each objective, circle just the magnification factor for that objective. Remember, the magnifying factor is a whole number, and differs for each different objective.
4. Write down the total magnification (eyepiece magnifying factor * objective magnifying factor) when using each objective on the microscope in front of you.
|
Objective one: |
|
Objective two: |
|
Objective three: |
|
Objective four: |
5. If you observed two features on a slide with your naked eye that were 0.5 mm apart, how far apart would they appear to be if you observed them with the microscope in front of you, using the second objective?
LICENSES AND ATTRIBUTIONS
CC LICENSED CONTENT, ORIGINAL
A&P Labs. Authored by: Ross Whitwam. Provided by: Mississippi University for Women. Located at: http://www.muw.edu/. License: CC BY-SA: Attribution-ShareAlike