18.2: Basic Concepts
- Page ID
- 44659
\( \newcommand{\vecs}[1]{\overset { \scriptstyle \rightharpoonup} {\mathbf{#1}} } \)
\( \newcommand{\vecd}[1]{\overset{-\!-\!\rightharpoonup}{\vphantom{a}\smash {#1}}} \)
\( \newcommand{\dsum}{\displaystyle\sum\limits} \)
\( \newcommand{\dint}{\displaystyle\int\limits} \)
\( \newcommand{\dlim}{\displaystyle\lim\limits} \)
\( \newcommand{\id}{\mathrm{id}}\) \( \newcommand{\Span}{\mathrm{span}}\)
( \newcommand{\kernel}{\mathrm{null}\,}\) \( \newcommand{\range}{\mathrm{range}\,}\)
\( \newcommand{\RealPart}{\mathrm{Re}}\) \( \newcommand{\ImaginaryPart}{\mathrm{Im}}\)
\( \newcommand{\Argument}{\mathrm{Arg}}\) \( \newcommand{\norm}[1]{\| #1 \|}\)
\( \newcommand{\inner}[2]{\langle #1, #2 \rangle}\)
\( \newcommand{\Span}{\mathrm{span}}\)
\( \newcommand{\id}{\mathrm{id}}\)
\( \newcommand{\Span}{\mathrm{span}}\)
\( \newcommand{\kernel}{\mathrm{null}\,}\)
\( \newcommand{\range}{\mathrm{range}\,}\)
\( \newcommand{\RealPart}{\mathrm{Re}}\)
\( \newcommand{\ImaginaryPart}{\mathrm{Im}}\)
\( \newcommand{\Argument}{\mathrm{Arg}}\)
\( \newcommand{\norm}[1]{\| #1 \|}\)
\( \newcommand{\inner}[2]{\langle #1, #2 \rangle}\)
\( \newcommand{\Span}{\mathrm{span}}\) \( \newcommand{\AA}{\unicode[.8,0]{x212B}}\)
\( \newcommand{\vectorA}[1]{\vec{#1}} % arrow\)
\( \newcommand{\vectorAt}[1]{\vec{\text{#1}}} % arrow\)
\( \newcommand{\vectorB}[1]{\overset { \scriptstyle \rightharpoonup} {\mathbf{#1}} } \)
\( \newcommand{\vectorC}[1]{\textbf{#1}} \)
\( \newcommand{\vectorD}[1]{\overrightarrow{#1}} \)
\( \newcommand{\vectorDt}[1]{\overrightarrow{\text{#1}}} \)
\( \newcommand{\vectE}[1]{\overset{-\!-\!\rightharpoonup}{\vphantom{a}\smash{\mathbf {#1}}}} \)
\( \newcommand{\vecs}[1]{\overset { \scriptstyle \rightharpoonup} {\mathbf{#1}} } \)
\(\newcommand{\longvect}{\overrightarrow}\)
\( \newcommand{\vecd}[1]{\overset{-\!-\!\rightharpoonup}{\vphantom{a}\smash {#1}}} \)
\(\newcommand{\avec}{\mathbf a}\) \(\newcommand{\bvec}{\mathbf b}\) \(\newcommand{\cvec}{\mathbf c}\) \(\newcommand{\dvec}{\mathbf d}\) \(\newcommand{\dtil}{\widetilde{\mathbf d}}\) \(\newcommand{\evec}{\mathbf e}\) \(\newcommand{\fvec}{\mathbf f}\) \(\newcommand{\nvec}{\mathbf n}\) \(\newcommand{\pvec}{\mathbf p}\) \(\newcommand{\qvec}{\mathbf q}\) \(\newcommand{\svec}{\mathbf s}\) \(\newcommand{\tvec}{\mathbf t}\) \(\newcommand{\uvec}{\mathbf u}\) \(\newcommand{\vvec}{\mathbf v}\) \(\newcommand{\wvec}{\mathbf w}\) \(\newcommand{\xvec}{\mathbf x}\) \(\newcommand{\yvec}{\mathbf y}\) \(\newcommand{\zvec}{\mathbf z}\) \(\newcommand{\rvec}{\mathbf r}\) \(\newcommand{\mvec}{\mathbf m}\) \(\newcommand{\zerovec}{\mathbf 0}\) \(\newcommand{\onevec}{\mathbf 1}\) \(\newcommand{\real}{\mathbb R}\) \(\newcommand{\twovec}[2]{\left[\begin{array}{r}#1 \\ #2 \end{array}\right]}\) \(\newcommand{\ctwovec}[2]{\left[\begin{array}{c}#1 \\ #2 \end{array}\right]}\) \(\newcommand{\threevec}[3]{\left[\begin{array}{r}#1 \\ #2 \\ #3 \end{array}\right]}\) \(\newcommand{\cthreevec}[3]{\left[\begin{array}{c}#1 \\ #2 \\ #3 \end{array}\right]}\) \(\newcommand{\fourvec}[4]{\left[\begin{array}{r}#1 \\ #2 \\ #3 \\ #4 \end{array}\right]}\) \(\newcommand{\cfourvec}[4]{\left[\begin{array}{c}#1 \\ #2 \\ #3 \\ #4 \end{array}\right]}\) \(\newcommand{\fivevec}[5]{\left[\begin{array}{r}#1 \\ #2 \\ #3 \\ #4 \\ #5 \\ \end{array}\right]}\) \(\newcommand{\cfivevec}[5]{\left[\begin{array}{c}#1 \\ #2 \\ #3 \\ #4 \\ #5 \\ \end{array}\right]}\) \(\newcommand{\mattwo}[4]{\left[\begin{array}{rr}#1 \amp #2 \\ #3 \amp #4 \\ \end{array}\right]}\) \(\newcommand{\laspan}[1]{\text{Span}\{#1\}}\) \(\newcommand{\bcal}{\cal B}\) \(\newcommand{\ccal}{\cal C}\) \(\newcommand{\scal}{\cal S}\) \(\newcommand{\wcal}{\cal W}\) \(\newcommand{\ecal}{\cal E}\) \(\newcommand{\coords}[2]{\left\{#1\right\}_{#2}}\) \(\newcommand{\gray}[1]{\color{gray}{#1}}\) \(\newcommand{\lgray}[1]{\color{lightgray}{#1}}\) \(\newcommand{\rank}{\operatorname{rank}}\) \(\newcommand{\row}{\text{Row}}\) \(\newcommand{\col}{\text{Col}}\) \(\renewcommand{\row}{\text{Row}}\) \(\newcommand{\nul}{\text{Nul}}\) \(\newcommand{\var}{\text{Var}}\) \(\newcommand{\corr}{\text{corr}}\) \(\newcommand{\len}[1]{\left|#1\right|}\) \(\newcommand{\bbar}{\overline{\bvec}}\) \(\newcommand{\bhat}{\widehat{\bvec}}\) \(\newcommand{\bperp}{\bvec^\perp}\) \(\newcommand{\xhat}{\widehat{\xvec}}\) \(\newcommand{\vhat}{\widehat{\vvec}}\) \(\newcommand{\uhat}{\widehat{\uvec}}\) \(\newcommand{\what}{\widehat{\wvec}}\) \(\newcommand{\Sighat}{\widehat{\Sigma}}\) \(\newcommand{\lt}{<}\) \(\newcommand{\gt}{>}\) \(\newcommand{\amp}{&}\) \(\definecolor{fillinmathshade}{gray}{0.9}\)Syringes
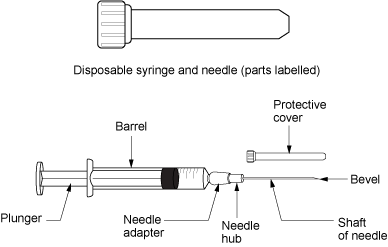
Syringes are used to administer parenteral medications. A disposable syringe is a sterile device that is available in various sizes ranging from 0.5 mL to 60 mL. A syringe consists of a plunger, a barrel, and a needle hub. Syringes may be supplied individually or with a needle and protective cover attached. See Figure \(\PageIndex{1}\)[1] for an illustration of the parts of a syringe.
Luer lock syringes have threads in the needle hub that provide a secure connection of needles, tubing, or other devices. See Figure \(\PageIndex{2}\)[2] for an image of a Luer lock syringe with a barrel and a readable scale. This image shows a syringe that holds 12 cc, also referred to as 12 mL. When withdrawing medication, match up the top of the plunger and the line on the barrel scale with the amount of medication you need to administer. In this image, 3 mL of medication is contained in the syringe.

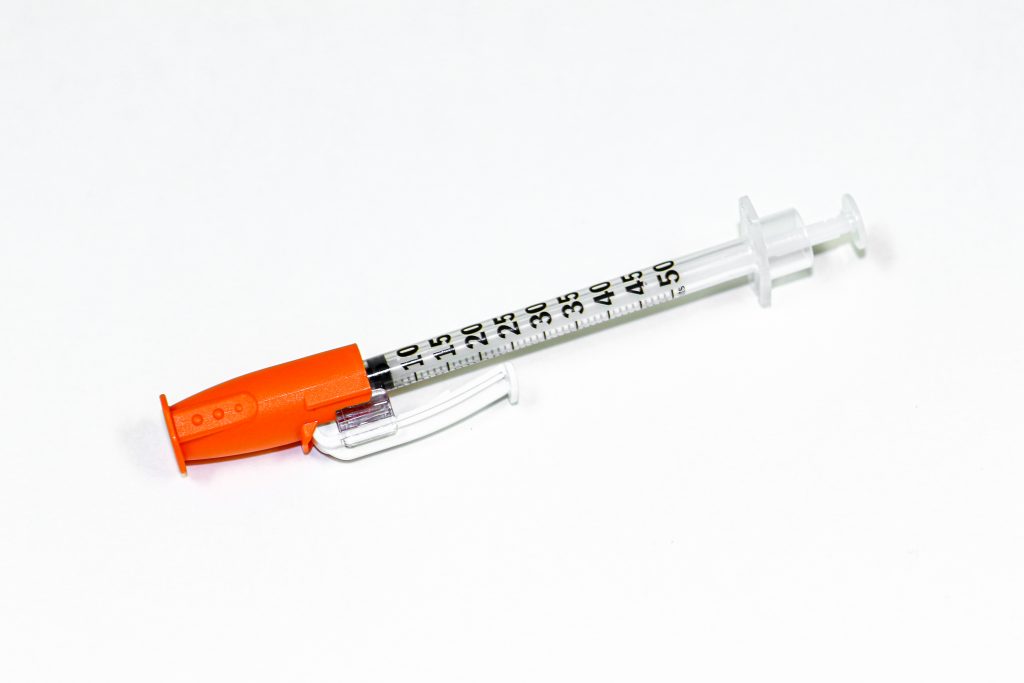
Insulin is administered using a specific insulin syringe. Insulin syringes are marked in units, not milliliters (mL), because insulin is prescribed by providers in units, not mLs. A regular syringe marked in milliliters should never be used to administer insulin. All insulin syringes have orange caps for quick identification, but verify the markings are in units to prevent a medication error. See Figure \(\PageIndex{3}\)[4] for an image of a 50-unit insulin syringe with a white safety shield attached.
Needles
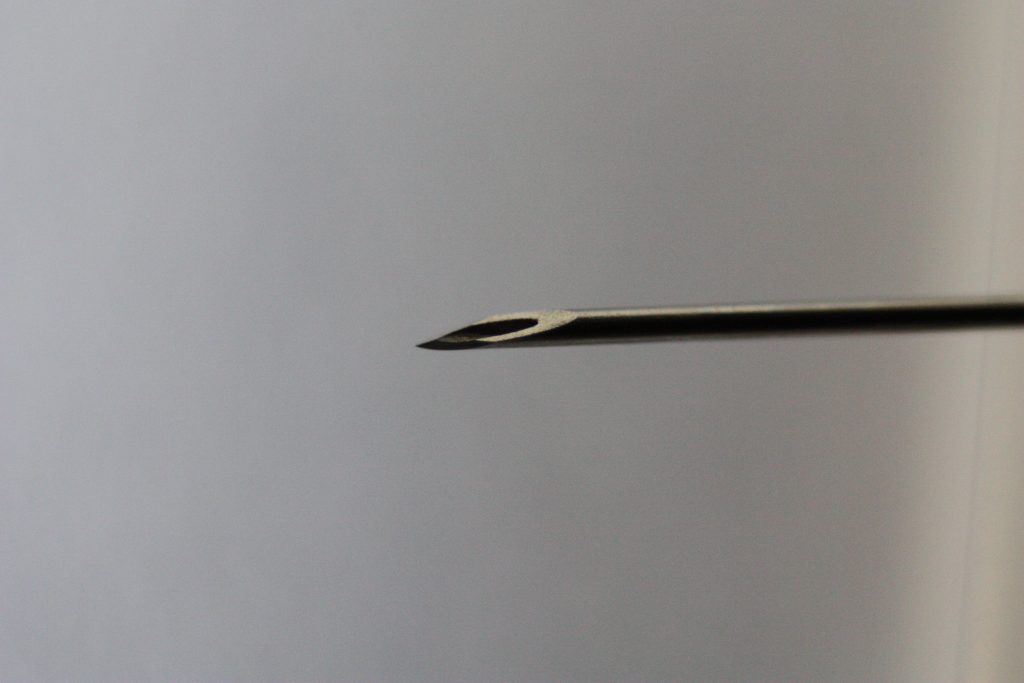
Needles are made out of stainless steel. They are sterile and disposable and are available in various lengths and sizes. A needle is made up of the hub, shaft, and bevel. The hub fits onto the tip of the syringe. All three parts must remain sterile at all times. The bevel is the tip of the needle that is slanted to create a slit into the skin. See Figure \(\PageIndex{4}\)[5] for an image of a bevel.
Gauge and Length
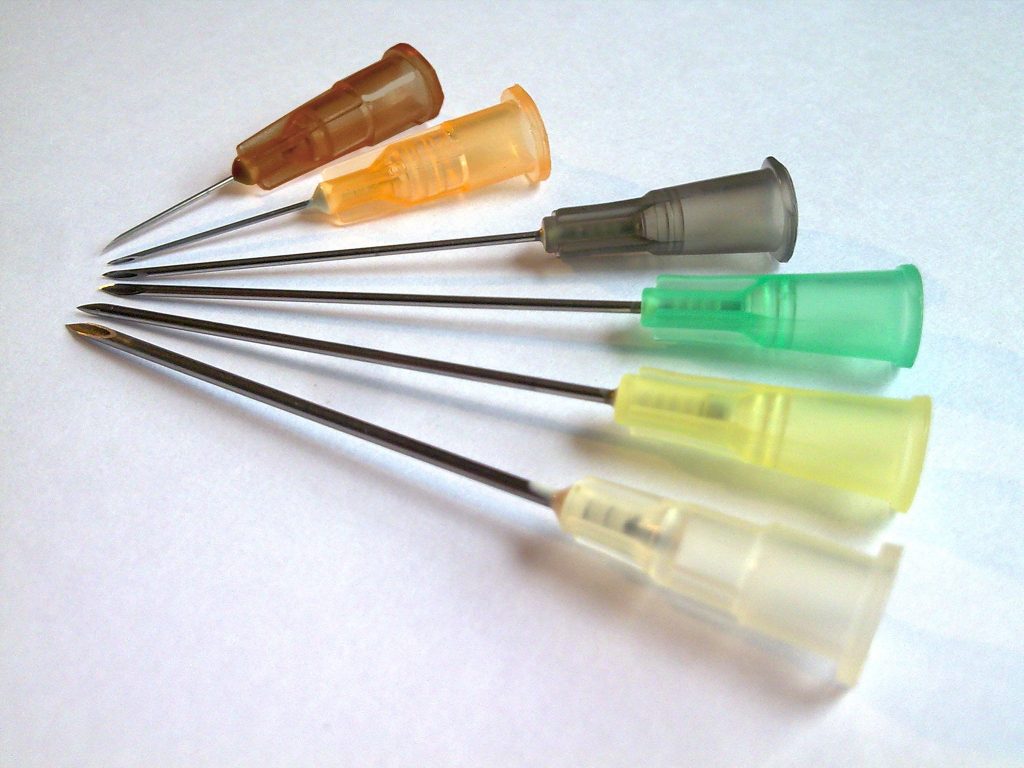
The gauge of a needle refers to its diameter. Needles range in various sized gauges from small diameter (25 to 29 gauge) to large diameter (18 to 22 gauge). Note that the larger the diameter of a needle, the smaller the gauge number. Larger diameter needles (18-22 gauge) are typically used to administer thicker medications or blood products. See Figure \(\PageIndex{5}\)[6] for an image comparing various needle lengths and gauges. Read more about needle gauges according to type of injection in Table \(\PageIndex{1}\) in the “Anatomic Location” subsection.
Gauge and length are marked on the outer packaging of needles. Needle length varies from 1/8 inches to 3 inches and is selected based on the type of injection. Nurses select the appropriate gauge and length according to the medication ordered, the anatomical location selected, and the patient’s body mass and age. For example, an intramuscular injection requires a longer needle to reach muscle tissue than an intradermal injection that is inserted just under the epidermis. Read more about needle length according to type of injection in Table \(\PageIndex{1}\) in the “Anatomic Location” section.
Many needles have safety shields attached to prevent needlestick injuries. See Figure \(\PageIndex{6}\)[7] for an image of a syringe inserted into a vial of medication with a needle and a type of safety shield attached.

Needle Insertion Angle and Removal
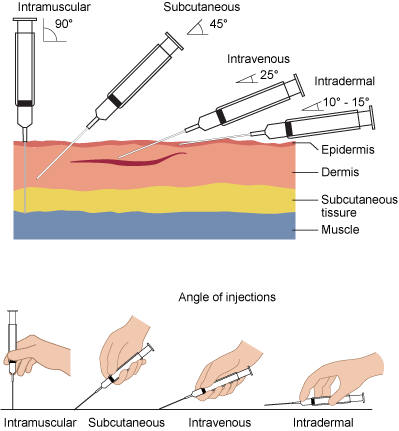
When administering an injection, the syringe should be held like a dart to prevent inadvertent release of medication as the needle is inserted. The needle should be inserted at the proper angle depending on the type of injection. See Table \(\PageIndex{1}\) for additional details regarding angles of insertion for each type of injection. The needle should be inserted all the way to the hub smoothly and quickly to reduce discomfort of the injection. See Figure \(\PageIndex{7}\)[8] for an illustration of angles of insertion for each type of injection. After the needle is inserted, it is important to hold the syringe steady to prevent tissue damage. The needle should be removed at the same angle used for insertion.[9]
Anatomical Location
It is important for the nurse to select the correct anatomical location for parenteral medication administration according to the type of injection prescribed and for optimal absorption of the medications. Injection of medication into the correct location also prevents injury to the tissues, nerves, blood vessels, and bones. Table \(\PageIndex{1}\) summarizes anatomical locations, needle sizes, amount of fluid, and the degree of angle of the needle insertion for each type of parenteral injection with life span and other considerations provided. Additional details regarding each type of injection are discussed later in this chapter.
| Injection Types | Locations | Needle Gauge and Length | Total Amount of Injectable Fluid | Degree of Angle When Injecting | Considerations |
|---|---|---|---|---|---|
| Intradermal | ● Upper third of the forearm
Up to 0.5 mL in infants and small children |
45-90 degree | The older patient’s skin is less elastic, and subcutaneous tissue may be reduced in the skinfolds.
The upper abdomen should be used for patients with less subcutaneous tissue. |
||
| Intramuscular | ●Ventrogluteal
●Vastus lateralis ●Deltoid |
●18 to 25G
●1/2” to 1 1/2” (based on age/size of patient and site used) |
0.5-1 mL (infants and children)
2-5 mL (adults) |
90 degree | The vastus lateralis site is preferred for infants because that muscle is most developed.
The ventrogluteal site is recommended in adults. The deltoid site is recommended for vaccinations in adults. |
Preparing Medications
Ampules
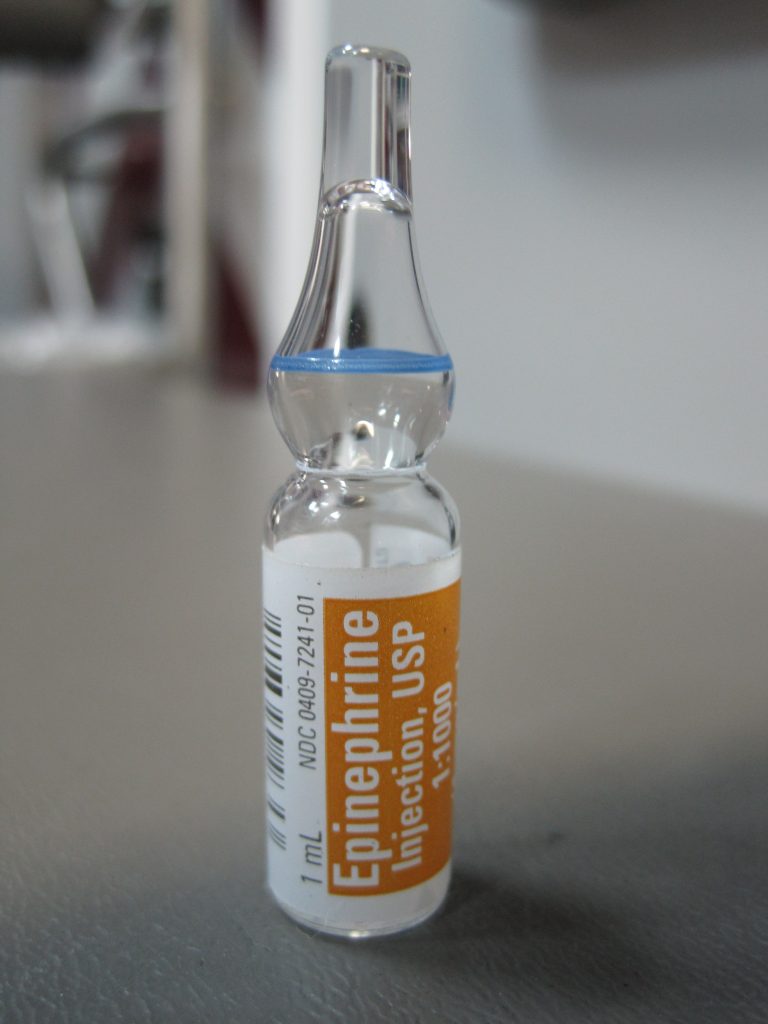
Parenteral medications are supplied in sterile vials, ampules, and prefilled syringes. Ampules are small glass containers containing liquid medication ranging from 1 mL to 10 mL sizes. They have a scored neck to indicate where to break the ampule. See Figure \(\PageIndex{8}\)[10] for an image of an ampule of epinephrine.
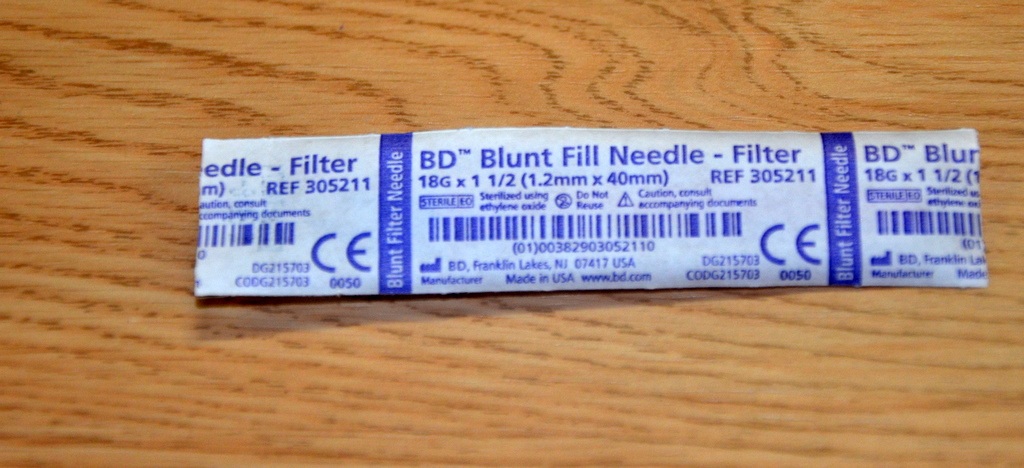
Medication is withdrawn from an ampule using a syringe with a special needle called a blunt fill filter needle. These needles have a blunt end to prevent needlestick injuries and a filter to prevent glass particles from being drawn up into the syringe. See Figure \(\PageIndex{9}\)[11] for an image of a blunt fill filter needle. Filter needles should never be used to inject medication into a patient. The filter needle should be removed and replaced with a needle appropriate in size and gauge for the type of injection and the anatomical location of the patient.
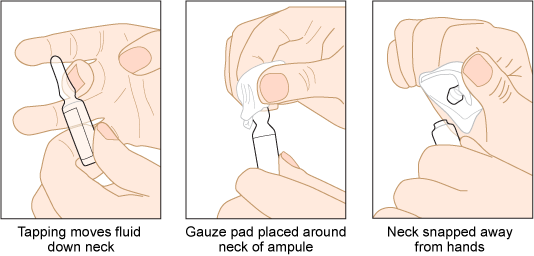
When breaking open an ampule, it is important to use appropriate steps to avoid injury. First, tap the ampule while holding it upright to move fluid down out of the neck. Place a piece of gauze around the neck, and then snap the neck away from your hands. See Figure \(\PageIndex{10}\)[12] for an illustration of how to safely open an ampule.
Vials
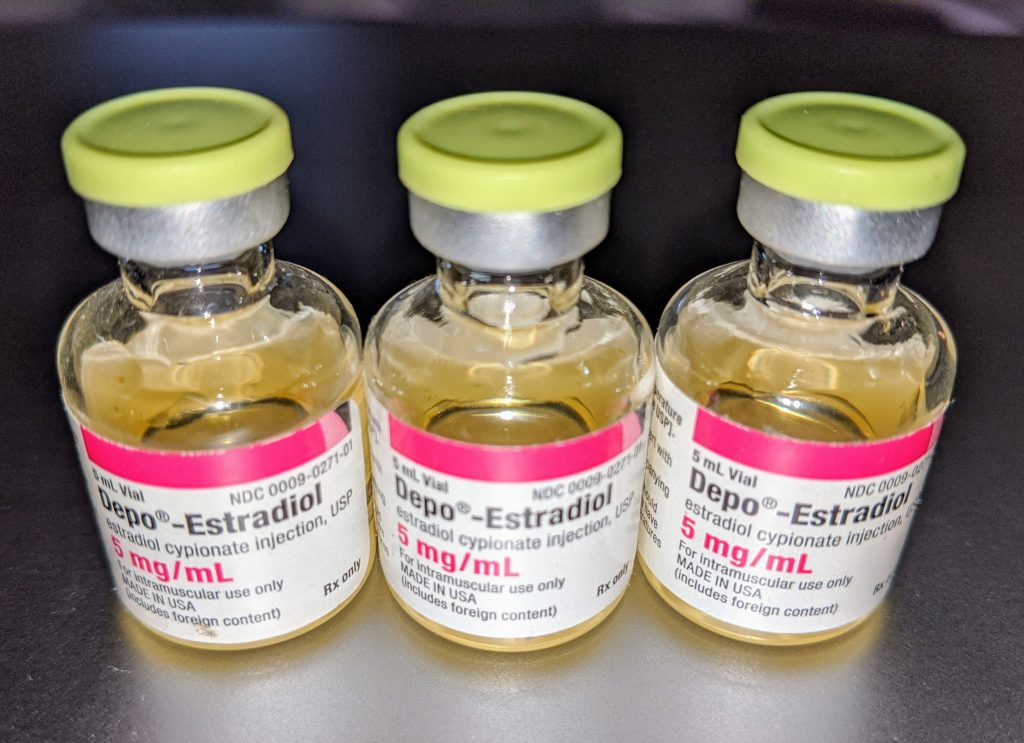
A vial is a single- or multi-dose plastic container with a rubber seal top. Most rubber seals are covered by a plastic cap. See Figure \(\PageIndex{11}\)[14] for an image of a medication dispensed in a vial. A single-use vial must be discarded after one use. Multi-dose vials are used for medications like insulin and must be labelled with the date it was opened. Refer to agency policy regarding how long an open vial may be used and how it should be stored. For example, insulin is typically refrigerated until the vial is opened, and then it can be stored at room temperature for 28 days.
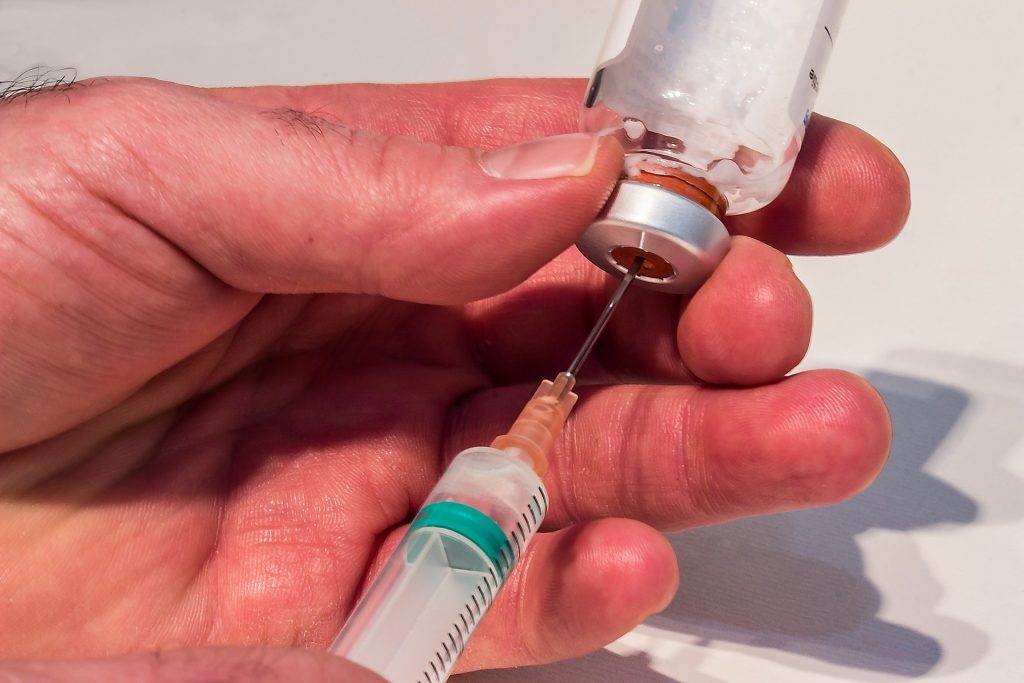
A vial is a closed system. Air must be injected prior to medication withdrawal to maintain a pressure gradient so that solution can be removed from the vial. It is also important to closely observe and maintain the tip of the needle within the level of medication inside the vial as it is removed. See Figure \(\PageIndex{12}\)[15] for an image of removing medication from a vial.
To remove medication from a vial, pull air into the syringe to match the amount of medication you plan to remove. Hold the syringe like a pencil and insert the needle into the rubber stopper on the top of the vial. Push the plunger down until all of the air is in the bottle. This helps to keep the right amount of pressure in the bottle and makes it easier to draw up the medication. With the needle still in the vial, turn the bottle and syringe upside down (vial above syringe). Pull the plunger to fill the syringe to the desired amount. Check the syringe for air bubbles. If you see any large bubbles, push the plunger until the air is purged out of the syringe. Pull the plunger back down to the desired dose. Remove the needle from the bottle. Be careful to not let the needle touch anything until you are ready to inject.[16]
Prefilled Syringes
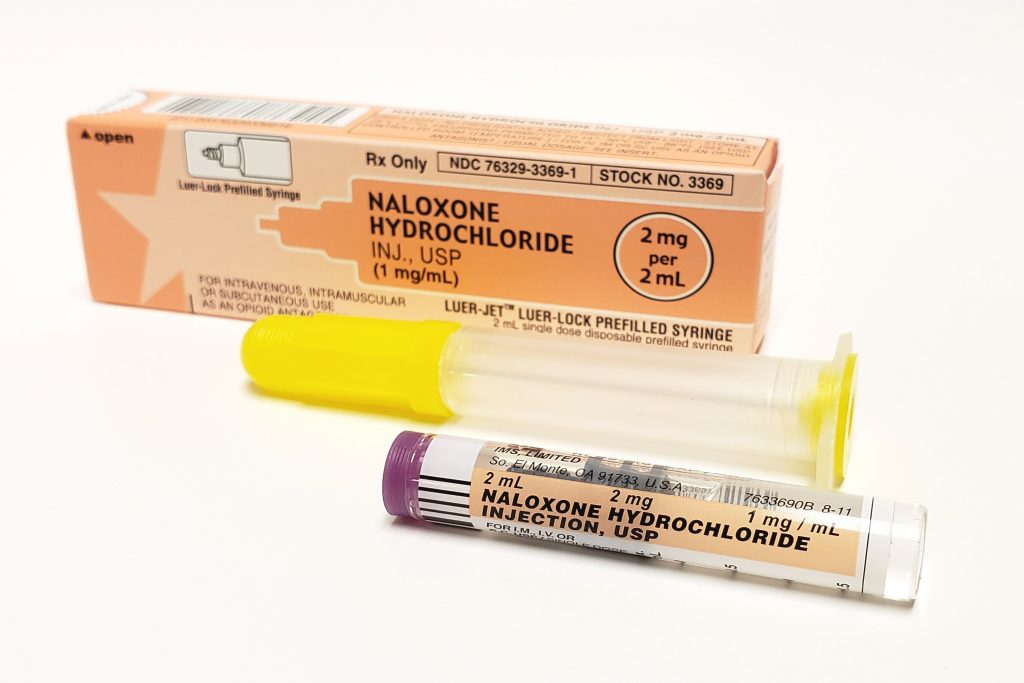
Prefilled syringes can provide greater patient safety by reducing the potential for inadvertent needlesticks and exposure to toxic products that can occur while withdrawing medication from vials. Prefilled syringes, with pre-measured dosage, can reduce dosing errors and waste. They are especially useful during emergent situations that require rapid administration of medication. See Figure \(\PageIndex{13}\)[17] for an image of a prefilled syringe.
- "Labeled syringe.png” by British Columbia Institute of Technology is licensed under CC BY 4.0.opentextbc.ca/clinicalskills/chapter/safe-injection-administration-and-preparing-medication-from-ampules-and-vials/↵
- “Syringe.jpg” by Erich Schulz, Brisbane is in the Public Domain↵
- RegisteredNurseRN. (2017, June 12). How to read a syringe 3 ml, 1 ml, insulin, & 5 ml/cc | Reading a syringe plunger. [Video]. YouTube. All rights reserved. Video used with permission. https://youtu.be/_TnDr8cKums↵
- “Insulin Syringe 3I3A0783.jpg” by Deanna Hoyord, for Chippewa Valley Technical College is licensed under CC BY 4.0.↵
- “Beveled tip of a hypodermic needle 20090714 005.JPG” by Politikaner is licensed under CC BY-SA 3.0↵
- “HypodermicNeedles.jpg” by Zephyris is licensed under CC BY-SA 3.0↵
- “Book-pictures-2015-527.jpg” by British Columbia Institute of Technology is licensed under CC BY 4.0. Access for free at opentextbc.ca/clinicalskills/chapter/safe-injection-administration-and-preparing-medication-from-ampules-and-vials/↵
- “Needle-insertion-angles-1.png” by British Columbia Institute of Technology is licensed under CC BY 4.0. Access for free at opentextbc.ca/clinicalskills/chapter/safe-injection-administration-and-preparing-medication-from-ampules-and-vials/↵
- This work is a derivative of Clinical Procedures for Safer Patient Care by British Columbia Institute of Technology and is licensed under CC BY 4.0↵
- “Epinephrine 1-1000 (1).JPG” by Intropin is licensed under CC BY 3.0↵
- “Oct-2-2015-009.jpg” by British Columbia Institute of Technology is licensed under CC BY 4.0. Access for free at https://opentextbc.ca/clinicalskills/chapter/safe-injection-administration-and-preparing-medication-from-ampules-and-vials/↵
- “Preparing-an-ampule-1.png” by British Columbia Institute of Technology is licensed under CC BY 4.0. Access for free at https://opentextbc.ca/clinicalskills/chapter/safe-injection-administration-and-preparing-medication-from-ampules-and-vials/↵
- RegisteredNurseRN. (2019, September 5). Ampule medication administration nursing clinical skills. [Video]. YouTube. All rights reserved. Video used with permission. youtu.be/mFKj3_Wk8m8↵
- “Depo-Estradiol (estradiol cypionate) vials.jpg” by Medgirl131 is licensed under CC BY-SA 4.0↵
- “ Syringe-1973129__340.jpg” by Myriams Zilles from Pixabay is licensed under CC0↵
- American Association of Diabetes Educators. (n.d.). Insulin injection know-how. https://www.diabeteseducator.org/docs/default-source/legacy-docs/_resources/pdf/general/Insulin_Injection_How_To_AADE.pdf↵
- "Naloxone_5.jpg" by Intropin (Mark Oniffrey) is licensed under CC BY-SA 4.0↵


