21.7: Managing Ostomies
- Page ID
- 44702
\( \newcommand{\vecs}[1]{\overset { \scriptstyle \rightharpoonup} {\mathbf{#1}} } \)
\( \newcommand{\vecd}[1]{\overset{-\!-\!\rightharpoonup}{\vphantom{a}\smash {#1}}} \)
\( \newcommand{\dsum}{\displaystyle\sum\limits} \)
\( \newcommand{\dint}{\displaystyle\int\limits} \)
\( \newcommand{\dlim}{\displaystyle\lim\limits} \)
\( \newcommand{\id}{\mathrm{id}}\) \( \newcommand{\Span}{\mathrm{span}}\)
( \newcommand{\kernel}{\mathrm{null}\,}\) \( \newcommand{\range}{\mathrm{range}\,}\)
\( \newcommand{\RealPart}{\mathrm{Re}}\) \( \newcommand{\ImaginaryPart}{\mathrm{Im}}\)
\( \newcommand{\Argument}{\mathrm{Arg}}\) \( \newcommand{\norm}[1]{\| #1 \|}\)
\( \newcommand{\inner}[2]{\langle #1, #2 \rangle}\)
\( \newcommand{\Span}{\mathrm{span}}\)
\( \newcommand{\id}{\mathrm{id}}\)
\( \newcommand{\Span}{\mathrm{span}}\)
\( \newcommand{\kernel}{\mathrm{null}\,}\)
\( \newcommand{\range}{\mathrm{range}\,}\)
\( \newcommand{\RealPart}{\mathrm{Re}}\)
\( \newcommand{\ImaginaryPart}{\mathrm{Im}}\)
\( \newcommand{\Argument}{\mathrm{Arg}}\)
\( \newcommand{\norm}[1]{\| #1 \|}\)
\( \newcommand{\inner}[2]{\langle #1, #2 \rangle}\)
\( \newcommand{\Span}{\mathrm{span}}\) \( \newcommand{\AA}{\unicode[.8,0]{x212B}}\)
\( \newcommand{\vectorA}[1]{\vec{#1}} % arrow\)
\( \newcommand{\vectorAt}[1]{\vec{\text{#1}}} % arrow\)
\( \newcommand{\vectorB}[1]{\overset { \scriptstyle \rightharpoonup} {\mathbf{#1}} } \)
\( \newcommand{\vectorC}[1]{\textbf{#1}} \)
\( \newcommand{\vectorD}[1]{\overrightarrow{#1}} \)
\( \newcommand{\vectorDt}[1]{\overrightarrow{\text{#1}}} \)
\( \newcommand{\vectE}[1]{\overset{-\!-\!\rightharpoonup}{\vphantom{a}\smash{\mathbf {#1}}}} \)
\( \newcommand{\vecs}[1]{\overset { \scriptstyle \rightharpoonup} {\mathbf{#1}} } \)
\(\newcommand{\longvect}{\overrightarrow}\)
\( \newcommand{\vecd}[1]{\overset{-\!-\!\rightharpoonup}{\vphantom{a}\smash {#1}}} \)
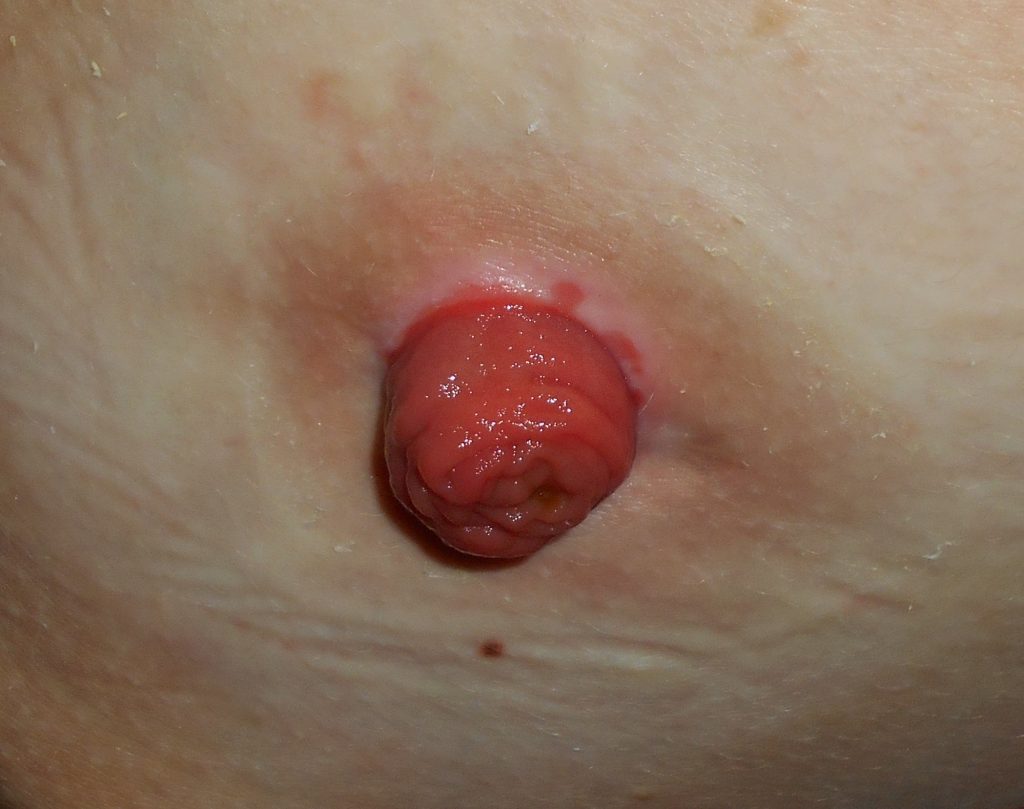
\(\newcommand{\avec}{\mathbf a}\) \(\newcommand{\bvec}{\mathbf b}\) \(\newcommand{\cvec}{\mathbf c}\) \(\newcommand{\dvec}{\mathbf d}\) \(\newcommand{\dtil}{\widetilde{\mathbf d}}\) \(\newcommand{\evec}{\mathbf e}\) \(\newcommand{\fvec}{\mathbf f}\) \(\newcommand{\nvec}{\mathbf n}\) \(\newcommand{\pvec}{\mathbf p}\) \(\newcommand{\qvec}{\mathbf q}\) \(\newcommand{\svec}{\mathbf s}\) \(\newcommand{\tvec}{\mathbf t}\) \(\newcommand{\uvec}{\mathbf u}\) \(\newcommand{\vvec}{\mathbf v}\) \(\newcommand{\wvec}{\mathbf w}\) \(\newcommand{\xvec}{\mathbf x}\) \(\newcommand{\yvec}{\mathbf y}\) \(\newcommand{\zvec}{\mathbf z}\) \(\newcommand{\rvec}{\mathbf r}\) \(\newcommand{\mvec}{\mathbf m}\) \(\newcommand{\zerovec}{\mathbf 0}\) \(\newcommand{\onevec}{\mathbf 1}\) \(\newcommand{\real}{\mathbb R}\) \(\newcommand{\twovec}[2]{\left[\begin{array}{r}#1 \\ #2 \end{array}\right]}\) \(\newcommand{\ctwovec}[2]{\left[\begin{array}{c}#1 \\ #2 \end{array}\right]}\) \(\newcommand{\threevec}[3]{\left[\begin{array}{r}#1 \\ #2 \\ #3 \end{array}\right]}\) \(\newcommand{\cthreevec}[3]{\left[\begin{array}{c}#1 \\ #2 \\ #3 \end{array}\right]}\) \(\newcommand{\fourvec}[4]{\left[\begin{array}{r}#1 \\ #2 \\ #3 \\ #4 \end{array}\right]}\) \(\newcommand{\cfourvec}[4]{\left[\begin{array}{c}#1 \\ #2 \\ #3 \\ #4 \end{array}\right]}\) \(\newcommand{\fivevec}[5]{\left[\begin{array}{r}#1 \\ #2 \\ #3 \\ #4 \\ #5 \\ \end{array}\right]}\) \(\newcommand{\cfivevec}[5]{\left[\begin{array}{c}#1 \\ #2 \\ #3 \\ #4 \\ #5 \\ \end{array}\right]}\) \(\newcommand{\mattwo}[4]{\left[\begin{array}{rr}#1 \amp #2 \\ #3 \amp #4 \\ \end{array}\right]}\) \(\newcommand{\laspan}[1]{\text{Span}\{#1\}}\) \(\newcommand{\bcal}{\cal B}\) \(\newcommand{\ccal}{\cal C}\) \(\newcommand{\scal}{\cal S}\) \(\newcommand{\wcal}{\cal W}\) \(\newcommand{\ecal}{\cal E}\) \(\newcommand{\coords}[2]{\left\{#1\right\}_{#2}}\) \(\newcommand{\gray}[1]{\color{gray}{#1}}\) \(\newcommand{\lgray}[1]{\color{lightgray}{#1}}\) \(\newcommand{\rank}{\operatorname{rank}}\) \(\newcommand{\row}{\text{Row}}\) \(\newcommand{\col}{\text{Col}}\) \(\renewcommand{\row}{\text{Row}}\) \(\newcommand{\nul}{\text{Nul}}\) \(\newcommand{\var}{\text{Var}}\) \(\newcommand{\corr}{\text{corr}}\) \(\newcommand{\len}[1]{\left|#1\right|}\) \(\newcommand{\bbar}{\overline{\bvec}}\) \(\newcommand{\bhat}{\widehat{\bvec}}\) \(\newcommand{\bperp}{\bvec^\perp}\) \(\newcommand{\xhat}{\widehat{\xvec}}\) \(\newcommand{\vhat}{\widehat{\vvec}}\) \(\newcommand{\uhat}{\widehat{\uvec}}\) \(\newcommand{\what}{\widehat{\wvec}}\) \(\newcommand{\Sighat}{\widehat{\Sigma}}\) \(\newcommand{\lt}{<}\) \(\newcommand{\gt}{>}\) \(\newcommand{\amp}{&}\) \(\definecolor{fillinmathshade}{gray}{0.9}\)An ostomy is the surgical procedure that creates an opening (stoma) from an area inside the body to the outside of the body. In ostomies related to elimination, a stoma is an opening on the abdomen that is connected to the gastrointestinal or urinary system to allow waste (i.e., urine or feces) to be collected in a pouch. See Figure \(\PageIndex{1}\)[1] for an image of a stoma. A stoma can be permanent, such as when an organ is removed, or temporary, such as when an organ requires time to heal. Ostomies are created for patients with conditions such as cancer of the bowel or bladder, inflammatory bowel diseases, or perforation of the colon.
There are several different kinds of ostomies related to elimination. Common types of ostomies include the following:
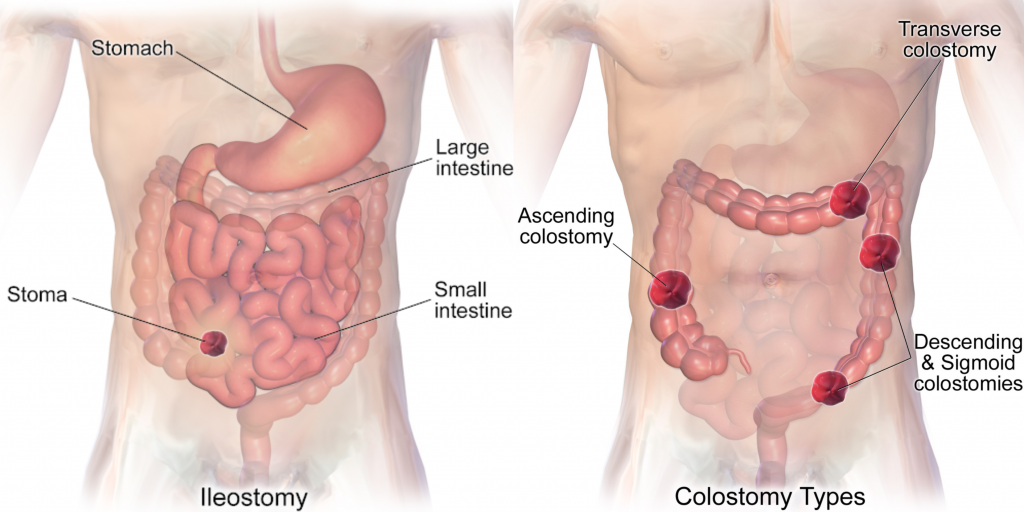
- Ileostomy: The lower end of the small intestine (ileum) is attached to a stoma to bypass the colon, rectum, and anus.
- Colostomy: The colon is attached to a stoma to bypass the rectum and the anus.
- Urostomy: The ureters (tubes that carry urine from the kidney to the bladder) are attached to a stoma to bypass the bladder.[2]
See Figure \(\PageIndex{2}\)[3] comparing the anatomical locations of ileostomies and various sites of colostomies. It is important for the nurse to understand the site of a patient’s colostomy because the site impacts the characteristics of the waste. For example, due to the natural digestive process of the colon and absorption of water, waste from an ileostomy or a colostomy placed in the anterior ascending colon will be watery compared to waste from an ostomy placed in the descending colon.
The tissue of a stoma is very delicate. Immediately after surgery, a stoma is swollen, but it will shrink in size over several weeks. A healthy, healed stoma appears moist and dark red or pink in color. Stomas that are swollen; dry; have malodorous discharge; or are bluish, purple, black, or pale should be reported to the provider. The skin surrounding a stoma can easily become irritated from the pouch adhesive or leakage of fluid from the stoma, so the nurse must perform interventions to prevent skin breakdown. Any identified signs of skin breakdown should be reported to the provider.[4]
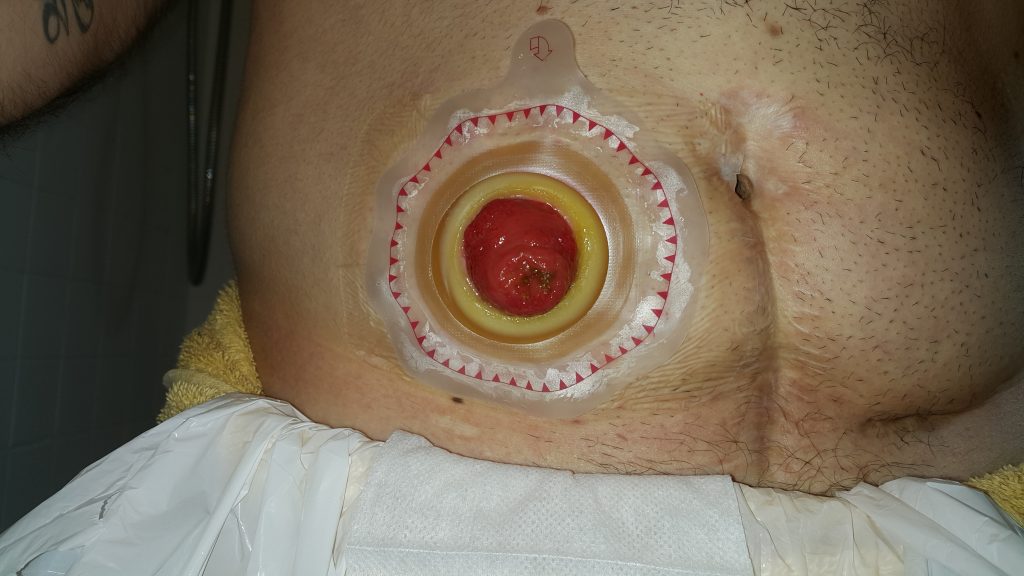
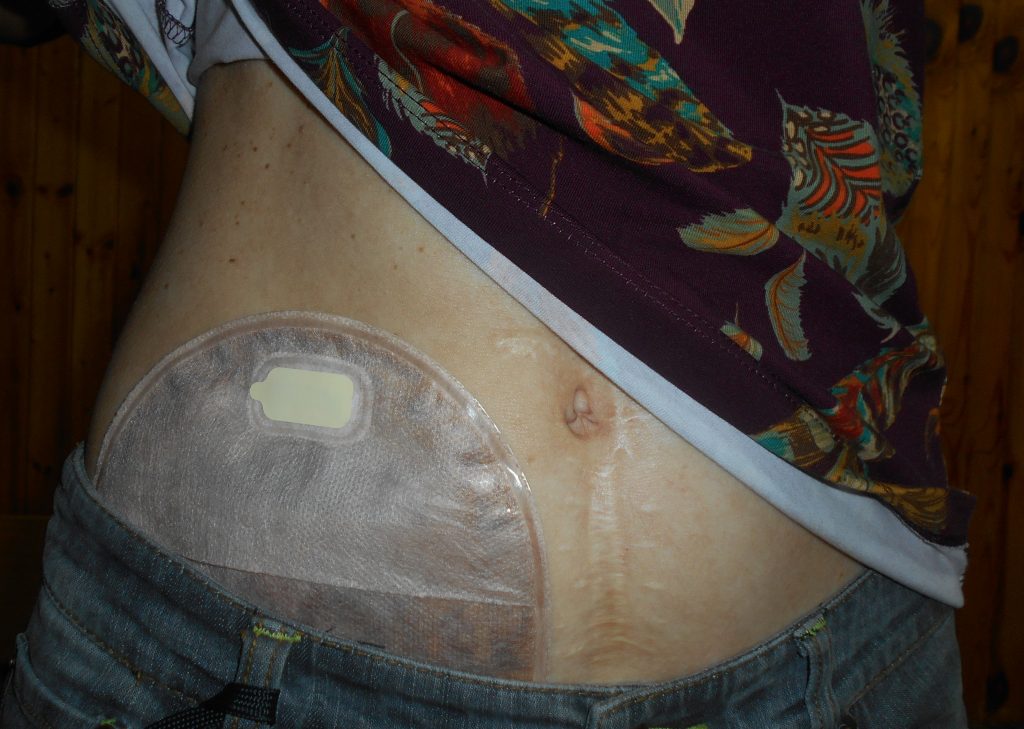
Stoma appliances are supplied as a one- or two-piece set. A two-piece set consists of an ostomy barrier (also called a wafer) and a pouch. The ostomy barrier is the part of the appliance that sticks to the skin with a hole that is fitted around the stoma. The pouch collects the waste and must be emptied regularly. It attaches to the ostomy barrier in a clicking motion to secure the two parts, similar to how a plastic storage container cover snaps to a container to create a seal. The pouching system must be completely sealed to prevent leaking of the waste and to protect the surrounding peristomal skin. The pouch has an end with an opening where the waste is drained and is closed using a plastic clip or VelcroTM strip.[5] In a one-piece stoma appliance set, the ostomy barrier and the pouch are one piece. See Figure \(\PageIndex{3}\)[6] for an image of a stoma with an ostomy barrier in place. See Figure \(\PageIndex{4}\)[7] for an image of a patient with an ileostomy appliance with a pouch attached.
Individuals with colostomies, ileostomies, and urostomies have no sensation and no control over the output of the stoma. Depending on the type of system, the ostomy appliance can last from four to seven days, but the pouch must be changed if there is leaking, odor, excessive skin exposure, or itching or burning under the skin barrier. Patients with pouches can swim and take showers with the pouching system on.[8]
When changing an ostomy appliance, the ostomy barrier is cut to fit closely around the stoma without impinging on it. See the “Checklist for Ostomy Appliance Change” for detailed instructions. The nurse measures the stoma with a template and then cuts and fits the ostomy barrier to a size that is 2 mm larger than the stoma.[9] See Figure \(\PageIndex{5}\)[10] for an image of a nurse measuring and cutting the ostomy barrier to fit around a stoma.

After the skin barrier is applied to the skin, the pouch is snapped to the ostomy barrier. See Figure \(\PageIndex{6}\)[11] for an image of applying the pouch.
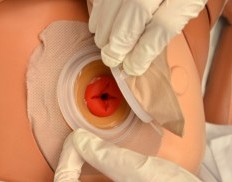
The ostomy bag may become filled with gas from the intestine. A patient may “burp” the bag through the opening at the top of a two-piece system by opening a corner of the ostomy pouch from the flange to let the air out. As the patient becomes more comfortable with the ostomy appliance, dietary changes can also help reduce the amount of gas produced.
Physical and Emotional Assessment
Patients may have other medical conditions that affect their ability to manage their ostomy care. Conditions such as arthritis, vision changes, Parkinson’s disease, or post-stroke complications can hinder a patient’s coordination and ability to manage the ostomy. In addition, the emotional burden of coping with an ostomy may be devastating for some patients and may affect their self-esteem, body image, quality of life, and ability to be intimate. It is common for patients with ostomies to struggle with body image and their altered pattern of elimination. Nurses can promote healthy coping by ensuring the patient has appropriate referrals to a wound/ostomy nurse specialist, a social worker, and support groups. Nurses should also be aware of their nonverbal cues when assisting a patient with their appliance changes. It is vital not to show signs of disgust at the appearance of the ostomy or at the odor that may be present when changing an appliance or pouching system.[12]
When a patient is discharged from acute care with a new ostomy, ensure they are able to empty the pouch system independently or with the assistance of the caregiver. Provide enough supplies for two or three days of home care or until ordered supplies are expected to arrive. Evaluate the patient’s and caregiver’s understanding of the signs of complications. Remind them to call the provider if the stoma becomes swollen, dry, discolored, or develops a malodorous discharge.
Urostomy Care
A urostomy is similar to a colostomy, but it is an artificial opening for passing urine. Urostomies are surgically created due to medical conditions such as bladder cancer, removal of the bladder, trauma, spinal cord injuries, or congenital abnormalities.
A urostomy patient has no voluntary control of urine, so the pouching system must be emptied regularly. Many patients empty their urostomy bag every two to four hours or when the pouch becomes one-third full. The pouch may also be attached to a drainage bag for overnight drainage. Patients with a urostomy are at risk for urinary tract infections (UTIs), so it is important to educate them regarding the signs and symptoms of an infection.
Some mucous in the urine is normal with a urostomy, but blood is not a normal or expected finding and should be reported to the health care provider.
- "Ileostomy 2017-02-20 5351.jpg” by Salicyna is licensed under CC BY-SA 4.0↵
- MedlinePlus [Internet]. Bethesda (MD): National Library of Medicine (US); [updated 2020, Apr 24]. Ostomy. [reviewed 2014, Jul 3; cited 2020, Nov 17]. https://medlineplus.gov/ostomy.html↵
- "Ileostomy.png” by BruceBlaus is licensed under CC BY-SA 4.0 and “Blausen_0247_Colostomy.png” by CC BY 3.0↵
- A.D.A.M. Medical Encyclopedia [Internet]. Atlanta (GA): A.D.A.M., Inc.; c1997-2020. Ileostomy - caring for your stoma; [updated 2020, Nov 3]. https://medlineplus.gov/ency/patientinstructions/000071.htm↵
- A.D.A.M. Medical Encyclopedia [Internet]. Atlanta (GA): A.D.A.M., Inc.; c1997-2020. Ileostomy - caring for your stoma; [updated 2020, Nov 3]. https://medlineplus.gov/ency/patientinstructions/000071.htm↵
- "Ostomy_wafer_being_worn_by_an_ileostomy_patient.jpg” by Eric Polsinelli (VeganOstomy) is licensed under CC BY 4.0↵
- "Ileostomy_2016-09-09_4158.jpg” by Salicyna is licensed under CC BY-SA 4.0. ↵
- This work is a derivative of Clinical Procedures for Safer Patient Care by British Columbia Institute of Technology and is licensed under CC BY 4.0↵
- This work is a derivative of Clinical Procedures for Safer Patient Care by British Columbia Institute of Technology and is licensed under CC BY 4.0↵
- “DSC_1284-e1442766479432.jpg" and “Assess-if-flange-is-the-correct-size-for-stoma-001.jpg” by British Columbia Institute of Technology are licensed under CC BY 4.0. Access for free at https://ecampusontario.pressbooks.pub/clinicalskills/chapter/10-6-ostomies/↵
- "Removing-ostomy-bag-from-flange-001.jpg” by British Columbia Institute of Technology is licensed under CC BY 4.0. Access for free at https://ecampusontario.pressbooks.pub/clinicalskills/chapter/10-6-ostomies/↵
- This work is a derivative of Clinical Procedures for Safer Patient Care by British Columbia Institute of Technology and is licensed under CC BY 4.0↵
- RegisteredNurseRN. (2017, February 14). Ostomy bag pouch change | Ostomy care nursing | Colostomy, ileostomy bag change. [Video]. YouTube. All rights reserved. Video used with permission. https://youtu.be/h8CtsPAaa5Y↵


