18.4: Administering Intradermal Medications
- Page ID
- 44661
\( \newcommand{\vecs}[1]{\overset { \scriptstyle \rightharpoonup} {\mathbf{#1}} } \)
\( \newcommand{\vecd}[1]{\overset{-\!-\!\rightharpoonup}{\vphantom{a}\smash {#1}}} \)
\( \newcommand{\dsum}{\displaystyle\sum\limits} \)
\( \newcommand{\dint}{\displaystyle\int\limits} \)
\( \newcommand{\dlim}{\displaystyle\lim\limits} \)
\( \newcommand{\id}{\mathrm{id}}\) \( \newcommand{\Span}{\mathrm{span}}\)
( \newcommand{\kernel}{\mathrm{null}\,}\) \( \newcommand{\range}{\mathrm{range}\,}\)
\( \newcommand{\RealPart}{\mathrm{Re}}\) \( \newcommand{\ImaginaryPart}{\mathrm{Im}}\)
\( \newcommand{\Argument}{\mathrm{Arg}}\) \( \newcommand{\norm}[1]{\| #1 \|}\)
\( \newcommand{\inner}[2]{\langle #1, #2 \rangle}\)
\( \newcommand{\Span}{\mathrm{span}}\)
\( \newcommand{\id}{\mathrm{id}}\)
\( \newcommand{\Span}{\mathrm{span}}\)
\( \newcommand{\kernel}{\mathrm{null}\,}\)
\( \newcommand{\range}{\mathrm{range}\,}\)
\( \newcommand{\RealPart}{\mathrm{Re}}\)
\( \newcommand{\ImaginaryPart}{\mathrm{Im}}\)
\( \newcommand{\Argument}{\mathrm{Arg}}\)
\( \newcommand{\norm}[1]{\| #1 \|}\)
\( \newcommand{\inner}[2]{\langle #1, #2 \rangle}\)
\( \newcommand{\Span}{\mathrm{span}}\) \( \newcommand{\AA}{\unicode[.8,0]{x212B}}\)
\( \newcommand{\vectorA}[1]{\vec{#1}} % arrow\)
\( \newcommand{\vectorAt}[1]{\vec{\text{#1}}} % arrow\)
\( \newcommand{\vectorB}[1]{\overset { \scriptstyle \rightharpoonup} {\mathbf{#1}} } \)
\( \newcommand{\vectorC}[1]{\textbf{#1}} \)
\( \newcommand{\vectorD}[1]{\overrightarrow{#1}} \)
\( \newcommand{\vectorDt}[1]{\overrightarrow{\text{#1}}} \)
\( \newcommand{\vectE}[1]{\overset{-\!-\!\rightharpoonup}{\vphantom{a}\smash{\mathbf {#1}}}} \)
\( \newcommand{\vecs}[1]{\overset { \scriptstyle \rightharpoonup} {\mathbf{#1}} } \)
\(\newcommand{\longvect}{\overrightarrow}\)
\( \newcommand{\vecd}[1]{\overset{-\!-\!\rightharpoonup}{\vphantom{a}\smash {#1}}} \)
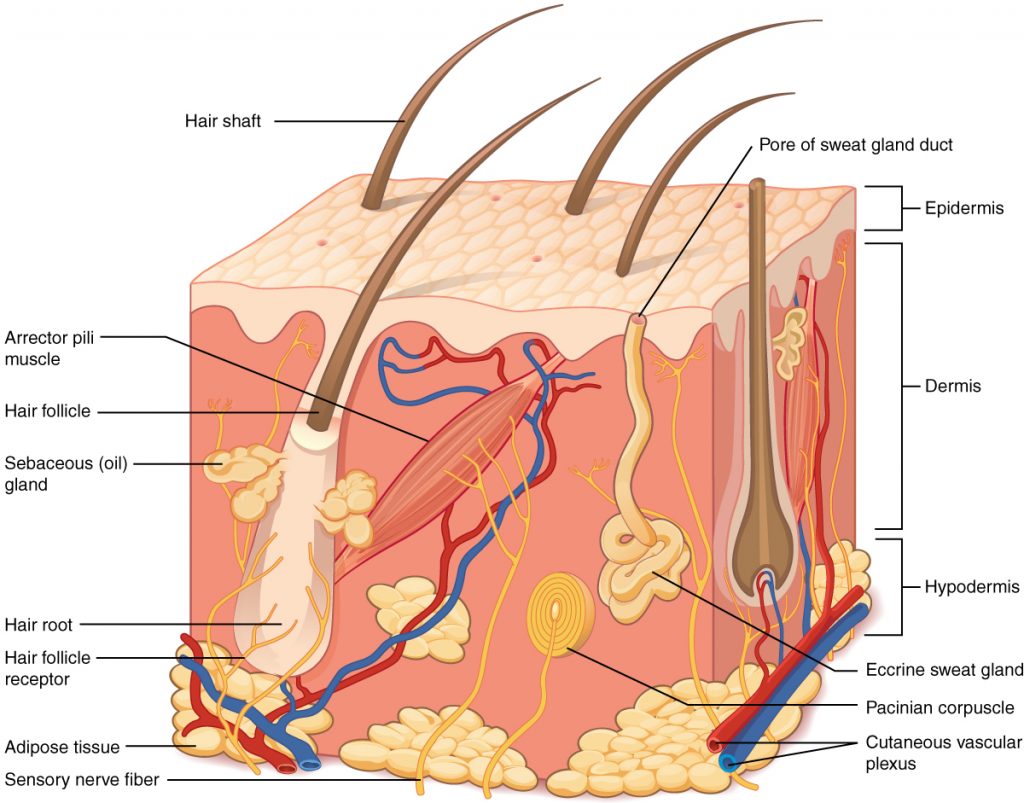
\(\newcommand{\avec}{\mathbf a}\) \(\newcommand{\bvec}{\mathbf b}\) \(\newcommand{\cvec}{\mathbf c}\) \(\newcommand{\dvec}{\mathbf d}\) \(\newcommand{\dtil}{\widetilde{\mathbf d}}\) \(\newcommand{\evec}{\mathbf e}\) \(\newcommand{\fvec}{\mathbf f}\) \(\newcommand{\nvec}{\mathbf n}\) \(\newcommand{\pvec}{\mathbf p}\) \(\newcommand{\qvec}{\mathbf q}\) \(\newcommand{\svec}{\mathbf s}\) \(\newcommand{\tvec}{\mathbf t}\) \(\newcommand{\uvec}{\mathbf u}\) \(\newcommand{\vvec}{\mathbf v}\) \(\newcommand{\wvec}{\mathbf w}\) \(\newcommand{\xvec}{\mathbf x}\) \(\newcommand{\yvec}{\mathbf y}\) \(\newcommand{\zvec}{\mathbf z}\) \(\newcommand{\rvec}{\mathbf r}\) \(\newcommand{\mvec}{\mathbf m}\) \(\newcommand{\zerovec}{\mathbf 0}\) \(\newcommand{\onevec}{\mathbf 1}\) \(\newcommand{\real}{\mathbb R}\) \(\newcommand{\twovec}[2]{\left[\begin{array}{r}#1 \\ #2 \end{array}\right]}\) \(\newcommand{\ctwovec}[2]{\left[\begin{array}{c}#1 \\ #2 \end{array}\right]}\) \(\newcommand{\threevec}[3]{\left[\begin{array}{r}#1 \\ #2 \\ #3 \end{array}\right]}\) \(\newcommand{\cthreevec}[3]{\left[\begin{array}{c}#1 \\ #2 \\ #3 \end{array}\right]}\) \(\newcommand{\fourvec}[4]{\left[\begin{array}{r}#1 \\ #2 \\ #3 \\ #4 \end{array}\right]}\) \(\newcommand{\cfourvec}[4]{\left[\begin{array}{c}#1 \\ #2 \\ #3 \\ #4 \end{array}\right]}\) \(\newcommand{\fivevec}[5]{\left[\begin{array}{r}#1 \\ #2 \\ #3 \\ #4 \\ #5 \\ \end{array}\right]}\) \(\newcommand{\cfivevec}[5]{\left[\begin{array}{c}#1 \\ #2 \\ #3 \\ #4 \\ #5 \\ \end{array}\right]}\) \(\newcommand{\mattwo}[4]{\left[\begin{array}{rr}#1 \amp #2 \\ #3 \amp #4 \\ \end{array}\right]}\) \(\newcommand{\laspan}[1]{\text{Span}\{#1\}}\) \(\newcommand{\bcal}{\cal B}\) \(\newcommand{\ccal}{\cal C}\) \(\newcommand{\scal}{\cal S}\) \(\newcommand{\wcal}{\cal W}\) \(\newcommand{\ecal}{\cal E}\) \(\newcommand{\coords}[2]{\left\{#1\right\}_{#2}}\) \(\newcommand{\gray}[1]{\color{gray}{#1}}\) \(\newcommand{\lgray}[1]{\color{lightgray}{#1}}\) \(\newcommand{\rank}{\operatorname{rank}}\) \(\newcommand{\row}{\text{Row}}\) \(\newcommand{\col}{\text{Col}}\) \(\renewcommand{\row}{\text{Row}}\) \(\newcommand{\nul}{\text{Nul}}\) \(\newcommand{\var}{\text{Var}}\) \(\newcommand{\corr}{\text{corr}}\) \(\newcommand{\len}[1]{\left|#1\right|}\) \(\newcommand{\bbar}{\overline{\bvec}}\) \(\newcommand{\bhat}{\widehat{\bvec}}\) \(\newcommand{\bperp}{\bvec^\perp}\) \(\newcommand{\xhat}{\widehat{\xvec}}\) \(\newcommand{\vhat}{\widehat{\vvec}}\) \(\newcommand{\uhat}{\widehat{\uvec}}\) \(\newcommand{\what}{\widehat{\wvec}}\) \(\newcommand{\Sighat}{\widehat{\Sigma}}\) \(\newcommand{\lt}{<}\) \(\newcommand{\gt}{>}\) \(\newcommand{\amp}{&}\) \(\definecolor{fillinmathshade}{gray}{0.9}\)Intradermal injections (ID) are administered into the dermis just below the epidermis. See Figure \(\PageIndex{1}\)[1] for an image of the layers of the skin. Intradermal (ID) injections have the longest absorption time of all parenteral routes because there are fewer blood vessels and no muscle tissue. These types of injections are used for sensitivity testing because the patient’s reaction is easy to visualize and the degree of reaction can be assessed. Examples of intradermal injections include tuberculosis (TB) and allergy testing.[2]
Anatomic Sites
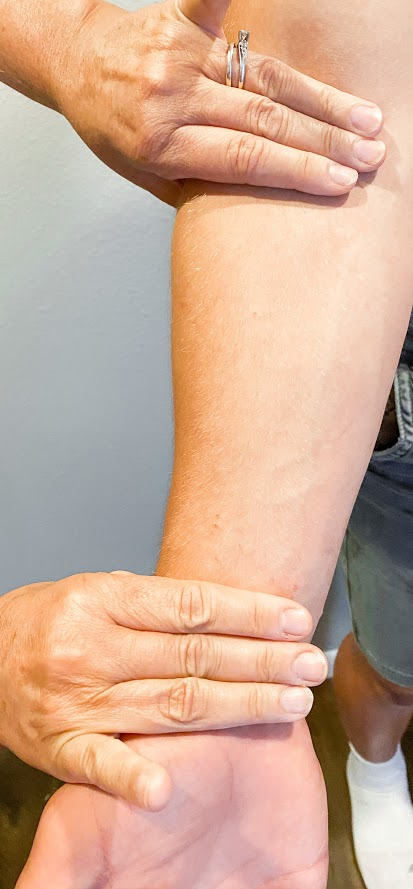
The most common anatomical sites used for intradermal injections are the inner surface of the forearm and the upper back below the scapula. The nurse should select an injection site that is free from lesions, rashes, moles, or scars that may alter the visual inspection of the test results. See Figure \(\PageIndex{2}\)[3] for an image of the nurse inspecting a patient’s forearm site prior to injection.
Description of Procedure
Clean the site with an alcohol swab or antiseptic swab for 30 seconds using a firm, circular motion. Allow the site to dry. Allowing the skin to dry prevents introducing alcohol into the tissue, which can be irritating and uncomfortable.[4]
Use a tuberculin syringe, calibrated in tenths and hundredths of a milliliter, with a needle length of 1/4 inches to 1/2 inches and a gauge of 26 or 27.[5] See Figure \(\PageIndex{3}\)[6] for an image of a tuberculin syringe. Remove the cap from the needle by pulling it off in a straight motion. A straight motion helps prevent needlestick injury.

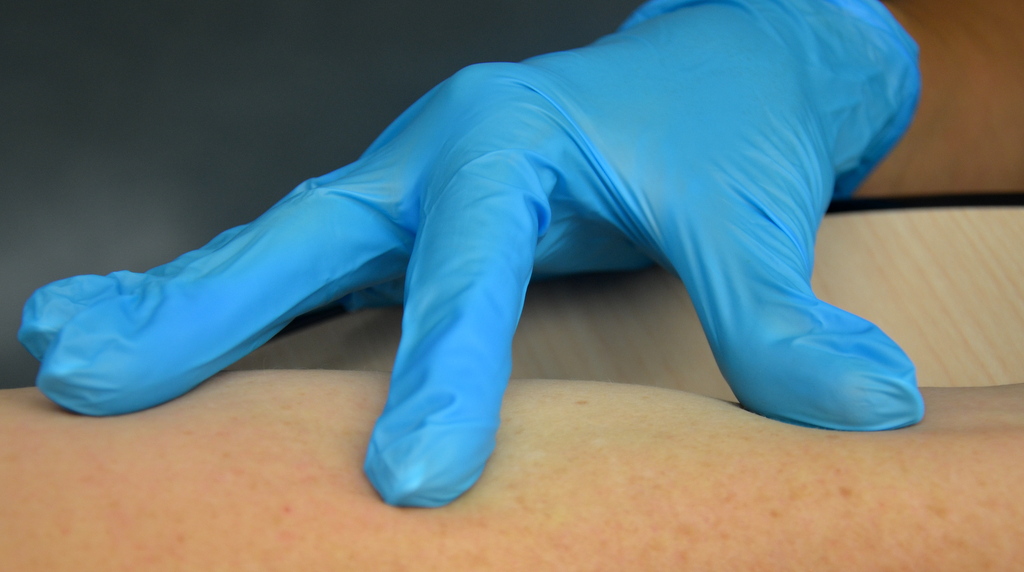
The dosage of an intradermal injection is usually under 0.5 mL, and the angle of administration for an ID injection is 5 to 15 degrees. Using your nondominant hand, spread the skin taut over the injection site. Taut skin provides easy entrance for the needle and is also important to do for older adults, whose skin is less elastic. See Figure \(\PageIndex{4}\)[7] of an image of a nurse holding the skin taut prior to injection.[8]
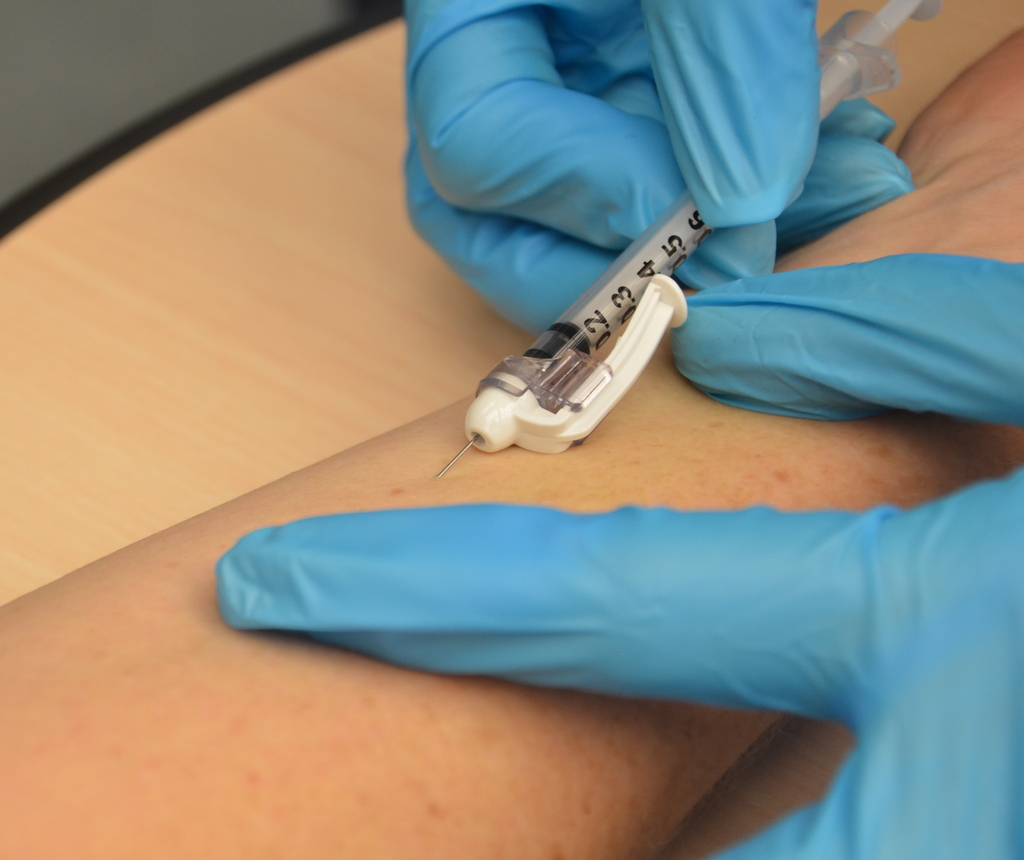
Hold the syringe in the dominant hand between the thumb and forefinger, with the bevel of the needle up at a 5- to 15-degree angle at the selected site. Place the needle almost flat against the patient’s skin, bevel side up, and insert the needle into the skin. Keeping the bevel side up allows for smooth piercing of the skin and induction of the medication into the dermis. Advance the needle no more than an eighth of an inch to cover the bevel. Once the syringe is in place, use the thumb of the nondominant hand to push on the plunger to slowly inject the medication.[9] See Figure \(\PageIndex{5}\)[10] for an image of a nurse administering an intradermal injection.
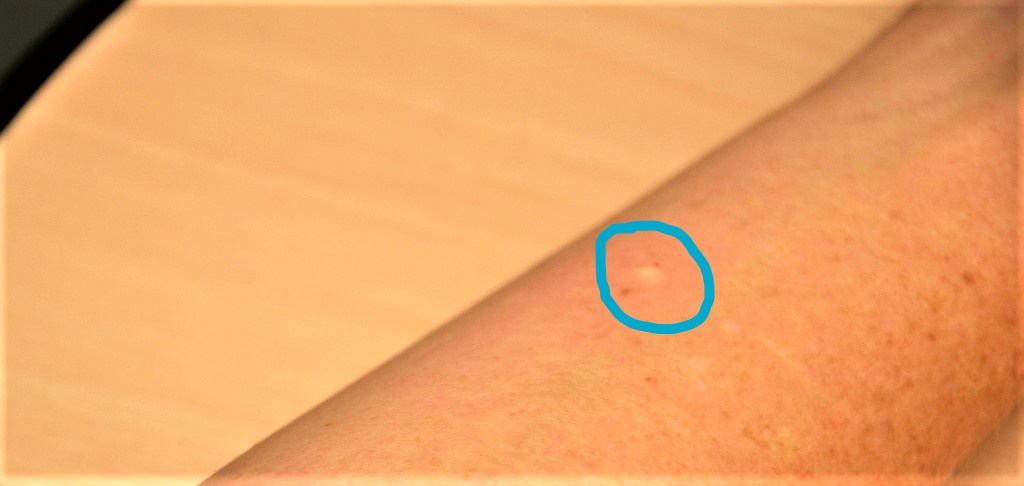
After the ID injection is completed, a bleb (small blister) should appear under the skin. The presence of the bleb indicates that the medication has been correctly placed in the dermis. See Figure \(\PageIndex{6}\)[11] for an image of a bleb.
Carefully withdraw the needle out of the insertion site using the same angle it was placed so as not to disturb the bleb. Withdrawing at the same angle as insertion also minimizes discomfort to the patient and damage to the tissue. Do not massage or cover the site. Massaging the area may spread the solution to the underlying subcutaneous tissue. Discard the syringe in the sharps container. If administering a TB test, advise the patient to return for a reading in 48-72 hours. Discard used supplies, remove gloves, perform hand hygiene, and document.[12]
- “501 Structure of the skin.jpg” by OpenStax is licensed under CC BY 3.0. Access for free at https://openstax.org/books/anatomy-and-physiology/pages/5-1-layers-of-the-skin.↵
- This work is a derivative of Clinical Procedures for Safer Patient Care by British Columbia Institute of Technology and is licensed under CC BY 4.0↵
- “Inspecting Forearm” by Meredith Pomietlo for Chippewa Valley Technical College is licensed under CC BY 4.0↵
- This work is a derivative of Clinical Procedures for Safer Patient Care by British Columbia Institute of Technology and is licensed under CC BY 4.0↵
- This work is a derivative of Clinical Procedures for Safer Patient Care by British Columbia Institute of Technology and is licensed under CC BY 4.0↵
- “Book-pictures-2015-544.jpg” by British Columbia Institute of Technology is licensed under CC BY 4.0. Access for free at opentextbc.ca/clinicalskills/chapter/6-7-intradermal-subcutaneous-and-intramuscular-injections/. ↵
- “Book-pictures-2015-623.jpg” by British Columbia Institute of Technology is licensed under CC BY 4.0. Access for free at https://opentextbc.ca/clinicalskills/chapter/6-7-intradermal-subcutaneous-and-intramuscular-injections/. ↵
- This work is a derivative of Clinical Procedures for Safer Patient Care by British Columbia Institute of Technology and is licensed under CC BY 4.0↵
- This work is a derivative of Clinical Procedures for Safer Patient Care by British Columbia Institute of Technology and is licensed under CC BY 4.0↵
- “Intradermal_injection.jpg“ by British Columbia Institute of Technology is licensed under CC BY 4.0. Access for free at https://opentextbc.ca/clinicalskills/chapter/6-7-intradermal-subcutaneous-and-intramuscular-injections/. ↵
- This work is derivative of “Book-pictures-2015-636.jpg" by British Columbia Institute of Technology and is licensed under CC BY 4.0. Access for free at https://opentextbc.ca/clinicalskills/chapter/6-7-intradermal-subcutaneous-and-intramuscular-injections/↵
- This work is a derivative of Clinical Procedures for Safer Patient Care by British Columbia Institute of Technology and is licensed under CC BY 4.0↵


